9-20
HOW TO USE YOUR MOTORHOME’S EQUIPMENT
BATTERY CHARGER
The battery charger for the motorhome
battery will automatically switch on when the
motorhome is connected to a mains supply.
The battery charger will also provide a 12V
supply to the motorhome when a battery is
not connected. Please note that the battery
charger fitted is designed to keep your
battery charged and is not designed for
charging up a flat battery.
Smoke Alarm
Operation
The smoke alarm is operating once a fresh
battery is installed and testing is complete.
When products of combustion are sensed,
the unit sounds a loud 85db pulsating alarm
until the air is cleared.
Hush Control - The “HUSH” feature has the
capability of temporarily desensitising the
alarm circuit for approximately 8 minutes.
This feature is to be used only when a known
alarm condition, such as smoke from cooking
activates the alarm. If the smoke is not too
dense, the alarm will silence immediately and
the Red LED will flash once every 10
seconds for approximately 8 minutes. This
indicates that the alarm is in a temporarily
desensitised condition. The smoke alarm will
automatically reset after approximately 8
minutes and sound the alarm if particles of
combustion are still present. The “HUSH”
feature can be used repeatedly until the air
has been cleared of the condition causing the
alarm.
Note: Dense smoke will override the hush
control feature and sound a continuous
alarm.
CAUTION: Before using the alarm hush
feature, identify the source of the smoke and
be certain a safe condition exists.
Flashing LED Light - This smoke alarm is
equipped with a flashing red indicator light.
The light is located under the test button and
will flash every 40 seconds to indicate that
the smoke alarm is receiving power.
Testing - Test by pushing the test button on
the cover and holding it down for a minimum
of 5 seconds. This will sound the alarm if the
electronic circuitry, horn and battery are
MICROWAVE
Notes:
1 - Your microwave is connected to your
230V electricity supply via a non customer
useable plug.
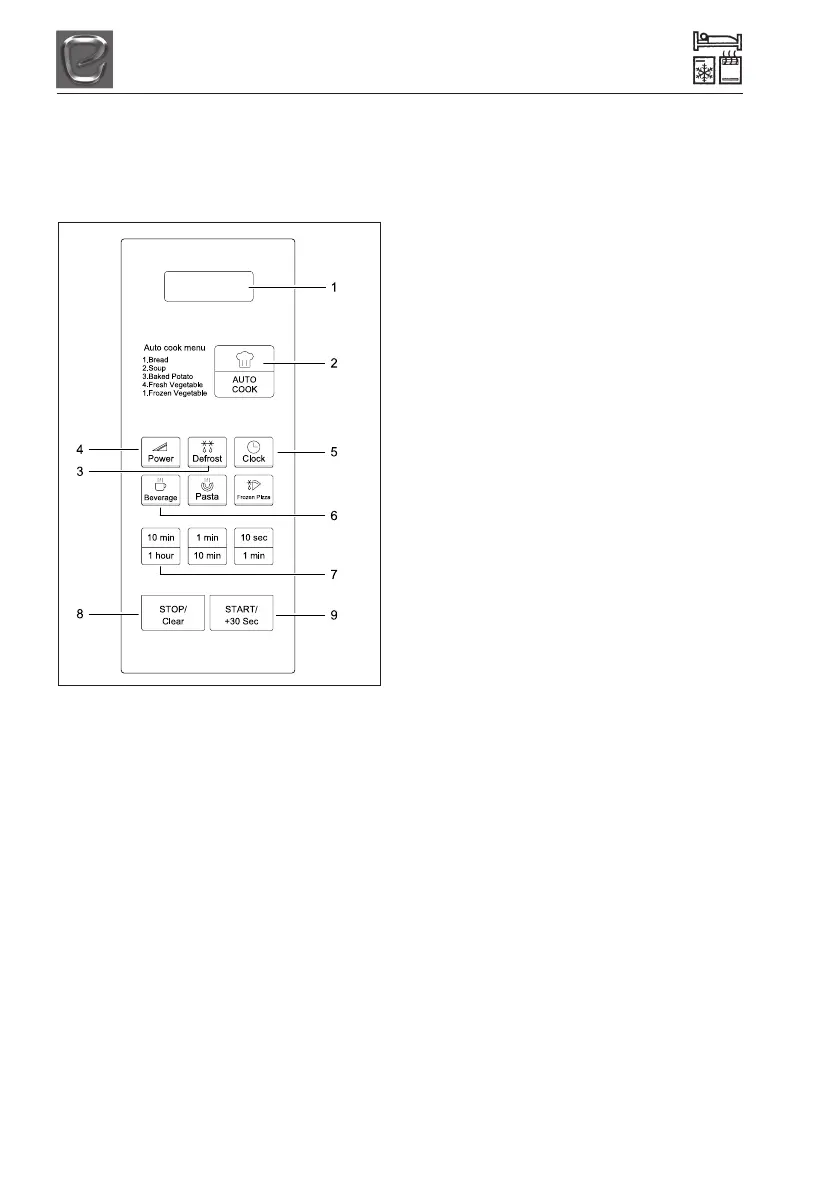
Controls:
1. Display - Cooking time, power level,
indicators and the current time are
displayed
2. Auto Cook - Used to cook or reheat many
of your favourite foods.
3. Defrost - Used to defrost foods for time
and weight.
4. Power - Used to set power level
5. Clock - Used to set clock
6. One Touch Cook - Used to cook or
reheat specific quantities of food.
7. Time Set Pad - Used to set the cooking
time and the current time.
8. Stop/Clear - Used to stop the oven
operation or to delete the cooking data.
9. Start/+30 Sec - Used to start the oven
and also used to set a reheat time.
Please note: Do not travel with anything in
the Microwave including the rotating plate.