EasyManua.ls Logo

Electrolux XBM20 - User Manual

Electrolux XBM20
8 pages
Print Icon
To Next Page IconTo Next Page
Loading...
Contents
Please refer to the numbered drawings which correspond to the paragraph
numbers in the instruction manual.
GB
Introduction 1
Installation 1
Use and safety 3
Cleaning and hygiene 5
Fault nding 6
Maintenance 6
Compliance with regulations 8
Introduction
1.1 DESCRIPTION
• These beater-mixers are professional bakery/pastry maker
appliances designed for kneading, mixing and whisking all food
products. The A versions when tted in the kitchen, can be used
to power accessory machines.
A Stainless steel bowl, 20/30 litre capacity
(Depending on model)
B Removable protection screen and with additional plastic
screen
C H-type accessories hub
D Head
E Control panel
F Speed change lever
G Raising and lowering lever
H Planet gear
I Column
J Bowl support cradle
K Feet
There are 3 standard tools available :
A A spiral hook for kneading dough
B A paddle for mixing
C A whisk for emulsifying
Optional equipment :
- Strengthened 20 L whisk for di󰀩cult work
- Reduced bowl of 10L with 3 tools (models 20l)
- Reduced bowl of 20L and 30L with 3 tools (models 30l)
- Stainless steel table (height 480mm) for 20l table model.
Optional equipment for A accessory hub versions only:
- Accessory machines (see § 3-6).
- Plate holder to collect products under the mincer, vegetable
slicer and sieve.
Installation
1 XBM20/30 GB 09 2023
09/2023
1.1b
Introduction
The User Manual contains useful information for the user on how
to work correctly and in complete safety, and is designed to make it
easier to use the machine (called “machine” or “appliance” below).
What follows is in no case intended to be a long list of warnings
and constraints, but rather as a series of instructions meant to
improve the service provided by the machine in every respect,
and particularly to avoid a series of injuries or damage to equip-
ment that might result from inappropriate procedures for use
and management.
It is essential that all the people responsible for transporting,
installing, commissioning, using, maintaining, repairing or dis-
mantling the machine should consult this manual and read it
carefully before proceeding with the various operations, in order
to avoid any incorrect or inappropriate handling that might be
result in damage to the machine or put people’s safety at risk.
It is just as important that the Manual should always be available
to the operator and it should be kept carefully where the machine
is used ready for easy and immediate consultation in case of any
doubt, or in any case, whenever the need arises.
If after reading the Manual, there are still any doubts concerning
how to use the machine, please do not hesitate to contact the
Manufacturer or approved After Sales Service provider, who is
constantly available to ensure quick and careful service for im-
proved machine operation and optimum e󰀩ciency.
Note that the safety, hygiene and environmental protection stan-
dards currently applicable in the country where the machine is
installed must always be applied during all phases of machine
operation. Consequently it is the user’s responsibility to ensure
that the machine is operated and used solely under the optimum
safety conditions laid down for people, animals and property.
ATTENTION!!
Machine storage: -25°C to +50°C
Ambient temperature during operation: +4°C to +40°C
This machine is for professional use and must be used by sta󰀨 trained to use, clean and maintain it, in terms or reliability and safety.
Use the machine in adequately lit premises (See applicable technical standard for the country of use. In Europe, refer to standard
EN 12464-1)
When handling the machine, always check that the parts taken hold of are not mobile elements: risk of dropping and injury to the
lower limbs.
The machine is not designed for use in explosive atmospheres.
The reference language for these instructions is French.

Other manuals for Electrolux XBM20

Question and Answer IconNeed help?

Do you have a question about the Electrolux XBM20 and is the answer not in the manual?

Summary

Introduction and Safety

1.1 DESCRIPTION

Details the components and available tools for bakery/pastry mixer appliances.

Optional Equipment

Lists optional accessories for the mixer, including those for the accessory hub.

Installation Safety Precautions

Provides critical safety warnings regarding machine storage, ambient temperature, and handling.

Installation and Electricals

Handling and Transport

Instructions for safely handling and transporting the beater, including pallet removal and stability.

Installation Procedures

Details procedures for fixing the mixer to the floor or a table.

Electrical Connection Safety

Crucial safety information regarding electrical connection and compliance with standards.

Electrical Setup and Operation

Motor Specifications and Connection

Details requirements for three-phase and single-phase motor connections and earthing.

Operational Safety Warnings

Critical safety warnings regarding crushing hazards, operating area, and safety system modifications.

3.1 Operation Safety

Explains how user safety is ensured through design features and proper operation.

Control Panel and Operation Modes

Identifies control panel buttons and describes timed/continuous operation modes.

Machine Operation Controls

Protection Screen Operation

Instructions for removing and refitting the protection screen for cleaning and operation.

Bowl and Tool Fitting

Step-by-step guide on how to correctly fit the bowl and tools into the machine.

Speed Control

Details how to change speeds and offers advice on gradual speed adjustment for different tasks.

Maximum Capacities

Provides recommended maximum quantities for various food products and the tools used.

Accessories and Cleaning

Accessories Hub Installation

Explains the accessory hub and provides instructions for installing optional accessories.

Cleaning and Hygiene Safety

Critical warnings against dismantling before power off and using pressure cleaners.

Cleaning Procedures

Details cleaning instructions for the machine and its components during and after use.

Flour Dust Reduction

Recommendations to reduce flour dust emission during loading and mixing.

Fault Finding

Beater Not Starting

Lists checks to perform when the beater fails to start, including power and safety interlocks.

Abnormal Operation

Identifies causes for metallic, grating noise, or lack of power during operation.

Tool Sticking Issues

Explains why tools might stick and provides methods for resolving the issue.

Speed Control Lever Issues

Troubleshooting steps if the speed control lever becomes stiff or fails to hold position.

Maintenance

Maintenance Safety Warning

Critical safety warning about unplugging the machine before any maintenance.

Mechanism Maintenance

Recommended annual maintenance tasks for the mechanism and electrical components.

Maintenance Procedures

Changing Drive Belt

Step-by-step guide on how to replace the drive belt of the machine.

Speed Adjustment

Instructions for adjusting the speed control lever and setting the factory speed.

Planet Gear and Safety Checks

Procedures for removing planet gear, checking electrical components, and verifying safety devices.

Maintenance Support

Provides guidance on contacting the dealer for maintenance and spare parts.

Regulatory Compliance

Machine Directives and Standards

Lists the directives and standards the machine complies with.

Environmental and Waste Regulations

Information on WEEE, waste, and packaging disposal regulations.

Safety, Acoustic, and Hygiene Standards

Details CE mark, acoustic specs, IP ratings, integral safety, and food hygiene compliance.

Overview

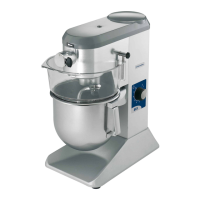
This document describes a range of professional bakery/pastry beater-mixers, designed for kneading, mixing, and whisking all food products. The A versions, when fitted in the kitchen, can also power accessory machines.

Function Description

The beater-mixers are designed for professional use in bakeries and pastry shops. They are capable of handling various food products for kneading, mixing, and whisking. The machine's operation is controlled via a panel with buttons for time setting (increase/decrease), start, and stop, along with a timer display. Safety features include motor stoppage upon opening the protection screen or lowering the cradle, and a requirement to press the START button after any stoppage. The machine is protected against overload by a thermal sensor.

Important Technical Specifications

The mixers are available in 20/30 litre capacities (floor-standing models) and 20 litre table models. Motor specifications (2.3a):

  • Number of phases: 1 (single phase) or 3 (three-phase)
  • Nominal voltage: (value, range or commutation)
  • Frequency: (Hertz)
  • Nominal rating: (Watts)
  • Rating of the fuse of the mains cable: (Amperes)

Dimensions and Weight (for information only - 2.1):

  • Gross weight when packaged (kg)
  • Net weight equipped (kg)
  • Packaging dimensions: L x W x H (mm)
  • Machine dimensions: L x W x H (mm)
  • Dimensions for beater bedding: E x E1 x E2 (mm)
  • Accessories hub height (A models)

Electrical Connection (2.3):

  • The AC power supply must comply with EN60204-1 standards.
  • Maximum voltage variation: ±10%.
  • Maximum frequency variation: ±1% on a continuous basis, ± 2% over short periods.
  • Electrical installation must comply with legal and standard requirements of the country of use, including protection against voltage surges.
  • For TT systems, a differential circuit breaker with a suitable power cut-off (e.g., 30 mA) is required.

Acoustic Specifications:

  • Acoustic pressure level measured in conformity with EN ISO 3743.1-EN ISO 3744 < 70 dBA.

Protection Indices (EN 60529-2000 standard):

  • IP55 electrical controls.
  • IP23 overall machine.

Compliance with Regulations (8):

  • Machine directive 2006/42 EEC
  • Machine directive CEM 2014/30 EU
  • 2011/65/EU Directive on the restriction of the use of certain hazardous substances
  • 2002/96/CEE « WEEE » (Waste Electrical and Electronic Equipment)
  • 2006/12/CEE "Waste"
  • 94/62/CEE "Packaging and packaging waste"
  • EN 454 - machine - mixers. Safety and hygiene regulations.
  • Food hygiene: materials comply with Directive 1935/2004/CEE and Standard EN 601- (cast aluminium alloys in contact with foodstuffs). Surfaces are smooth and easy to clean, complying with EN 1672-2.

Usage Features

Tools: Three standard tools are available:

  • A spiral hook for kneading dough.
  • A paddle for mixing.
  • A whisk for emulsifying.

Optional Equipment (1.1):

  • Strengthened 20 L whisk for difficult work.
  • Reduced bowl of 10L with 3 tools (models 201).
  • Reduced bowl of 20L and 30L with 3 tools (models 301).
  • Stainless steel table (height 480mm) for 201 table model.
  • Optional equipment for A accessory hub versions only: accessory machines (mincers, vegetable slicers, sieves) and plate holder to collect products.

Installation (2.2):

  • Floor-standing models (20/30 litre) can be chocked or fixed to the floor using rear feet.
  • Table models (20 litre) can be installed on a stable, non-resonant support or an optional stainless steel table. They can also be chocked or embedded in the floor.
  • The beater is delivered fixed to a wooden pallet and requires a forklift for removal. Manual unloading requires precautions to prevent tipping.

Operation (3.1):

  • The machine must be used by trained staff in adequately lit premises.
  • Always check that parts taken hold of are not mobile elements to avoid injury.
  • The machine is not designed for use in explosive atmospheres.
  • Prior to first use, the machine must be properly cleaned.
  • Safety devices must be checked before each use.
  • Never put hands in the work area during operation.
  • Do not put hard, frozen objects in the appliance.
  • Always use a washable or disposable head covering.
  • The machine will not start if the protection screen is open or the cradle is lowered.
  • The beater will only start if the bowl support cradle assembly is in the working position, the protection screen is fitted and closed, and the timer is set.
  • Timed operation: Select time using buttons A and B, start with D, stop with C or at the end of the set time.
  • Continuous operation: Select by pressing and holding button A, start with D, stop with C.
  • Do not use the machine without the bowl.

Raising/Lowering the Protection Screen (3.2):

  • The rotating protection screen can be removed for cleaning. The beater cannot be started while the screen is removed.

Fitting the Bowl and Tools (3.3):

  • Lower the cradle, put the tool inside the bowl, present the bowl onto the cradle, engage the bowl ball-and-socket, and position the cradle pins.
  • Slide the tool onto the tool-holder and twist to lock.
  • Raise the bowl to the work position, close the protection screen, and press START.

Changing and Selecting Speeds (3.4):

  • The drive belt variable speed provides a continuous range of speeds.
  • To change speeds, press START, then pull the lever towards you to decrease speed or push it away to increase speed.
  • Never move the speed lever when stopped.
  • Always start with a slow speed to prevent splashes or flour dust, then gradually increase speed.
  • The lever stays at the selected speed due to its self-maintaining system.
  • If the drive belt slips, decrease the speed.
  • After work, return the lever to slow speed, press stop, and lower the bowl.

Maximum Capacities (3.5):

  • Working capacity depends on the tool used, nature, quantity, density of matter, and optimum speed.
  • Excessive quantity can detriment quality, shorten mechanical component life, and cause motor overheating.

Accessories Hub (3.6):

  • Version A beaters are fitted with an H12-type variable speed drive for optional accessories: mincers (H 70 H, HV 82 H), vegetable slicers (CX 21 H), and food processors (P 200 H).
  • To install an accessory, raise cover H, present the accessory, introduce the cone into the beater hub, engage the male square section into the drive shaft, position the pin opposite the housing, push firmly into hub A, and tighten the locking screw.
  • Select speed according to the accessory.
  • The machine must be stopped in slow speed using the stop button before fitting or removing the accessory.

Maintenance Features

General (6):

  • Maintenance must only be carried out by a qualified, trained, and authorised person.
  • Unplug the machine before any operation.
  • Residual current may remain on capacitor terminals; discharge them with an insulated conductor before working on the machine.

Mechanism (6.1):

  • Recommended at least once a year: grease planet gear pinions with very adhesive grease, clean dust from the drive belt and flour dust from inside the machine using a vacuum cleaner.
  • Access to electrical components requires unplugging the machine.

Changing the Drive Belt (6.2):

  • Stop the beater in high speed, unplug, remove casing top cover, free the drive belt from the driven variable pulley and drive pulley.
  • Lightly oil motor shaft and variable pulley driven shafts with Vaseline.
  • To fit: present the new drive belt to the drive pulley, pull firmly to engage, engage the drive pulley onto the driven pulley, and turn the driven pulley by hand to centre it.

Speed Adjustment (6.3):

  • If the speed lever does not lock in position, adjust by running the beater at slow speed, unscrewing the speed change lever, removing the cap, re-tightening the lever, starting the beater, unscrewing the anti-slip screw until the lever is held at all speeds, and re-tightening the lock-nut.
  • Factory setting: approximately 35 to 180 rpm (planet gear speed).

Removing the Planet Gear (6.4):

  • Remove protection screen and cover, drive belt, driven pulley and its key, and accessories hub (if present).
  • Hold the planet gear with a piece of wood between the bowl and the planet gear.
  • Remove the planet gear assembly by tapping it with a mallet on top of the sun gear shaft and lowering the bowl.

Checking Safety Devices (6.5):

  • Correct operation of safety devices (motor stopping on opening protection screen and lowering bowl) should be checked frequently.
  • If these functions do not occur, do not use the machine and have it adjusted by a dealer's maintenance department.
  • The machine must not operate if the bowl is not in position on the cradle.

Electrical Components (6.6):

  • Check the condition of the cable and electrical components regularly.

Cleaning and Hygiene (4):

  • Disconnect the appliance from the power supply before dismantling any part.
  • Read instructions and safety information for cleaning products.
  • Do not clean the machine with a pressure cleaner.
  • In-between use (4.1): Remove bowl and tool, wash in hot water with disinfectant/detergent, rinse, and dry. Clean planet gear holder, tool-holder shaft, and protection screen with damp sponge and detergent/disinfectant, then rinse. Oil accessory shaft (cooking oil or grease).
  • After use (4.2): Unplug, remove bowl, tool, and protection screen. Wash bowl and tools in a basin with disinfectant/degreasing product, rinse, and dry. Only the bowl is dishwasher-safe. The full protection screen is not dishwasher-safe. Clean planet gear holder, tool-holder shaft, protection screen, and cradle. Oil accessory shaft. Check all elements are clean.
  • Use cleaning products compatible with aluminium parts. Avoid abrasive detergents.
  • Periodically (at least once a month): Remove dust from ventilation holes, wipe and lightly oil raising and lowering pillars with Vaseline.

Stray Flour Particles (4.3):

  • To reduce flour dust emission: empty flour bags without shaking, pour water before flour if possible, start at slow speed during water/flour mixing, and roll empty flour bags with care.
  • The see-through plastic screen supplied with the machine must be used.

Electrolux XBM20 Specifications

General IconGeneral
BrandElectrolux
ModelXBM20
CategoryKitchen Appliances
LanguageEnglish

Related product manuals