Do you have a question about the Elite Screens Ceiling Trim Kit and is the answer not in the manual?
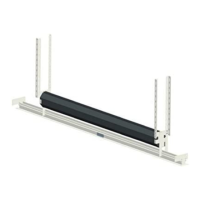
4 pieces, 39" /1000±80mm each, used for mounting.
1 piece, used for attaching the screen to the installation plank.
1 piece, provides support for the screen assembly.
2 pieces, form the ceiling trim.
1 piece, used for attaching the screen to the installation plank.
1 piece, provides support for the screen assembly.
8 pieces, used for attaching the ceiling panel to installation planks.
10 pieces, used for securing brackets to the assembly bar.
Attach left and right brackets to screen casing using assembly bolt/nut set and assembly bar.
Install ceiling panel using mounting screws to attach left and right installation planks.
Attach suspension bar using screws, overlapping to adjust length.
The Elite Screens Ceiling Trim Kit is an accessory designed to integrate a projection screen seamlessly into a ceiling, providing a clean and finished appearance. This kit is particularly useful for installations where the projection screen needs to be recessed or concealed within the ceiling structure, offering an aesthetic solution for various environments such as home theaters, conference rooms, or educational facilities.
The primary function of the Ceiling Trim Kit is to provide a decorative and structural frame for a recessed projection screen. It allows the screen casing to be hidden above the ceiling line, with only a minimal trim visible when the screen is retracted. When the screen is deployed, it descends smoothly from this concealed position. The kit comprises several key components that work together to achieve this integration: suspension bars, left and right brackets, ceiling panels, installation planks, mounting screws, and assembly bolts/nuts.
The suspension bars are crucial for supporting the entire assembly from the structural elements above the ceiling. These bars are designed to be adjustable, allowing installers to determine the appropriate length needed to position the screen at the desired depth within the ceiling. This adjustability ensures compatibility with various ceiling depths and installation requirements. The left and right brackets serve as the attachment points for the screen casing itself, securing it firmly within the trim kit structure. These brackets are designed to interface directly with the end caps of the projection screen casing, ensuring a stable and secure fit.
The ceiling panels are the visible components of the kit, forming the finished trim around the screen opening. These panels are designed to blend with the ceiling, providing a neat and professional look. They are attached to installation planks, which in turn connect to the brackets, creating a robust framework. The mounting screws and assembly bolts/nuts are provided to facilitate the secure attachment of all these components, ensuring the entire system is stable and durable.
The Elite Screens Ceiling Trim Kit is engineered for straightforward installation, although professional installation is recommended to ensure optimal performance and aesthetic integration. The kit's design emphasizes modularity and adjustability, making it adaptable to different installation scenarios.
One of the key usage features is the ability to set the left and right brackets onto the end caps of the screen casing. This step involves passing assembly bolts/nuts through the assembly bar and attaching them to the brackets, creating a secure connection between the screen and the trim kit. This method ensures that the screen is firmly held in place, preventing any wobbling or misalignment during operation.
The installation of the ceiling panel is another critical step, involving the use of mounting screws to attach the left and right installation planks. A helpful note for installers is that "Left/Right" is designated from the perspective of the viewer looking at the projection surface. This clear instruction helps prevent errors during assembly, ensuring that the components are oriented correctly for the intended viewing experience.
The suspension bars offer significant flexibility during installation. By attaching the suspension bars using the provided screws, installers can overlap the hanging bars to determine the various lengths needed to achieve the desired depth in the ceiling. This feature is particularly beneficial for accommodating different ceiling structures and ensuring that the screen is positioned perfectly flush with the ceiling surface when retracted. The ability to adjust the suspension length allows for precise alignment and a custom fit, which is essential for a high-quality recessed installation.
The kit's design also considers the overall aesthetic. Once installed, the trim kit provides a clean, unobtrusive appearance, making the projection screen virtually invisible when not in use. This feature is highly valued in environments where visual clutter is undesirable, such as minimalist interior designs or multi-purpose rooms where the screen is not always needed. The trim kit effectively transforms the projection screen from a visible fixture into an integrated architectural element.
While the Elite Screens Ceiling Trim Kit itself requires minimal maintenance once installed, its design facilitates access for potential screen maintenance or adjustments. The robust construction of the brackets, suspension bars, and panels ensures long-term stability and reduces the need for frequent adjustments.
The use of durable materials for all components means that the kit is designed to withstand the rigors of being installed within a ceiling environment. The mounting screws and assembly bolts/nuts are selected for their strength and resistance to loosening over time, contributing to the overall reliability of the installation.
Should the projection screen itself require servicing or replacement, the modular design of the trim kit allows for relatively straightforward access. While the screen casing is securely mounted, the method of attachment typically allows for its removal without dismantling the entire ceiling structure. This is a significant advantage, as it simplifies any future maintenance tasks, reducing labor and potential damage to the surrounding ceiling.
Regular inspection of the visible trim components can help maintain the aesthetic appeal of the installation. Cleaning the ceiling panels with appropriate methods for the ceiling material can keep the trim looking fresh and integrated with the room's decor. The trim kit is designed to be a "set and forget" component, providing a reliable and aesthetically pleasing solution for recessed screen installations with minimal ongoing intervention required. The emphasis on secure, adjustable, and durable components ensures that the trim kit will perform its function effectively for the lifespan of the projection screen it supports.
| Color | White |
|---|---|
| Dimensions | Varies by model |
| Weight Capacity | Varies by model |
| Material | Metal |
| Purpose | To provide a clean, professional finish by concealing the projector screen housing above the ceiling. |
| Installation Type | Ceiling mounted |