Do you have a question about the Emerson FD113 and is the answer not in the manual?
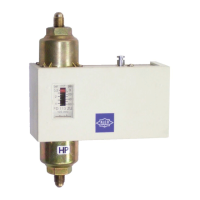
Explains the FD113 Oil Pressure Safety Control's function and adjustable features for compressor oil pressure monitoring.
Details the adjustable pressure range, timer function, voltage compatibility, and manual reset switch.
Provides essential safety precautions to prevent system damage, failure, or personal injury during installation and use.
Lists the pilot duty ratings (U.L. B300) and voltage/VA specifications for the control.
Specifies the NEMA CLASS I enclosure requirement for mounting the control body in protected areas.
Outlines general steps for cover removal, mounting, and routing capillary tubes for proper installation.
Details specific operating ranges, pressure settings, and timer specifications for the FD113ZU/ZUK models.
Defines effective net oil pressure as the difference between oil pump and crankcase pressure, with an example.
Provides typical time delay and pressure settings for various compressor manufacturers like Copeland, Bitzer, and Carrier.
Details the procedure for checking and adjusting the pressure setting disc to achieve desired timer start pressure.
Explains how to check and adjust the timer to achieve the desired trip-out time for compressor shutdown.
Instructs on connecting the 'Oil' and 'Low' pressure elements to the compressor's oil pump and crankcase connections.
Provides a cross-reference for wiring when replacing other control brands and illustrates terminal connections.
Details the procedure to test the timer function by energizing the circuit and observing the compressor shutdown time.
Explains how to accurately check the operating pressure of the FD113 control after installation.
Illustrates wiring for a new Copeland 3-wire setup, addressing nuisance trips from auxiliary devices.
Details wiring for a 3-wire control using a separate power source, ensuring consistent voltage for all components.
Presents a 4-wire wiring configuration where the control power is common to the compressor, suitable for 208/240V systems.
The FD113 Oil Pressure Safety Control is designed to monitor the effective oil pressure differential in compressors equipped with positive displacement oil pumps. Its primary function is to ensure adequate oil pressure for compressor operation and to prevent damage due to low oil pressure conditions. If the oil pressure drops below a safe level, a time delay is initiated. Should the oil pressure not recover within this set delay, the compressor is shut down. This mechanism allows for sufficient time for oil pressure to establish during start-up and prevents unnecessary shutdowns caused by brief pressure drops during normal operation.
The control features an adjustable differential pressure switch, allowing it to be tailored to the specific minimum oil pressure requirements of various compressors. An adjustable time delay further enhances flexibility, enabling users to set the duration the compressor can run below the minimum pressure before shutdown. The manufacturer's specified minimum pressure setting and time delay values should always be used during installation.
| Brand | Emerson |
|---|---|
| Model | FD113 |
| Category | Controller |
| Language | English |