Be careful to assemble all components
in the sequence they are presented.
Note: Do not fully tighten bolts until the unit is completely assembled.
A. Attach Ramp (D) to Ramp Support Bracket (E) and secure using:
Four 55 (M8x30 round allen head bolt)
Four66(M8.5atwasher)
Four 71 (M8 nut)
B. Slightly lift Main Frame (A) and slide the ramp assembly under the treadmill.
Position Ramp (D) so that locations H1 and H2 are properly aligned with
Ramp (D).
NOTE: The wheelchair accessible ramp is does not need to be installed for
general purpose operation.
C. Now completely tighten all assembled hardware from Step 1 - Step 5.
D. Congratulations! Your new treadmill is completely installed.
NOTE: If you experience slippage of the treadmill belt while walking/running on
the treadmill, please stop using the treadmill immediately and follow the
instruction of how to adjust the belt tension on Page 28 & 29.
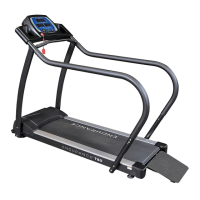
WHEELCHAIR ACCESS
A wheelchair non-slip access ramp has been provided with the treadmill. Users
with limited mobility may approach the access ramp with or without a wheelchair.
If using a wheelchair, secure the wheelchair using the wheel brakes. Remove the
wheelchair foot rests. Use the handrails for support and slowly lift onto the access
ramp.
Start with 0.1 mph workouts and slowly increase the treadmill speed as you
become more familiar with the treadmill and the physical endurance is appropriate.
Remember, before beginning any tness program, you should obtain a complete
physical examination and workout instructions from your physician.
Step 5
18
 Loading...