This document outlines the procedure for making the IQ Combiner 5/5C compatible with the IQ Battery 3T/10T, primarily through the installation of a new Communications Kit. The IQ Combiner 5/5C is a critical component in an Enphase energy system, serving as the central hub for communication and power aggregation for Enphase microinverters and batteries. Its compatibility with different battery models ensures flexibility and scalability for various solar energy installations.
Function Description:
The IQ Combiner 5/5C acts as a gateway for the Enphase system, facilitating communication between Enphase microinverters, IQ Batteries, and the Enphase Cloud. It aggregates the AC output from multiple microinverters, simplifying wiring and installation. For battery integration, it manages the communication necessary for charge and discharge cycles, system monitoring, and grid interaction. The core function described in this manual is to update the communication hardware within the IQ Combiner to support the IQ Battery 3T/10T, which likely utilizes a different communication protocol or requires enhanced communication capabilities compared to older battery models. This update involves replacing an existing Communications Kit (COMMS-KIT-02) with a new one (COMMS-KIT-01), specifically designed for compatibility with the 3T/10T batteries. The new kit ensures that the IQ Combiner can effectively communicate with and control these advanced battery units, enabling seamless energy management and system operation.
Important Technical Specifications (Inferred and Explicit):
- Device Compatibility: The IQ Combiner 5/5C is designed to be compatible with Enphase IQ Battery 3T/10T models after the described upgrade. It is also compatible with IQ-6/7 and IQ8 Grid Tied Systems, and IQ-BGrid Forming Systems, as indicated on the deadfront diagram.
- Communications Kits:
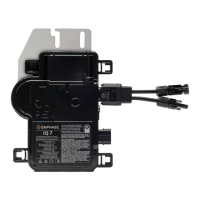
- COMMS-KIT-02 (Pre-installed): This is the original communications kit that comes pre-installed in the IQ Combiner 5/5C. It is unplugged and remains within the combiner but is no longer actively used for battery communication after the upgrade.
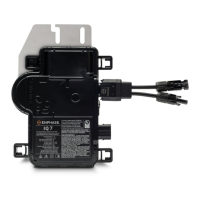
- COMMS-KIT-01 (New): This is the replacement communications kit required for IQ Battery 3T/10T compatibility. It connects to a USB port within the IQ Combiner and is designed to be located outside the deadfront, suggesting it might have external indicators or require easier access for troubleshooting or future upgrades.
- Connectivity: The Communications Kits utilize a USB port for connection to the IQ Combiner's internal circuitry. The new kit also features an Ethernet cable, which is routed through a dedicated gap on the side of the deadfront, indicating potential for wired network connectivity for enhanced reliability or specific system configurations.
- Power Supply: The IQ Combiner handles AC voltage, as indicated by the "WARNING: HIGH VOLTAGE" and "DE-ENERGIZE ALL CIRCUITS" labels. The communications kits themselves are likely low-voltage devices powered through the USB connection.
- Physical Dimensions: While not explicitly stated, the images show the IQ Combiner as a robust, wall-mountable enclosure, typical for outdoor electrical installations. The internal components, including the communications kits, are compact enough to fit within the enclosure's designated spaces.
- Safety Features: The device includes clear warnings about high voltage and the need to de-energize all circuits before servicing. The deadfront serves as a protective barrier, and its secure reinstallation is emphasized.
Usage Features:
- Modular Design: The ability to upgrade the communications kit highlights the modular design of the IQ Combiner, allowing for future compatibility with new Enphase products without requiring a complete system replacement.
- Simplified Installation: The process involves straightforward steps: unplugging, unscrewing, plugging in, and re-securing. This suggests that the upgrade can be performed by qualified installers with basic tools (e.g., a screwdriver).
- Clear Instructions: The manual provides step-by-step instructions with accompanying images, making the upgrade process clear and easy to follow.
- Cable Management: The instructions emphasize proper routing of the new Communications Kit's cable and the use of zip ties for securing components, contributing to a neat and reliable installation. The dedicated gap for the Ethernet cable on the deadfront is a thoughtful design feature for organized wiring.
- External Communication Kit Placement: The new COMMS-KIT-01 is explicitly placed outside the deadfront. This could offer several advantages:
- Improved Signal Strength: Potentially better wireless signal reception if the kit contains antennas.
- Easier Access: Simplifies access for diagnostics, firmware updates, or replacement without needing to open the main enclosure.
- Reduced Internal Clutter: Frees up space inside the combiner.
Maintenance Features:
- Field Upgradability: The primary maintenance feature described is the ability to upgrade the device in the field to support newer battery technologies. This extends the lifespan of the IQ Combiner and protects the customer's investment.
- Tool Requirements: The upgrade process primarily requires a screwdriver, indicating minimal specialized tools are needed for maintenance.
- Safety Protocols: The repeated emphasis on de-energizing the system and handling high voltage components underscores the importance of safety during any maintenance or upgrade procedure. This is a critical aspect of ensuring installer safety and preventing damage to the equipment.
- Cable Management for Reliability: The use of zip ties to secure cables and components helps prevent accidental disconnections or damage due to vibration or movement, contributing to long-term system reliability and reducing the need for frequent maintenance.
- Documentation: The provision of a detailed step-by-step guide with visual aids is a key maintenance feature, empowering installers to perform the upgrade correctly and efficiently. The revision history ensures that installers are using the most current and accurate instructions.
In summary, the IQ Combiner 5/5C, through this upgrade process, demonstrates its adaptability and forward-thinking design, allowing it to integrate with evolving battery technologies. The clear instructions, emphasis on safety, and practical design considerations make it a user-friendly component for installers, while its modularity ensures long-term viability within an Enphase energy system.