Page 32
STEP 5.
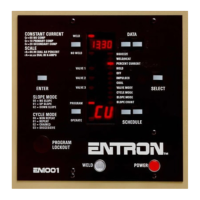
Press the ENTER Push Button (29) to enter the data in the DATA DISPLAY into
non-volatile memory. As the ENTER key is pressed the DATA Display will blink
and then remain steady.
Repeat STEPS 2, 3, 4 and 5 as required. Any or all Functions may be
programmed depending on the final Welding Schedule desired.
NOTE:
If the ENTER key is not pressed, and the control is placed back into the
OPERATE mode, or if a different function is selected, the data entered into the
display will be lost and the display will show the previously stored value for that
FUNCTION.
STEP 6.
When the desired FUNCTIONS for all desired SCHEDULES have been
programmed, the OPERATE mode can be reached by again pressing and releasing
the PROGRAM/OPERATE Push Button switch (26), as in STEP 1, until the
OPERATE LED (25) turns on and the PROGRAM LED (27) turns off.
352*5$0/2&.287237,21
A PROGRAM LOCKOUT (24) key switch can be ordered as a factory installed option. It
may also be added later by the customer, if desired. To install the key switch, remove the
hole plug from the lower left corner of the front panel and mount the switch using the nut
provided. Plug the wires from the switch onto the mating 2 prong connector on the back of
the control circuit board.
In "S" cabinets, mounting the key switch will be easier if the front panel + control circuit
board assembly is removed from the enclosure. Remove the power (19) and weld (23) lights
and disconnect the electrical connectors from the back of the control circuit board. Remove
the four (4) mounting screws from the front panel and lift it off of the enclosure.
To select the PROGRAM Mode using the PROGRAM LOCKOUT Switch, the Key must
be rotated 45 degrees clockwise and held against spring pressure while the
PROGRAM/OPERATE Push Button is pressed. The OPERATE LED will now turn off and
the PROGRAM LED will turn on, indicating programmability of all functions. Pressing the
PROGRAM/OPERATE Push Button again will return the control to the OPERATE Mode
without the necessity of rotating the Key.
 Loading...