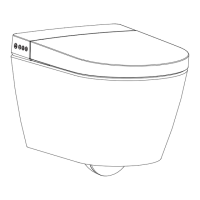
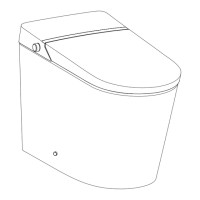
This document describes the EPLO smart toilet, models E18PRO and E13PRO, focusing on its remote control functions, installation, and usage.
Function Description:
The EPLO smart toilet offers a range of intelligent features designed to enhance hygiene and comfort. Key functions include:
- Washing: Rear and front washing with oscillating options for expanded cleaning.
- Drying: Adjustable dryer temperature for post-wash comfort.
- Temperature Control: Independent adjustment for water and seat temperatures.
- Nozzle Adjustment: Customizable nozzle position for personalized washing.
- Flushing: Full flush, half flush, and an automatic flush function.
- Lid and Seat Control: Automatic and manual opening/closing of the lid and seat.
- Deodorization: Automatic deodorization function.
- Night Light: Integrated night light with intelligent mode.
- Energy Saving: A dedicated mode to reduce energy consumption.
- Sterilization (Optional): Plasma sterilization function for enhanced hygiene.
- Pre-wetting (Optional): Automatic pre-wetting function.
- Foot Sensor (Optional): Foot sensor for hands-free operation.
- Voice Function (Optional): Voice control capabilities.
- APP Code Matching (Optional): Connectivity for smart application control.
- Electronic Bidet Tank Flushing (Optional): Flushing via an electronic bidet tank.
Important Technical Specifications:
While specific technical specifications like power consumption, water pressure, or dimensions are not detailed in this manual, the presence of features such as adjustable water temperature (0-5 levels), seat temperature (0-5 levels), dryer temperature (0-5 levels), and nozzle position (5 levels) indicates a sophisticated control system. The remote control uses radio frequency (RF) for communication, requiring a matching process with the toilet.
Usage Features:
Remote Control Installation:
The remote control holder can be installed in two ways:
- Drill and Screw: Drill a 6mm hole (35mm deep), insert an anchor, stick the holder with double-sided tape, secure with screws, and then apply a patch with tape.
- Adhesive Only: Clean and dry the installation area, remove the double-sided tape, stick the holder vertically, and apply a patch with tape.
Batteries are inserted into the remote control, which is then placed in the holder.
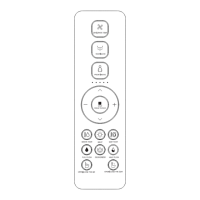
Remote Control Illustration:
The remote control features clearly labeled buttons for various functions:
- DRY/DRYER TEMP: Controls drying and dryer temperature.
- REAR MOVE: Initiates rear washing and oscillating washing.
- FRONT MOVE: Initiates front washing and oscillating washing.
- Up/Down Arrows: Adjust nozzle position.
- Plus/Minus Buttons: Adjust water volume.
- STOP/HOLD TO ECO: Stops current operation and activates energy-saving mode.
- WATER TEMP: Adjusts water temperature.
- LIGHT: Controls the night light.
- SEAT TEMP: Adjusts seat temperature.
- FULL FLUSH: Initiates a full flush.
- DEODORIZER: Activates/deactivates deodorization.
- HALF FLUSH: Initiates a half flush.
- OPEN/CLOSE THE LID: Opens/closes the toilet lid.
- OPEN/CLOSE THE SEAT: Opens/closes the toilet seat.
An indicator light on the remote control provides feedback on current settings.
Washing Functions (Rear/Front Washing):
- Activation: Washing functions are activated only when the user is seated and a buzzer beeps.
- Rear Washing: Press the "REAR MOVE" button. Press again for oscillating washing.
- Front Washing: Press the "FRONT MOVE" button. Press again for oscillating washing.
- Automatic Stop: Washing stops automatically after one cycle or immediately if the "STOP" button is pressed.
- Pulse Cleaning (Optional): Long press "REAR MOVE" or "FRONT MOVE" during washing to toggle pulse cleaning.
- Positioning: Users should sit backward for correct washing position and to avoid splashing.
- Safety: Press "STOP" before standing up, as the nozzle may spray for 1-2 seconds after the user leaves the seat.
Drying/Dryer Temperature:
- Activation: Press "DRY/DRYER TEMP." to start drying.
- Temperature Adjustment: Press "DRY/DRYER TEMP." again to adjust the air temperature from 0 to 5 levels. Level 0 is room temperature.
- Automatic Stop: Drying stops automatically after one cycle or upon leaving the seat.
Water Volume Adjustment:
- Press "+" or "-" during washing to adjust water volume. The indicator light shows the current level.
Nozzle Position Adjustment:
- Press "Λ" or "V" during washing to adjust nozzle position (5 levels). The indicator light shows the current position.
Energy Saving:
- Activation: Long press "STOP/HOLD TO ECO" to enter energy-saving mode.
- Deactivation: Long press "STOP/HOLD TO ECO" again to exit.
- Seat Temperature: In energy-saving mode, seat temperature is set to Level 1 (or neutral if it was neutral before).
- Suspension: Energy-saving mode is suspended when the seat is used, and heating resumes. It restores when the seat is no longer used.
Water Temperature Adjustment:
- Short press "WATER TEMP." to adjust water temperature from 0 to 5 levels. Level 0 is room temperature.
Seat Temperature Adjustment:
- Short press "SEAT TEMP." to adjust seat temperature from 0 to 5 levels. Level 0 is room temperature.
Night Light:
- On/Off: Short press "LIGHT" to turn the night light on or off.
- Intelligent Mode: Long press "LIGHT" to enter intelligent mode, where the light adjusts based on ambient light. Short press "LIGHT" to exit intelligent mode (factory default).
Full Flush/Half Flush:
- Half Flush: Short press "HALF FLUSH" for a half flush.
- Full Flush: Short press "FULL FLUSH" for a full flush.
- Auto Flush: Long press "FULL FLUSH" to toggle auto flush. When enabled, the toilet flushes automatically after the user leaves the seat.
Auto Lid Open/Close:
- Lid Control: Short press "OPEN/CLOSE THE LID" to open or close the lid.
- Seat Control: Short press "OPEN/CLOSE THE SEAT" to open or close the seat.
- Auto Function: Long press "OPEN/CLOSE THE LID" to toggle auto lid open/close.
Auto Deodorization:
- Short press "DEODORIZER" to turn deodorization on or off.
- Automatic Activation: Deodorization turns on automatically when the user is seated and stops after leaving. It also stops during drying. (Default: ON)
Water Tank Flush Volume Adjustment (Optional):
- Full Flush Volume: Press and hold the "FULL FLUSH" button, then press "+" or "-" to adjust the full flush volume.
- Half Flush Volume: Press and hold the "HALF FLUSH" button, then press "+" or "-" to adjust the half flush volume.
User Code (Radio Frequency Remote Control Matching):
- Turn off the toilet's power.
- Press and hold the "STOP" button, then press the "DRY/DRYER TEMP." button. The indicator light will flash.
- Reconnect the power plug and press the "reset" button (location not specified in the manual).
- The indicator stops flashing and stays on for 2 seconds, indicating successful matching. The toilet beeps once after self-inspection.
IR Remote Control Matching:
- Power on the toilet; it beeps once after self-inspection.
- Press and hold the "STOP" button, then press the "DRY/DRYER TEMP." button. The indicator light will flash.
- Press "+" or "-" to select a user code (1-9). The indicator light displays the selected code and flashes.
- Press the "STOP" button, then press the "DRY/DRYER TEMP." button. The main unit beeps once, confirming successful matching.
Other Operations:
Quiet Mode:
- Press and hold the "STOP" button and press the "LIGHT" button to toggle quiet mode.
Sterilization Function (Optional):
- When no one is seated and washing/drying is off, long press the "DRY/DRYER TEMP." button to activate plasma sterilization.
- This function runs for 2 hours and stops automatically if any button is pressed or a user is seated.
Automatic Pre-wetting Function (Optional):
- Press and hold the "STOP" button and press the "DRY/DRYER TEMP." button to toggle automatic pre-wetting.
- When enabled, pre-wetting occurs when a user is detected on the seat.
- Long press the "DEODORIZER" button to toggle the foot sensor function.
- The foot sensor is deactivated when a user is seated.
- Press and hold the "STOP" button and press the "DEODORIZER" button to toggle the foot sensor indicator.
APP Code Matching (Optional):
- Press and hold "WATER TEMP." and "SEAT TEMP." simultaneously for over 3 seconds to start APP code matching.
Voice Function (Optional):
- Press and hold "SEAT TEMP." and "DEODORIZER" simultaneously for over 3 seconds to toggle the voice function.
Electronic Bidet Tank Flushing (Optional):
- Press and hold "FULL FLUSH" and "HALF FLUSH" simultaneously for over 3 seconds to initiate flushing via the electronic bidet tank.
Maintenance Features:
- Power Cut Protocol: In case of a power cut during nozzle spraying, wait for power to be restored. For prolonged outages, gently push the wand back manually to avoid damage.
- Troubleshooting (Buzzer): The buzzer indicates successful signal reception. If no sound, adjust the remote control direction and repress the button.
Notices:
- Ensure the remote control is within reach when on the seat.
- Do not install or use the product in damp places like shower rooms.
- Avoid placing the product where it is easily exposed to water.