EasyManua.ls Logo

EPLO G20PRO - User Manual

EPLO G20PRO
19 pages
Print Icon
To Next Page IconTo Next Page
Loading...
Thank you for choosing our products. Please read the instructions carefully before
installation and keep it available for future maintenance or reference.
E-mail:service@eplo.com
Installation Manual
Model:G20PRO/G27PRO
ENJOY SMART LIFE

Other manuals for EPLO G20PRO

Question and Answer IconNeed help?

Do you have a question about the EPLO G20PRO and is the answer not in the manual?

Summary

Important Safeguards

Electrocution Risk Precautions

Precautions to mitigate electrocution risks, covering usage, handling, and electrical connections.

Fire and Injury Risk Precautions

Measures to prevent burns, fire, and injuries, emphasizing supervision and correct product use.

Additional Safety Instructions

Cautionary Notes

Cautions regarding installation, usage, and maintenance to prevent damage or injury.

Grounding and Electrical Safety

Essential grounding instructions and warnings for safe electrical connections and plug usage.

Technical Specifications

Main Unit Specifications

Details on rated voltage, power, water proofing, pressure range, and cord length.

Toilet Specifications

Information on flush volume, flushing mode, rough-in, outlet diameter, and drainage method.

Cleaning Device Specifications

Features of the cleaning device, including heating, water temp/volume, modes, and safety.

Drying Device Specifications

Details on warm air volume, temperature, heating power, and safety devices for drying.

Deodorization Specifications

Information on the deodorization method used by the product.

List of Materials

Main Unit

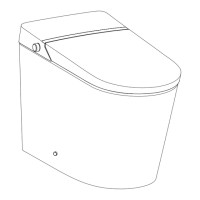
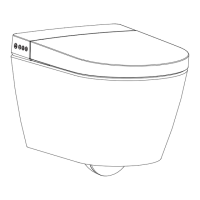
The primary component of the bidet toilet system.

Remote Control Components

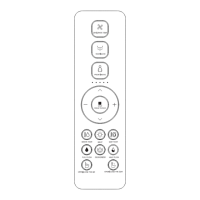
Includes the remote control for operating the bidet functions.

Installation Manual

The user guide for installing and operating the product.

Installation Cardboard

A template or guide used during the installation process.

Sealing Flange

A component used to create a watertight seal at the drain outlet.

Hose (Installed)

The water supply hose, likely pre-attached or ready for connection.

Angle Valve

A valve used to control the water supply to the bidet.

Mounting Accessory Kit

A set of hardware for securing the toilet unit.

Technical Drawing and Dimensions

Parts Identification

Left Side View

Identification of parts visible from the left side of the toilet unit.

Right Side View

Identification of parts visible from the right side of the toilet unit.

Toilet Installation Guide

Angle Valve Installation

Steps for installing the angle valve for water supply connection.

Cardboard Installation

Procedure for using cardboard for accurate drain outlet alignment.

Water Inlet Hose Connection

Connecting the water supply hose to the toilet's inlet.

Mounting Bracket Installation

Steps to assemble and install the mounting bracket securely.

Preparation Steps

Angle Valve Operation

Instructions for turning on the angle valve and checking for leaks.

Power Connection and Test

Connecting the power plug and performing a leakage protection test.

Self-Inspection Procedure

Steps for the product's self-inspection after power connection.

Lid Auto Open;Close Functions

Automatic Lid Operation

How the lid automatically opens upon approach and closes upon leaving.

Foot Sensor Operation

Using the foot sensor to control lid/seat opening and activate flushing.

Maintenance Procedures

Main Unit Care

Instructions for cleaning and maintaining the main unit.

Spray Nozzle Maintenance

Steps for self-cleaning, disassembly, and cleaning of the spray nozzle.

Emergency Troubleshooting

Filter Maintenance

Steps to clean the filter for poor spray performance.

Power and Water Failure

Troubleshooting for no power or no water supply issues.

Troubleshooting Remote and Unused Product

Remote Control Failure

Solutions for remote control issues, including battery replacement.

Product Unused for Extended Period

Procedure for draining water to prevent freezing and preparing for reuse.

Knob Function Description

Knob Operation Modes

Detailed explanation of knob functions for washing, drying, and temperature adjustments.

Indicator Light Status

Explanation of indicator light colors for different operational modes.

Troubleshooting Guide

Overview

This document is an installation and user manual for the EPLO smart toilet, models G20PRO and G27PRO. It provides comprehensive information on the product's features, installation, operation, and maintenance.

Function Description

The EPLO smart toilet is an integrated unit designed to offer advanced hygiene and convenience features. Its primary functions include:

  • Flushing: Offers both full (1.6/1.1 Gpf, 6.0L) and half (4.1L) flush options using a siphonic jet flushing mode. It also supports automatic flushing after use and manual flushing during power failure.
  • Cleaning Device: Features rear washing, oscillating washing, and front washing functions with 5-level nozzle position adjustment and 3-level water volume adjustment. Water temperature is adjustable across 6 levels. Safety features include a pressure maintaining device, automatic pressure relief device, automatic nozzle cleaning, anti-syphon device, anti-backflow device, and a filter device.
  • Drying Device: Provides warm air drying with 6-level temperature adjustment and an air volume of over 0.2m³/min.
  • Heated Seat: The seat offers 6-level temperature adjustment and a burn protection feature that automatically drops the seat temperature to a low level after 10 minutes of continuous use.
  • Deodorization: Utilizes diatom deodorization to eliminate odors.
  • Caring Device: Includes a night light assembly with intelligent, always-on, and always-off modes. It also features a user ID setting to avoid interference when used by multiple users.
  • Lid Auto Open/Close: For models equipped with this function, the lid automatically opens when a user approaches and closes 180 seconds after the user leaves. The seat and lid also close automatically 180 seconds after a user stands up to urinate.
  • Foot Sensor (Optional): For models with a foot sensor, touching the sensing area with a foot can open the lid (when both lid and seat are closed), open the seat (when lid is open and seat is closed), or activate a half flush (when both lid and seat are open).
  • Antibacterial Site: The seat and nozzle are designed with antibacterial properties.

Important Technical Specifications

  • Rated Voltage: 120V, 60Hz
  • Rated Power: 1120W
  • Waterproof Rating: IPX4
  • Water Pressure Range: 0.08MPa - 0.8MPa
  • Power Cord Length: About 2.2m
  • Rough-in: 305mm
  • Outlet Outside Diameter: ≤100mm
  • Drainage Method: S-trap
  • Heating Power (Cleaning Device): 1400W
  • Heating Power (Heated Seat): 50W
  • Heating Power (Drying Device): 250W
  • Inlet Water Temperature: 3~35°C / 37.4~95°F

Usage Features

The smart toilet is designed for user-friendly operation with a knob and optional remote control.

  • Knob Functionality:
    • When seated: Turning the knob clockwise initiates rear washing, and counterclockwise initiates front washing. Both functions automatically transition to drying after completion. Long pressing the knob switches between water pressure adjustment (clockwise increases, counterclockwise decreases) and spray wand position adjustment (clockwise moves forward, counterclockwise moves backward).
    • When not seated: Turning the knob clockwise starts manual nozzle cleaning.
    • During drying: Clockwise rotation increases air temperature, and counterclockwise rotation decreases air temperature.
    • Stopping functions: Pressing the knob stops any active function (washing, drying, nozzle cleaning) and flushes the toilet.
    • Standby/Functional Mode: Pressing and holding the knob toggles between standby (light off) and functional mode (red light).
  • Indicator Lights:
    • Red light: Functional mode
    • Purple light: Flushing mode
    • Blue light: Energy saving mode
    • Light off: Standby mode
  • Safety Features: Includes thermal fuse, water temperature sensor, ground protection, thermostat, over-temperature protection, and a leakage protection plug. It is recommended to use a waterproof electrical outlet with a ground fault circuit interrupter.
  • Power Connection: The leakage protection plug should be inserted into a power socket, and the reset switch pressed. The plug indicator light confirms power is on. A test button is available to verify the leakage protection function.

Maintenance Features

Regular maintenance is crucial for the longevity and performance of the smart toilet.

  • Main Unit Care:
    • Always shut off the power supply before maintenance.
    • Clean with only a soft, damp cloth. Avoid harsh chemicals.
    • After cleaning, ensure all surfaces are dry before reconnecting power.
  • Spray Nozzle Maintenance:
    • Self-cleaning: When no one is seated, turn the knob clockwise to extend the nozzle for automatic cleaning.
    • Disassembly: Once the nozzle moves forward, it can be removed for separate cleaning.
    • Cleaning: Use a soft cloth or soft brush. Do not pull or push the wand to avoid damage.
    • Retraction: After cleaning, put the nozzle back and press the "Stop" button to return it to its normal position.
  • Filter Maintenance:
    • If spray performance is poor, unscrew the angle valve nut and remove the filter net.
    • Clean the filter net under running water using a toothbrush.
    • Reinstall the filter net and angle valve nut.
  • Emergency Troubleshooting:
    • Power/Water Failure: In case of no power, press and hold the manual flushing button for 4 seconds to flush. If there's no water supply, pour approximately 8L of water into the ceramic bowl to flush, avoiding spillage.
    • Remote Control Failure: Operate the toilet via the buttons on the main unit. For battery replacement, remove the remote from its holder, open the battery cover, replace batteries, and then put the remote back. Note that settings will revert to defaults after battery replacement.
    • Product Unused for a Period: If the product is unused for a long time, especially in cold weather, it is highly recommended to drain the water to prevent freezing. To do this, unplug the unit, activate flushing, turn off the angle valve, disconnect the hose, drain the water, and then reconnect. Antifreeze can be added to the remaining water in the bowl for safety. Always ensure power is cut off before draining water.

The manual emphasizes the importance of reading all instructions carefully before installation and keeping the manual for future reference. For further assistance, users can contact service@eplo.com.

EPLO G20PRO Specifications

General IconGeneral
BrandEPLO
ModelG20PRO
CategoryToilets
LanguageEnglish

Related product manuals