L200/L201/L100/L101 Revision A
Disassembly/Assembly Details of Disassembling/Reassembling by Parts/Unit 30
Confidential
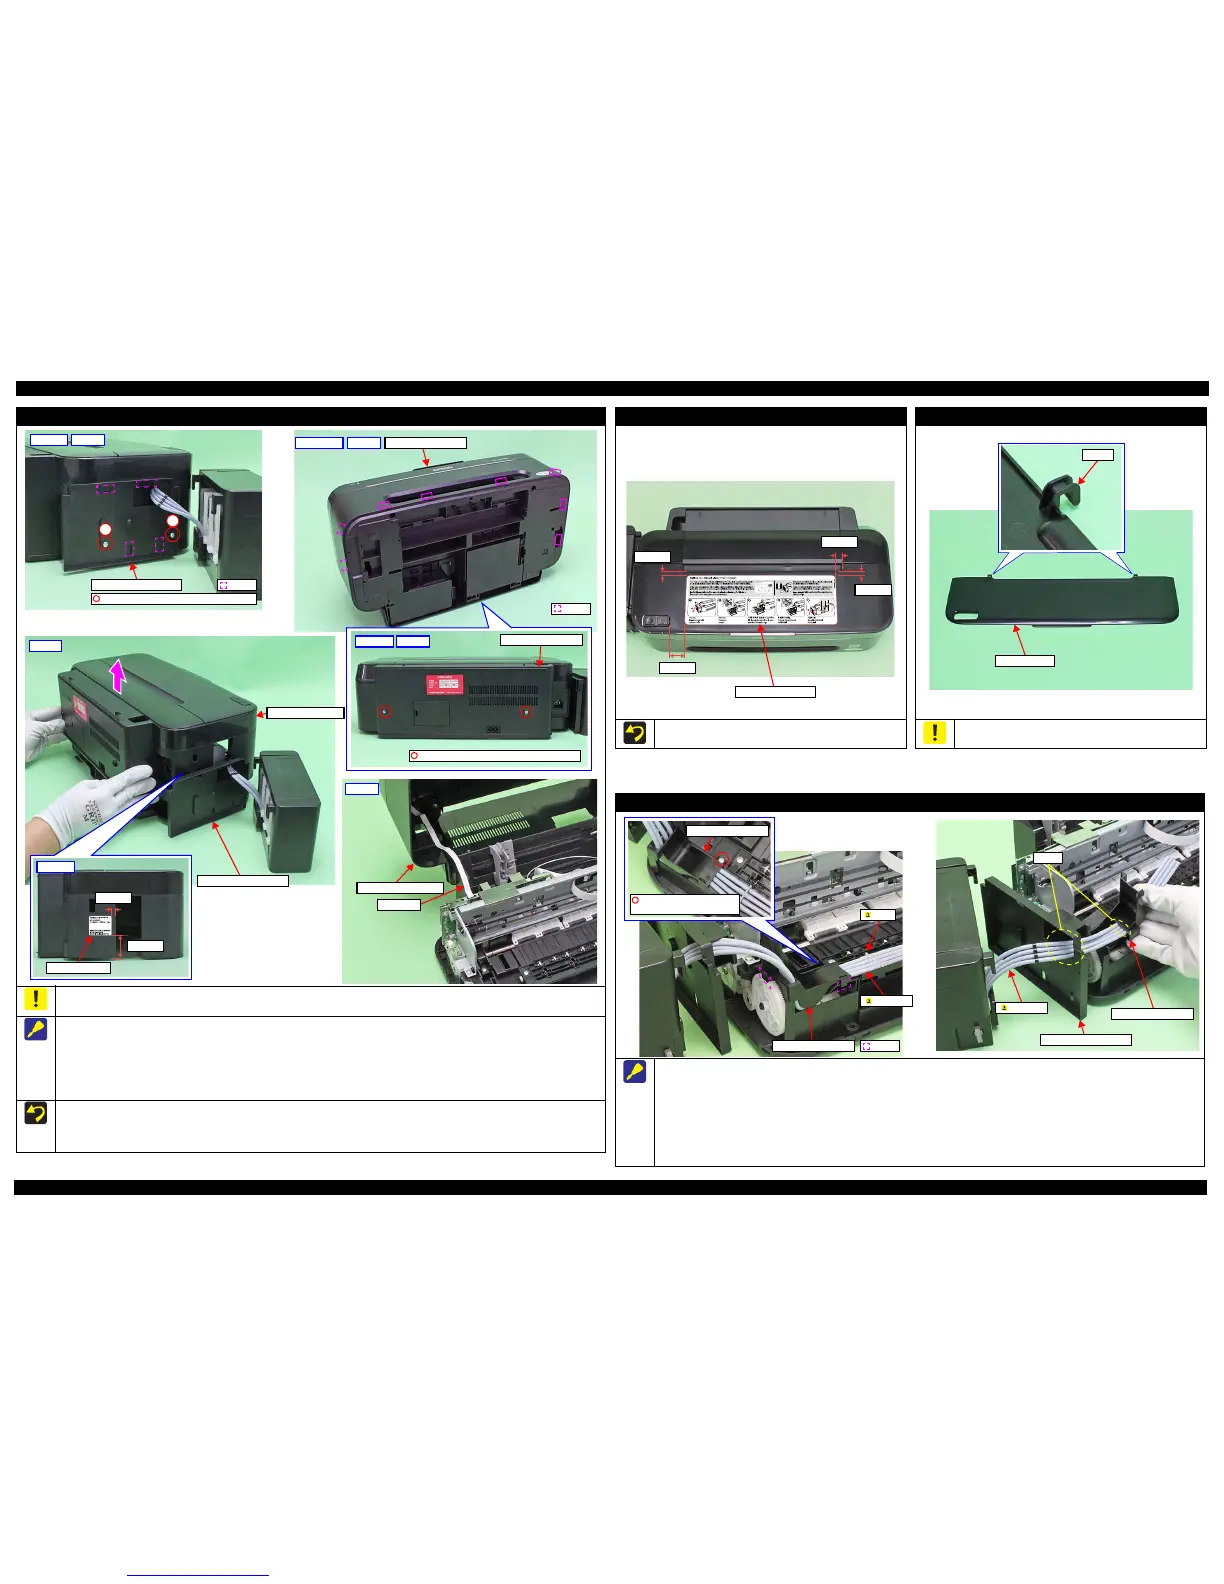
Upper Housing Assy / Ink Supply Holder Assy (L100/L101)
Do not lift the Upper Housing Assy too fast, since the Panel FFC is connected to the back of the Upper Housing Assy.
Be careful not to damage the hooks (x2) on the bottom left because these cannot be seen when removing.
Follow the procedure below when removing the Upper Housing Assy.
1. Remove the screws (x2) that secure the Ink Supply Holder Assy.
2. Remove the screws (x2) that secure the Upper Housing Assy.
3. Release the hooks (x8) that secure the Upper Housing Assy.
4. Lift the Upper Housing Assy while leaving the Ink Supply Holder Assy.
5. Disconnect the Panel FFC from the connector on the main board, and remove the Upper Housing Assy.
When replacing the Upper Housing Assy, peel off the Voluntary Label from the old housing and attach it to the new housing as specified in the
figure above.
When installing the Ink Supply Holder Assy, align the hooks (x4) of it with the holes of the Upper Housing Assy and then tighten the screws in
the order indicated in the figure above.
Bottom side
Hook
Upper Housing AssyStep 3
Upper Housing Assy
Panel FFC
Step 5
1
C.B.P-TITE SCREW 3x6 (5.0 ~ 6.0 kgf·cm)
Ink Supply Holder Assy
Hook
2
C.B.P-TITE SCREW 3x10 (5.0 ± 0.5 kgf·cm)
Upper Housing Assy
Upper Housing Assy
Ink Supply Holder Assy
Left side
Rear side
Step 1
Step 2
Step 4
Left side
Voluntary Label
5.0 mm
30.0 mm
Refilling Ink Label (L100/L101)
Attach the Refilling Ink Label on the position shown in the figure
above.
23.2 mm
4.0 mm
4.0 mm
10.0 mm
Refilling Ink Label
Printer Cover (L100/L101)
Be careful when removing the Printer Cover, because the hooks
(x2) are fragile and easily get damaged or softened.
Ink Tube Guide 1st / Ink Supply Holder Assy (L100/L101)
Follow the procedure below when removing the Ink Supply Holder Assy / Ink Tube Guide 1st.
1. Remove the Upper Housing Assy. (p 30)
2. Peel off the acetate tape (x2) that secure the Ink Tube Guide 1st. (p 27)
3. Remove the screw (x1) that secures the Ink Tube Guide 1st.
4. Release the hooks (x2) that secure the Ink Tube Guide 1st, and remove it from the frame.
5. After confirming the Valve is closed, disconnect the Ink Tubes from the Joint. (p 10)
6. Pull out the Ink Tubes from the holes of the Ink Supply Holder Assy / Ink Tube Guide 1st, and remove the Ink Supply Holder Assy / Ink Tube
Guide 1st.
Hook
Joint
Ink Tube Guide 1st
Ink Supply Holder Assy
Ink Tube Guide 1st
Holes
Ink Tube
Ink Tube
C.B.P-TITE SCREW 2.5x5
(5.0 ~ 6.0 kgf·cm)
Ink Tube Guide 1st