11
Accessing Photos
Follow the instructions in these sections to access your photos:
■ “Inserting Memory Cards” below
■ “Connecting External Devices” on page 12
■ “Viewing a Slide Show of Your Photos” on page 15
■ “Copying Photos to Your Computer” on page 15
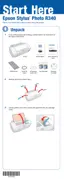
Inserting Memory Cards
1. Press the P power button to turn on your Epson Stylus Photo R340.
2. Open the memory card door.
3. Insert the memory card into one of the three slots, as shown below.
Note: Insert just one card at a time. See your on-screen User’s Guide for supported photo
file formats.
4. Push the card in carefully until it stops (it doesn’t go in all the way). When it is in, the
card light comes on.
5. Close the memory card door.
CompactFlash or
Microdrive
(left)
Memory Stick,
SD (Secure Digital), or
MMC (MultiMediaCard)
(middle)
SmartMedia or
xD Picture Card
(right)
Pbasics.book Page 11 Monday, August 1, 2005 12:31 PM

 Loading...