P/N P-047550-1726-EN • REV 08 • ISS 05AUG16 3 / 8
Notes
• The module is shipped from the factory as an assembled
unit; it contains no user-serviceable parts and should not
be disassembled.
• This module does not operate without electrical power. As
fires frequently cause power interruption, discuss further
safeguards with the local fire protection specialist.
• This module does not support conventional four-wire
smoke detectors.
To install the module:
1. Write the address assigned to the module on the label
provided and apply the label to the module. Remove the
serial number label from the module and attach it to the
project documentation.
2. Wire in accordance with “Wiring” below.
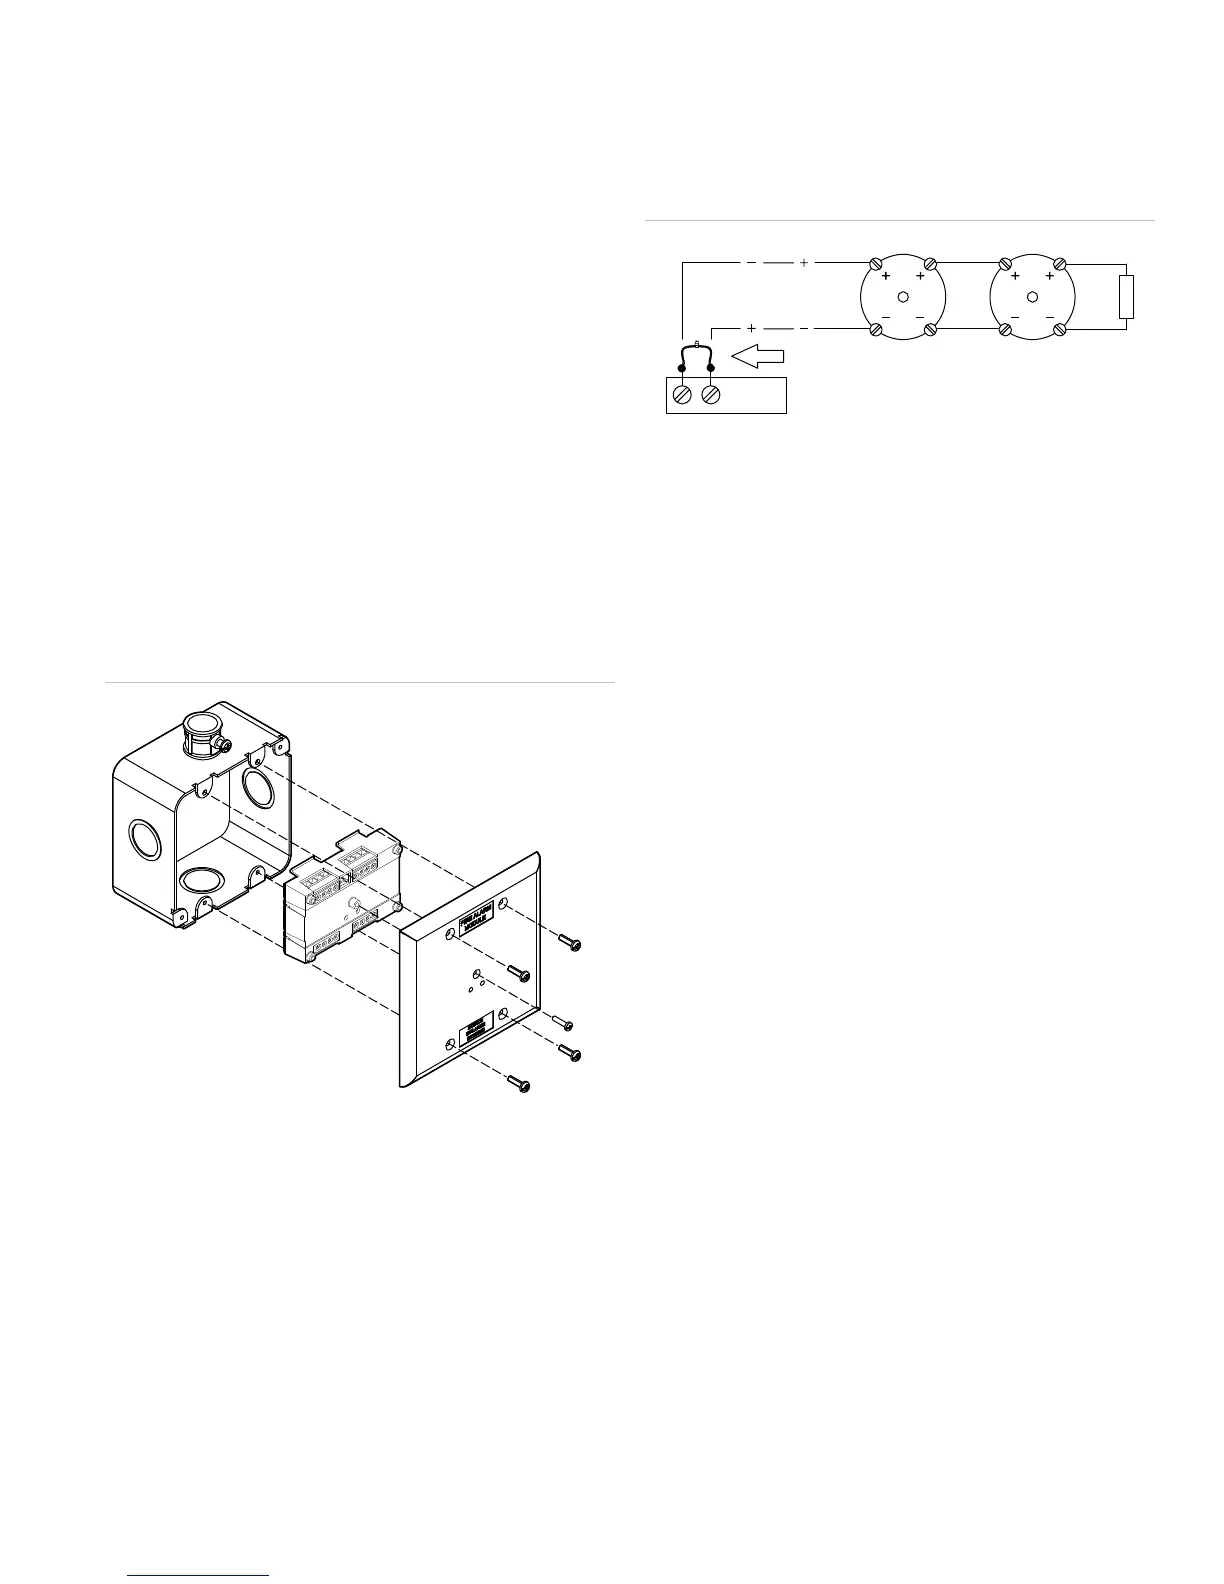
3. Using the self-tapping screw provided, attach the wall
plate to the module. See Figure 1.
4. Using the four machine screws provided, attach the wall
plate and module to the electrical box.
Figure 1: Installing the SIGA-UM module
(1) Compatible electrical box
(2) SIGA-UM module
(3) Wall plate
(4) #6-32 × 5/8 machine screw
(4X)
(5) #4 × 1/2 self-tapping screw
Protection from transient spikes
For installations in which the output circuit connects to
electromechanical bells or horns, install a bipolar transient
protector (P/N 235196P) to protect the module from transient
spikes caused by switching inductive loads. Locate bells and
horns at least 6 ft. (1.8 m) from the module.
To install a transient protector:
1. Install the transient protector across the output circuit
inside the electrical box with the module. See Figure 2.
Figure 2: Bell circuit showing bipolar transient protector
placement
(1) Normal state (2) Active state
Wiring
Wire this device in accordance with applicable national and
local codes, ordinances, and regulations.
General wiring notes
• Refer to the Signature loop controller installation sheet for
SLC wiring specifications.
• Each terminal on the module is limited to a single
conductor.
• Only personality codes 13, 14, 20, and 21 support two-
wire smoke detectors.
• Test resistors are supplied with the SIGA-UM to prevent
trouble signals on unused circuits during installation.
When connecting field wires, remove the test resistors and
install a UL/ULC Listed 47 kΩ EOLR at the end of the
circuit.
Riser wiring notes
• For maximum line impedance, refer to the installation
manual for the fire alarm panel. Maximum circuit
capacitance is 0.1 µF.
• If the riser is used for more than one notification zone,
install in accordance with the survivability from attack by
fire requirements in NFPA 72 National Fire Alarm and
Signaling Code.
Two-wire smoke detector notes
• A maximum of 15 SIGA-UM modules per circuit can be
configured to support two-wire smoke detectors
(personality codes 13, 14, 20, and 21). However, if a
Signature Series IM module or Signature Series detector
with an isolator base is installed on the SLC, only 7
SIGA-UM modules may be configured to support two-wire
smoke detectors.
• Use compatible smoke detectors. See the control panel
compatibility list for type and quantity.
(1)
(2)
(3)
(4
(5)
12 11
1
2


 To Next Page