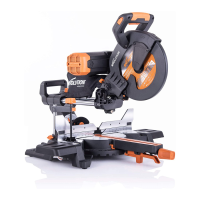
ADDITIONAL SAFETY INSTRUCTIONS FOR TABLE SAWS
• Wear a dust mask. Exposure to dust particles can be harmful to
your health and make it dicult to breath. Use a dust extraction
system and wear a suitable protective mask.
• Do not use any abrasive wheels.
• Use only saw blades that comply with the characteristics
specied in this manual.
• Use only saw blade diameter(s) in accordance with the
markings.
• Use only saw blades with a speed marking that is higher than
or equal to the speed marked on the tool.
• Avoid heating the blade tips. Avoid overheating or melting
the materials. When cutting plastic, let the tool do the work. Do
not force the tool or cut too slowly which could result in melting
the plastic.
• Use only saw blades recommended by the manufacturer,
which conform to EN 847-1, if intended for wood and
analogous materials.
RESIDUAL RISKS
Even with application of safety standards and using the tool as
prescribed, certain residual risks can remain:
• Risk of personal injury due to prolonged use.
• Risk of injury caused by dust.
• Risk of injury caused by flying objects.
• Risk of burns due to accessories becoming hot.
• Risk of electric shock due to cutting through electric cables.
When cutting through floors, ceilings of walls ensure there are no
hidden cables or water pipes.
CLEANING AND MAINTENANCE
WARNING: Disconnect the tool from the power source before
any adjustments, cleaning, or maintenance is carried out.
• Use compressed air to blow dirt out of the main housing air
vents and the blade guard. Wear approved eye protection and
a dust mask.
• Use a cloth dampened with water to clean the other areas of
the tool. Never use solvent based or harsh chemicals of any type
as this may weaken, damage or destroy plastic components.
• Do not attempt to modify the tool or accessories in any way.
• When servicing only use Evolution original parts and carried
out by a qualified person.
•
NOISE WARNING
WARNING: The noise emissions during actual use of the
power tool can dier from the declared values depending on the
ways in which the tool is used especially what kind of workpiece
is processed.
WARNING: The need to identify safety measures to protect
the operator that are based on an estimation of exposure in
the actual conditions of use (taking account of all parts of the
operating cycle such as the times when the tool is switched o
and when it is running idle in addition to the trigger time).
The declared noise emission value(s) have been measured in
accordance with a standard test method and may be used for
comparing one tool with another. The declared noise emission value(s)
may also be used in a preliminary assessment of exposure.
ENVIRONMENTAL PROTECTION
Waste electrical products should not be disposed
of with household waste. Please recycle where
facilities exist. Check with your Local Authority
or retailer for recycling advice.
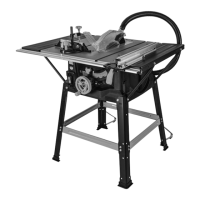
PRODUCT OVERVIEW KEY
MACHINE OVERVIEW
A. Sliding mitre fence
B. Hold down clamp*
C. Blade guard
D. Riving knife
E. Rack and pinion fence
F. Outfeed support*
G. Rear dust extraction port
H. Table extension locking lever
I. Stand**
J. Stand latch**
K. Sliding table top
L. Extending rails
M. Micro-adjusting dial
N. Bevel locking lever
O. ON/OFF switch
P. Bevel / height adjusting dial
Q. Push stick
R. Spanner x 2
S. Dual hex key
T. Blade
U. Outer blade ange
V. Outer blade lock nut
W. Dust port adaptor*
X. Elbow joint dust port adaptor***
Y. Dual port adaptor*
Z. Dust hose*
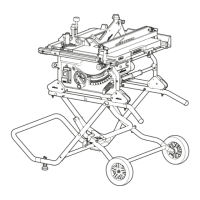
STAND OVERVIEW
A1 - G. Stand Components
H1 - H2. Foot Pad Components
I. Wheels (x2)
J - P. Stand Fixings
ASSEMBLY
WARNING: To reduce risk of injury, disconnect the tool from
the power source before installing, repositioning or removing
accessories. Only connect the plug to the power source just
before starting the saw.
• Assembling the stand** (figs. 1)
• Assembling the outfeed support* (fig. 2)
• Assembling the blade and riving knife (fig. 3)
SETTING UP THE SAW
• Using the rack and pinion fence (fig. 4)
Note: The fence can be installed in three positions atop the screws
installed in the extending rails (fig. 4.1). Use position A for left
positioning, position B for 0-550mm ripping, and position C for
100-650mm ripping.
• Aligning the rack and pinion fence (fig. 5)
• Adjusting the cutting height (fig. 6)
• Using the push stick for rip cutting (fig. 7)
OPERATION
• Powering the tool on/off (fig. 8)
• 90
º
cutting (fig. 9)
• Bevel cutting (fig. 10)
• Mitre cutting (fig. 11)
• Using the extended table (fig.12)
• Attaching the clamp (fig.13)
• Dust extraction (fig. 14)
• Transporting the saw (fig. 15)
• Adjusting the kerf plate height (fig. 16)
MAINTENANCE
• Checking riving knife and blade parallelism (fig. 17)
• Checking the blade at 45
º
(fig. 18)
*Models R255TBL+ and R255TBLX+ only.
**Models R255TBLX and R255TBLX+ only.
***Models R255TBL and R255TBLX only.
 Loading...