NOISE WARNING
WARNING: The noise emissions during actual use of the
power tool can dier from the declared values depending on the
ways in which the tool is used especially what kind of workpiece
is processed.
WARNING: The need to identify safety measures to protect
the operator that are based on an estimation of exposure in
the actual conditions of use (taking account of all parts of the
operating cycle such as the times when the tool is switched o
and when it is running idle in addition to the trigger time).
The declared noise emission value(s) have been measured in
accordance with a standard test method and may be used for
comparing one tool with another. The declared noise emission value(s)
may also be used in a preliminary assessment of exposure.
ENVIRONMENTAL PROTECTION
Waste electrical products should not be disposed of with
household waste. Please recycle where facilities exist.
Check with your Local Authority or retailer for recycling
advice.
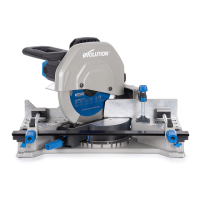
SETTING UP THE SAW
WARNING: To reduce risk of injury, disconnect the tool from
the power source before installing, repositioning or removing
accessories Only connect the plug to the power source just before
starting the saw.
WARNING: Only transport the saw with the cutting head in
the down position, with the locking pin fully engaged (Fig.1).
Note: The bases on all these chop saw models have mounting holes
(located in the corners) which with suitable fixings (not supplied) can
be placed to secure the machine.
When mounting the machine onto a saw stand or appropriate
worktop, consider the following guidelines:
• Position the saw away from other people or bystanders to
avoid potential injury due to flying debris.
• Locate the saw on a firm, level surface where there is plenty of
room for handling and properly supporting the workpiece.
• Ensure the power cord is positioned away from the machine
to avoid entanglement or causing obstruction during cutting
operations.
ASSEMBLY
• Fig.1 Locking the head position
• Fig.2 Installing/removing the blade
PRE-CUTTING CHECKS
• Ensure that the power supply matches the requirements
specified on the machines rating plate.
• If an extension cable is required it must be of a suitable type
for the work environment. If used outdoors it should be
waterproof and so labelled.
• The manufacturers instructions should be followed when
using an extension cable.
• Route any extension cable so that it does not pose a trip
(or any other) hazard to the operator, colleagues or any
bystanders.
CUTTING
WARNING: Ensure the workpiece is supported for stable
cutting. Allow the blade to reach maximum speed before starting
the cut. Cut smoothly and allow the blade to do the work without
forcing the blade.
• Fig. 3 Mitering the rear vice and using the quick-release clamp
• Fig. 4 Repositioning the rear mitre vice
Note: There are three possible positions for the rear vice (Fig. 4) to
allow the user to make cuts based on different material profiles and
angles. For example, the rearmost position (A) enables the widest
section of some workpieces to be cut, while the most frontal position
(C) is most ideal for cutting box-section mild steel at a 45
º
angle.
Ensure the workpiece is positioned so that the blade can cover the
length of the desired cut entirely before cutting.
• Fig. 5 Rear vice positioning for 90º cutting
• Fig. 6 Rear vice positioning for 45º cutting
WARNING: Always ensure the material will be covered by the
cutting area of the blade before making a cut.
• Fig. 7 Performing cuts
• Fig. 8 Emptying the chip collection tray (die-cast base models
only)
MAINTENANCE AND ADJUSTMENTS
• Fig. 9 Replacing the carbon brushes
Note: Excessive sparking may indicate the presence of dirt in the
motor or worn out carbon brushes. Disconnect the machine from
the power supply before attempting to replace or check the carbon
brushes. Replace both carbon brushes if either has less than 6mm
length of carbon remaining, or if the spring or wire is damaged or
burned.
To replace the carbon brush, unscrew the plastic caps found at the
side of the motor carefully (Fig. 9). Remove the brushes from their
springs, and if necessary, replace the brushes and the caps. Fit the
caps back to the motor and screw to tighten. Run the motor without
load to test new brushes.
Fig. 10 Cutting head travel adjustment
Note: To prevent the blade from contacting any part of the machines
metal base, the downward travel of the Cutting Head can be adjusted.
Lower the Cutting Head and check for any blade contact with the
machines base. If the downward travel of the Cutting Head needs to
be adjusted, do the following:
• Loosen the locknut (A) on the downward travel stop screw.
• Turn the adjusting screw (B) out (counter-clockwise) to decrease
the downwards travel of the Cutting Head.
• Turn the adjusting screw in (clockwise) to increase the downwards
travel of the Cutting Head.
• Tighten the adjustment screw locknut when satisfactory
downward travel of the Cutting Head is achieved.
 Loading...