Do you have a question about the Evolution S355CPSL and is the answer not in the manual?
Warns about health risks from vibration and factors affecting declared values.
Details safety regarding electrical connections and maintaining a safe work environment.
Focuses on user alertness, protective gear, and preventing unintentional tool starts.
General warnings and instructions for safe power tool operation.
Ensures user alertness, correct dress, and proper tool handling.
Addresses hazards from dust and flying debris, emphasizing protection.
Details safety regarding wheel selection, speed, flanges, and inspection.
Explains how kickback occurs due to blade binding or misalignment.
Defines kickback and provides related warnings for safe operation.
Techniques to control kickback and handle binding wheels safely.
Covers crucial checks like guards, keys, work area, and environment.
Lists essential safety checks and reiterates the need for PPE.
Warns against cutting asbestos-containing materials and advises caution.
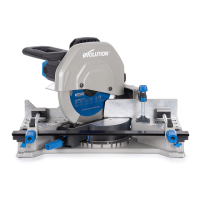
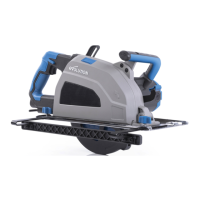
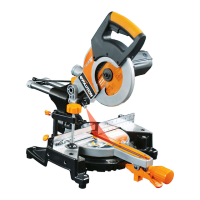
This document describes the Evolution S355CPSL, S355CPS, and S380CPS Steel Chop Saws, which are designed for cutting various materials including mild steel, thin steel, stainless steel, aluminum, wood, and masonry. These machines are intended for use with special Evolution blades and accessories.
The Evolution Steel Chop Saws are powerful tools designed for precise cutting of a wide range of materials. They operate by using a rotating blade to cut through workpieces. The cutting head is mounted on a pivot, allowing it to be lowered onto the material. These models feature a vice system to securely hold the workpiece during cutting, ensuring stability and accuracy. The S355CPSL model is equipped with a steel shield for debris management, while the S355CPS and S380CPS models include a chip collection tray for efficient debris containment.
General Operation: The chop saw should be permanently mounted on a firm, level surface, such as a workbench, to ensure stability and prevent rocking during operation. Mounting holes are provided in the base for this purpose. It is crucial to position the saw so that other people or bystanders are not too close or behind it, to avoid injury from flying debris. The power cord should be routed in a way that prevents entanglement with machine parts or posing a trip hazard.
Unlocking the Cutting Head: To unlock the cutting head from its locked-down transport position, gently press down on the cutting handle and pull out the locking pin. The cutting head will then rise to its upper position. It is recommended to maintain a grip on the cutting handle throughout this process for controlled movement.
Blade Installation and Removal: Only genuine Evolution blades designed for these machines should be used. When handling blades, wearing protective gloves is recommended. To remove a blade, ensure the cutting head is in its upper position. Loosen the front arbor cover bolt with the supplied hex key and rotate the cover out of the way. Press the arbor lock button and use the hex key to remove the blade bolt, washer, and outer blade flange. Carefully remove the old blade after opening the blade guard, leaving the inner blade flange in place. For installation, place the new blade, ensuring the directional arrow on the blade matches the arrow on the upper blade guard. Close the blade guard, refit the outer blade flange and washer, and partially refit the arbor bolt. Press the arbor lock button and fully tighten the arbor bolt with the hex key. After any blade replacement, run the machine without load for one minute to ensure the blade is correctly seated.
Cutting Angle Adjustment: The rear vice jaw can be adjusted for angled cuts. To adjust, loosen the lever handle. The lever handle is a spring-loaded ratchet type; pull it up and reposition to continue loosening. Once sufficiently loose, rotate the fence to the desired angle and retighten the lever handle.
Positive Stop for 45° Angle (S355CPS & S380CPS): A fixed angular setting for a 45° rear jaw angle is provided. To access this, ensure the location pin is in its upper (unset) position. Set the rear vice jaw to approximately 45° using the protractor scale. Turn the location pin a quarter turn, which will release the pin and allow it to push downwards, locking the vice jaw in place.
Repositioning the Rear Vice Jaw: The rear vice jaw has three possible positions, with two mounting holes at each position. It is typically attached in the rearmost position for cutting wider workpieces. To reposition, completely remove the lever handle, fence securing bolt, washer, and spacer. Place the vice jaw in the new desired position and refit all components. For S355CPS and S380CPS models, ensure the location pin is in its upper (unset) position before repositioning, then turn it a quarter turn to lock the vice jaw in place. The swiveling front vice jaw automatically aligns with the rear vice jaw and accommodates irregular workpieces.
Front Vice Jaw Adjustment (S355CPS & S380CPS): These models feature a Quick Release Mechanism for the front vice jaw. To operate, lift and rotate the sleeve nut rearwards, slide the front jaw to the required position, then return the sleeve nut to its normal service position and tighten the vice. Always check the security of the workpiece before cutting.
Making a Cut: Before cutting, ensure the workpiece is firmly secured in the vice. Freehand cutting is not recommended. With the cutting head in the upper position, switch on the motor and allow it to reach full operational speed. Gently lower the cutting head to the material, applying light pressure to prevent the blade from grabbing. Do not force the machine; allow the blade to do the work. Excessive pressure can reduce blade and motor life. Reduce pressure as the blade exits the material. Release the ON/OFF trigger switch to turn off the motor once the cut is complete. Allow the cutting head to return to its upper position and the blade to stop completely before removing hands or the workpiece.
On/Off Trigger Switch: These models are equipped with a non-latching safety start trigger switch. To start the motor, slide the safety lock on the left side of the trigger switch to the left, then depress the main trigger switch. Never start the saw with the cutting edge of the blade in contact with the workpiece surface.
General Maintenance: All maintenance procedures must be performed with the machine switched off and disconnected from the mains power supply. Regularly check that all safety features and guards are operating correctly. All motor bearings are lubricated for life and require no further lubrication. Plastic parts of the machine should be cleaned with a clean, slightly damp cloth; avoid solvents or similar products that could damage plastic. Air vents should be cleaned using compressed dry air only.
Checking/Replacing Carbon Brushes: Excessive sparking may indicate dirt in the motor or worn carbon brushes. Disconnect the machine from the power supply before checking or replacing brushes. Replace both carbon brushes if either has less than 6mm of carbon remaining, or if the spring or wire is damaged or burned. To remove brushes, unscrew the plastic caps at the back of the motor (they are spring-loaded), withdraw the brushes with their springs. If replacement is needed, renew both brushes and replace the caps. Serviceable brushes can be reinserted, but only in the same position as they were removed. Run new brushes without load for approximately 5 minutes to aid the bedding-in process.
Cutting Head Travel Adjustment: To prevent the blade from contacting the metal base, the downward travel of the cutting head can be adjusted. Lower the cutting head and check for blade contact with the base. If adjustment is needed, loosen the locknut on the downward travel stop screw. Turn the adjusting screw counter-clockwise to decrease downward travel or clockwise to increase it. Tighten the locknut once satisfactory downward travel is achieved.
Chip Collection: For the S355CPSL, a steel shield prevents debris from being expelled forcefully. Accumulated chippings behind the machine need regular removal. For S355CPS and S380CPS, a shield diverts debris into a collection tray. To maintain operational safety, remove accumulated chippings when the tray is approximately 2/3 full. The tray is located under the saw and accessed from the rear. To release it, turn the locking handle a quarter turn, slide the tray out, dispose of the chippings, and refit the tray before using the saw again. Always clear chippings with the machine disconnected from the mains power supply.
Environmental Protection: Waste electrical products should not be disposed of with household waste. Recycle where facilities exist and check with local authorities or retailers for recycling advice.
| Motor Power (220-240V~ 50 Hz) | 2200 W |
|---|---|
| Motor (110V~ 60 Hz) | 1800 W |
| Motor Power | 2200 W |
| Max. Steel Box Section @ 90° | 120 x 120 mm |
| Mild Steel Plate - Max. Thickness | 12 mm |
| Blade Diameter | 355 mm |
| Bore Diameter | 25.4 mm |
| Number of Teeth | 66 |
| Weight | 23.2 kg |
| Blade Speed | 1550 rpm |
| Speed No Load | 1550 rpm |
| No Load Speed | 1550 rpm |