A01-4.3)
Operazioni di assistenza
• Sostituzione della lama della pialla
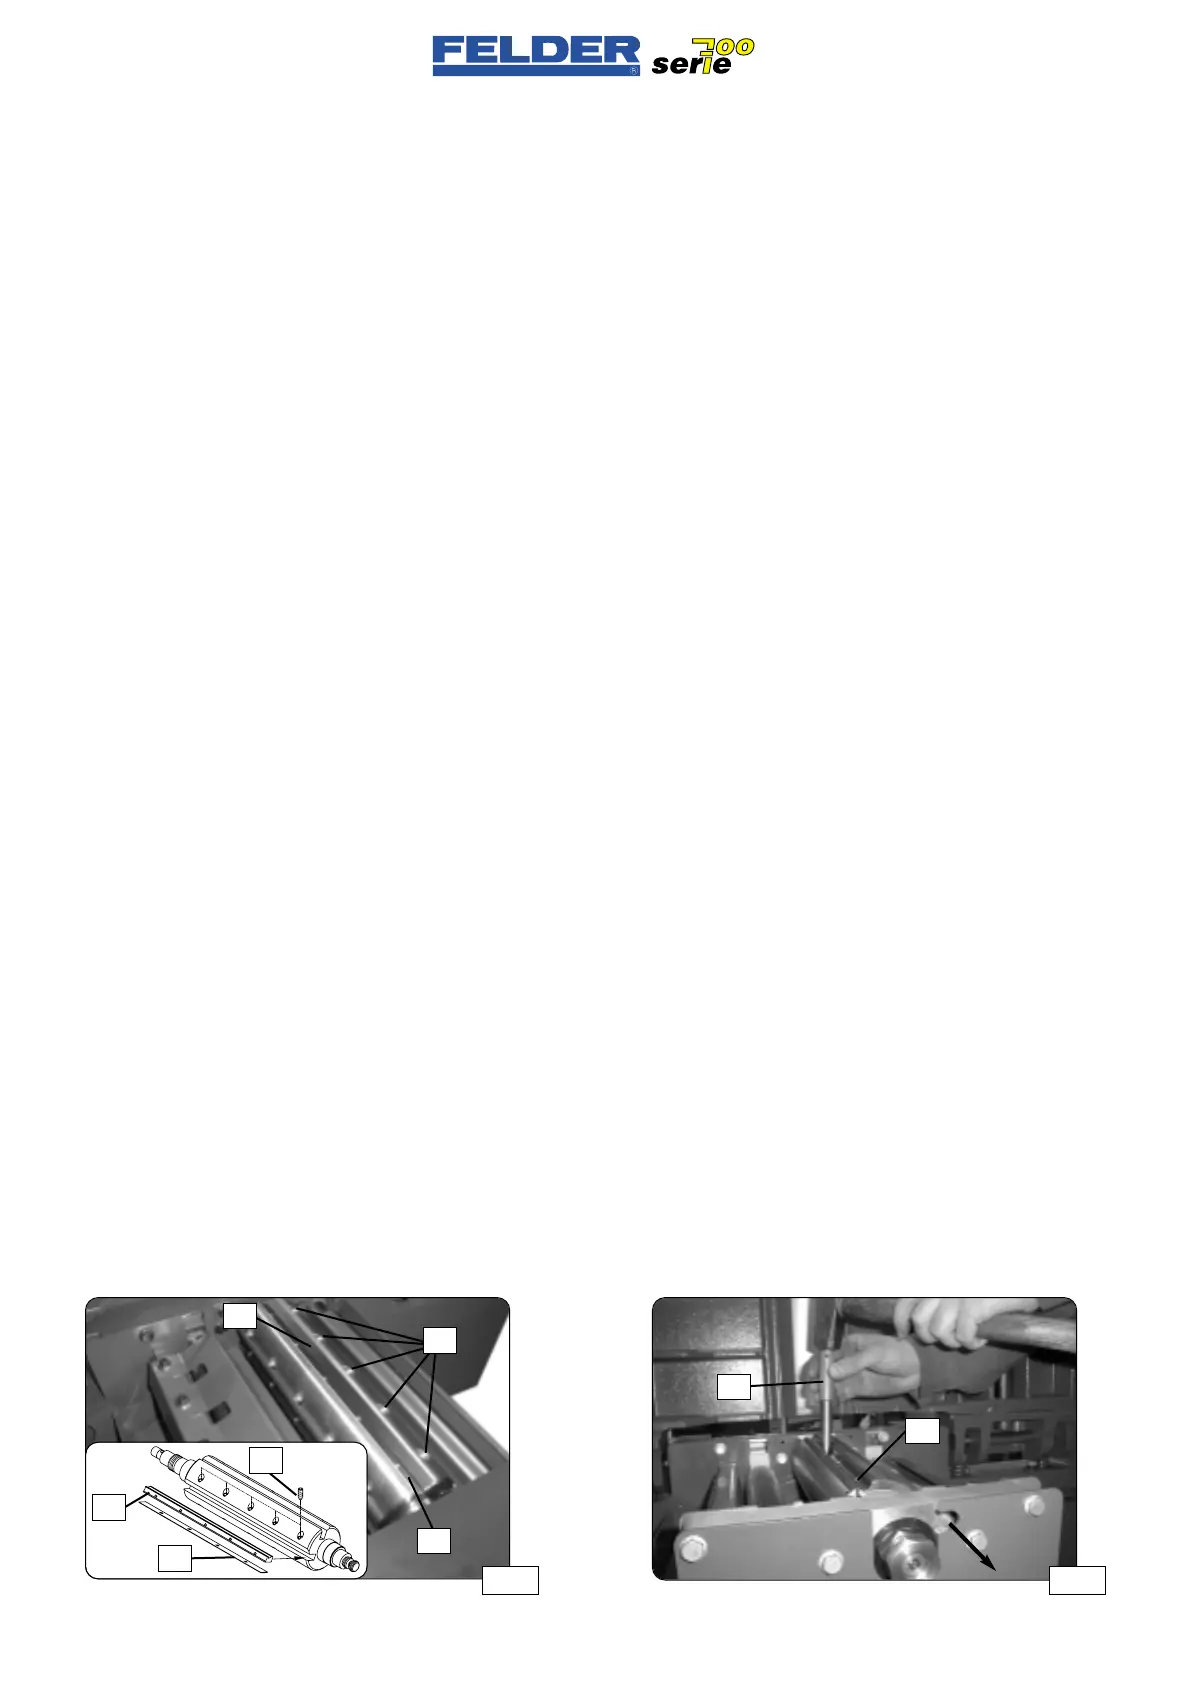
Vedere fig. 31
Allentare tutte le viti del cuneo di
serraggio S di una lama e rimuo-
vere il cuneo K nonché la lama della
pialla M.
Ripetere questa procedura per tutti
le lame. Voltare la lama della pialla
(se fosse stata consumata solo da un
lato). Togliere tutti i resti di resina
dalla lama della pialla, dai cunei e
dall’albero della piallatrice
(Non pulire con aria compressa!)
Inserire nuovamente la lama della
pialla ed i cunei, serrare le viti dei
cunei prima leggermente, poi a fondo.
(Coppia di serraggio minima: 20Nm)
• Albero piallatura automatica
sistema Tersa
Vedere fig. 32
Battere con una punta di ottone S il
portalame M verso il basso ed
estrarre lateralmente la lama della
pialla dall’albero della pialla.
Togliere tutti i resti di resina dalla
lama della pialla, dal supporto delle
lame e dall’albero della pialla
(Non pulire con aria compressa)
Girare la lama della pialla (se fosse
stata consumata solo un lato).
Inserire nuovamente la lama della
pialla ed avviare l’albero della pialla.
Le lame della pialla vengono bloc-
cati dalla forza centrifuga.
Attenzione!
Le lame della pialla vengono corretta-
mente bloccate solo dopo la piallatura
di un pezzo di prova.
A01-4.3)
Service work
• Changing the planer blades
See fig. 31
Release all blade holder screws S of
a blade, remove the blade holder K
and planer blades M.
Repeat this process with all blades.
Reverse the planer blades (if only
one side has been used).
Clean the planer blades, blade hol-
ders and planer arbor of traces of
resin as thoroughly as possible.
(do not clean with compressed air!)
Reinstall the planer blades and
blade holders, tighten the blade hol-
der screws lightly at first, then firmly.
(minimum tightening torque: 20Nm)
• Tersa automatic planer arbor
system
See fig. 32
Use a brass drift S to drive the blade
carrier M downwards and remove
the planer blades laterally from the
planer arbor.
Clean the planer blades, blade hol-
ders and planer arbor of traces of
resin as thoroughly as possible.
(do not clean with compressed air!)
Reverse the planer blades
(if only one side has been used).
Replace the planer blades and start
the planer arbor.
The planer blades are seated by
centrifugal force.
Attention:
The planer knives are not properly
seated until a test workpiece has been
planed.
- 20 -
A01 V1/99 S1
A01-4.3)
Servicearbeiten
• Hobelmesserwechsel
Siehe Abb. 32
Alle Keilleistenschrauben S eines
Messers lösen und Keilleiste K sowie
Hobelmesser M entfernen.
Diesen Vorgang bei allen Messern
wiederholen.
Hobelmesser wenden (falls erst eine
Schneidenseite verbraucht wurde).
Hobelmesser, Keilleisten und Hobel-
welle gründlichst von Harzresten
reinigen!
(Nicht mit Druckluft reinigen!)
Hobelmesser und Keilleisten wieder
einsetzen, Keilleistenschrauben
zuerst nur leicht, dann fest anzie-
hen.
(Mindestanzugsmoment: 20 Nm)
• Automatikhobelwelle System Tersa
Siehe Abb. 33
Mit einem Messingstift S den Mes-
serträger M nach unten schlagen
und Hobelmesser seitlich aus der
Hobelwelle ziehen.
Hobelmesser, Messerträger und
Hobelwelle gründlichst von Harz-
resten reinigen!
(Nicht mit Druckluft reinigen!)
Hobelmesser wenden
(falls erst eine Schneidenseite ver-
braucht wurde).
Hobelmesser wieder einfügen und
Hobelwelle starten.
Die Hobelmesser werden durch die
Fliehkraft geklemmt.
Achtung:
Die Hobelmesser sind erst nach
hobeln eines Probewerkstückes richtig
geklemmt.
Abb 32 Abb 33
A01 V1/99 S1
S
K
M
M
S
S
K
M
 Loading...

