Contents
Limited Warranty .............................................2
30 Day Money Back Guarantee......................... 2
1+2 Limited Warranty..................................... 2
Conditions of 1+2 Limited Warranty.................. 2
Repairs ......................................................... 2
Returns......................................................... 2
Liability Statement ......................................... 2
Proprietary Notice........................................... 2
About This Manual............................................3
Tool Symbols................................................. 3
General Power Tool Safety Warnings ...............4
Work Area Safety........................................ 4
Electrical Safety.......................................... 4
Personal Safety........................................... 4
Power Tool Use and Care.............................. 4
Service...................................................... 5
Specific Safety Rules for Miter Saws.................. 5
Respiratory Exposure Safety Warnings .............. 5
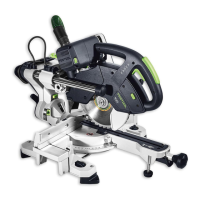
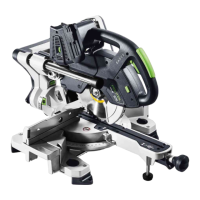
Tool Description ...............................................5
Technical Specifications................................... 5
Intended Use................................................. 6
Functional Description..................................... 6
Setup................................................................8
Setting Up a New Miter Saw............................. 8
Changing Sawblades....................................... 9
Transporting the Saw.....................................10
Dust Extraction .............................................10
Basic Operation..............................................11
Setting the Motor Speed.................................11
Using the Laser Guides...................................11
Power Trigger and Plunge Release................... 11
Using the Hold Down Clamp ........................... 12
Setting the Miter Angle.................................. 12
Setting the Bevel Angle ................................. 13
Using the Auxiliary Fence............................... 13
Setting the Depth Limit.................................. 14
Using the Tall Miter Latch............................... 14
Using the MiterFast Tool ................................ 15
Using the Bed Extensions and Crown Stops ...... 16
Cutting Techniques ........................................17
Miter Cuts.................................................... 18
Bevel Cuts................................................... 18
Depth Limited (Dado/Half-Lap) Cuts................ 19
Compound Miter Cuts.................................... 20
Calculating Compound Angles...................... 21
Compound Angle Calculator ........................ 21
Crown Moulding............................................ 22
Adding Auxiliary Fence Faces.......................... 23
Making a Zero-Clearance Insert ...................... 23
Calibration and Adjustment............................24
Calibrating the Miter Angle............................. 24
Calibrating the Bevel Angle ............................ 26
Calibrating the Lasers.................................... 28
Troubleshooting.............................................29
Optional Accessories......................................30
Sawblades................................................... 30
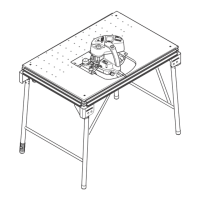
MFT/3-Kapex Table....................................... 31
Bolt Down (Clamping) Kit............................... 31
Crown Stop.................................................. 31
About This Manual
Save These Instructions
It is important for you to read and understand this manual. The
information it contains relates to protecting YOUR SAFETY and
PREVENTING PROBLEMS. The symbols below are used to help you
recognize this information.
WARNING!
Indicates a potentially hazardous
situation which, if not avoided, could
result in death or serious injury.
CAUTION!
Indicates a potentially hazardous
situation which, if not avoided, could
result in minor or moderate injury.
Laser
Radiation
This symbol is used on the machine and
in this manual to signify the possibility of
laser radiation.
NOTICE:
Indicates a potential situation which, if
not avoided, can result in property
damage or damage to the tool.
Note:
Indicates information, notes, or tips for
improving your success using the tool.
Tool Symbols
V Volts
W Watts
Hz Hertz
~ Alternating Current (AC)
n
o
No-load Speed
Ø Diameter
Class II Double Insulated
Designated Danger Zone.
Avoid positioning hands,
fingers, or arms in the area
designated by this symbol.
Supplemental User’s Manual 3

 Loading...