[2-11]
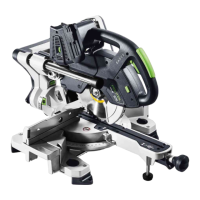
Cable winder with integral carry han
dle
[3]
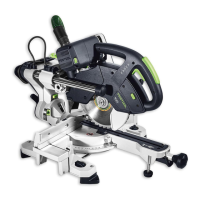
Remove the transport safety device
[4]
Insulated gripping surfaces (grey
shaded area)
The illustrations specified are located at the be
ginning and end of the operating instructions.
6 Operation
6.1 Initial commissioning
WARNING
Unauthorised voltage or frequency!
Risk of accidents
► Observe the specifications on the ma
chine's name plate.
► Observe country-specific regulations.
Ensure that the power tool is securely
positioned. Risk of tipping over. If re
quired, observe the assembly instructions for
the MFT multifunction table or UG-KAPEX KS
60 underframe.
► Remove the transport safety device [3].
▷ Remove the protective sleeve from the
left-hand pulling rail
.
▷ Push the saw unit down, thus breaking
through the cable ties that are securing
it in place
.
▷ Remove the clamp from around the tilt
locking device
.
► Set up the machine and move it into the
working position.
6.2 Setting up and securing [5]
Pull out the mains plug before you carry
out any work on the machine.
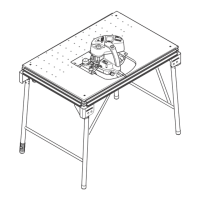
Before securing, if required, install the A-SYS-
KS60 support legs (optional accessory). Thanks
to these support legs, the work surface on the
rotary base is at the same height as a Systainer
1. These Systainers mean that long workpieces
can then be supported [5].
You have the following options for
securing:
Secure the machine in such a way that it cannot
slip when you are working on it.
Screws[5A]: Use four screws to secure the ma
chine to the work surface. Use the holes [5A-1]
at the four support points on the saw table to do
this.
Fastening clamps [5B]: Use fastening
clamps [5B-1] to secure the machine to the
work surface. The support points are used to
firmly secure the machine while taking the cen
tre of gravity into consideration.
Clamping set (for MFT) [5C]: Use the clamping
set [5C-2] to secure the machine onto the Fes
tool MFT 3 or MFT/Kapex (SZ-KS) multifunction
table. The hexagonal holes [5C-1] close to the
table extension on both sides are used for this.
UG-KAPEX KS 60 underframe[5D]: Observe the
installation instructions that are enclosed with
the underframe.
6.3 Transport
CAUTION
Risk of crushing
The saw unit may swing out/extend
► The machine must always be transported
in the transport position that has been pro
vided for this purpose.
Risk of injury! The machine may slip out
of your hands when you are carrying it.
Always carry the machine with both hands, us
ing the carrying handles [6] provided.
Securing the machine (transport position)
► Wind up the mains cable on the cable wind
er [2-11] and use the cable clamp [2-1] to
secure it.
► Move the saw unit into the rear position and
lock it in place using the rotary knob [1-5].
► Swivel the saw unit into a vertical position.
▷ Loosen the star handle [2-9].
▷ Move the saw unit into a vertical posi
tion.
▷ Tighten the star handle.
► Lock the saw unit in place.
▷ Press and hold the safety button [1-2].
▷ Move the saw unit downwards until it
reaches the limit stop.
▷ Pull the lever for the transport locking
device [1-6].
▷ Release the safety button.
The saw unit remains in the lower position.
English
24
 Loading...