additional connections may be required
Passive Arming: This user feature will activate or deactivate the Firstech system passive arming. The
Firstech system is capable of arming itself automatically (not all Firstech systems are capable of passive
arming feature) after a preset period of time has passed which will start once the vehicle is off and all of
the connected zones are closed. (Preset time is selected by the install tech at the time of installation).
NOTE: The Passive arming feature must be enabled on the Firstech CM by the install tech at the time of
installation, additional connections may be required.
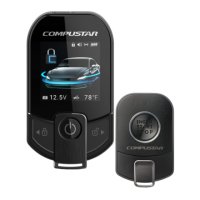
Alarm Alert mode: This remote feature will allow the remote to toggle between “Full” (will receive alarm
notifications when within range of the vehicle) and “Half” (will only receive alerts while remote started)
modes. If you Firstech system is equipped with security, then “full mode” is the recommended setting.
IMPORTANT: when in Full mode the remote battery life between charges will be approx. 30-45 days.
When the remote is in Half mode, the remote battery life between charges can reach up to 60 days.
NOTE: The Proximity function requires the remote to be in full mode.
Valet Mode: This feature will allow the user to activate or deactivate the Firstech system “Valet mode”.
All remote start and security functions of your Firstech system can be disabled at any time by activating
“Valet Mode”. Once in Valet mode your Firstech system will only control the door locking/unlocking
function. If the remote start is attempted the vehicle should respond with an error 10, the vehicle will
flash the parking lights 3 times, then pause then flash 10 more times indicating Valet mode. There are
several ways to enter Valet mode which are in the description above. NOTE: When entering Valet Mode
using the remote the vehicle ignition must be on.
AUX 1 ICON configuration: The AUX 1 Icon displayed when AUX 1 is activated can be set to 1 of the 3
options shown on the remote or may be turned off. NOTE: AUX output configuration must be done at the
time of installation and may require additional parts or connections.
AUX 2 ICON configuration: The AUX 2 Icon displayed when AUX 2 is activated can be set to 1 of the 3
options shown on the remote or may be turned off. NOTE: AUX output configuration must be done at the
time of installation and may require additional parts or connections.
AUX Mode: This will allow the remote to control additional AUX outputs that may be programmed or
configured by the install tech at the time of installation. The remote must have AUX mode enabled in
order to access control of the additional AUX outputs, then disabled to resume normal remote operation.
The additional AUX output activation process can be found in the table listed above.
LCD Language: This remote feature will change the displayed language between English, French, and
Spanish. This will change the alert notifications, actions, responses, and display.