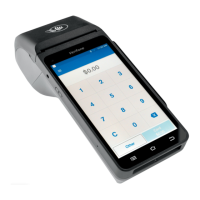
The Verifone Trinity T650c is a versatile payment terminal designed to streamline transaction processing for businesses. This device offers a comprehensive suite of features for accepting various payment methods, managing transactions, and ensuring secure operations. Its user-friendly interface and robust design make it suitable for a wide range of retail and service environments.
Function Description
The primary function of the Trinity T650c is to facilitate secure and efficient payment processing. It supports multiple transaction types, including credit, debit, and contactless payments, ensuring broad compatibility with customer preferences. The terminal is equipped with a high-resolution touchscreen display that guides users through each step of a transaction, from entering amounts to capturing signatures.
One of its core capabilities is the ability to process sales transactions. Users can input transaction amounts, add tips, and select payment methods with ease. The device supports both traditional card insertion (for chip cards) and swiping (for magnetic stripe cards), as well as contactless payments via NFC technology. This multi-modal acceptance ensures that businesses can cater to all common card types and payment preferences.
Beyond basic sales, the Trinity T650c also handles more complex transaction scenarios. It can manage split tickets, allowing customers to divide payments across multiple cards or payment types. The terminal is designed to calculate sales tax automatically, a feature that can be configured during the initial setup. This capability helps businesses accurately apply taxes to sales, reducing manual calculation errors and speeding up checkout times.
The device includes a built-in printer for generating customer receipts. This ensures that a physical record of each transaction is available, which is crucial for both customers and businesses for record-keeping and dispute resolution. The printer is designed for easy paper roll loading, minimizing downtime during busy periods.
For connectivity, the Trinity T650c offers both Ethernet and Wi-Fi options. This flexibility allows businesses to integrate the terminal into their existing network infrastructure, whether through a wired connection for stability or Wi-Fi for mobility. The device supports both dynamic and static IP configurations, accommodating various network setups.
Security is a paramount feature of the Trinity T650c. It is designed to handle sensitive payment information securely, adhering to industry standards for data protection. The terminal prompts cardholders for PIN entry when required, further securing debit transactions. For signature-based transactions, the device allows customers to sign directly on the touchscreen, with a fallback to printed signature lines if the screen times out.
The terminal also includes features for managing and reviewing past transactions. Users can access an "Order History" screen to search for specific transactions, view details, and perform actions such as voids or returns. This functionality is essential for managing customer service requests and reconciling daily sales.
Usage Features
The Trinity T650c is designed for intuitive and straightforward operation, making it accessible for staff with varying levels of technical expertise.
Initial Setup and Configuration:
- Unpacking and Inspection: The first step involves unpacking the terminal and reviewing the packing list.
- Paper Roll Loading: Loading paper into the built-in printer is a simple process. Users locate indentations on the printer cover, pull up to open the tray, place the paper roll, and close the cover. It's important to ensure the paper feeds off the spool towards the bottom of the device.
- Back Cover Removal: To access the connectivity ports, the back cover needs to be removed by pressing a button, sliding it down, and lifting it off.
- Connecting Peripherals:
- Ethernet Connection: For wired internet access, an Ethernet cord is plugged into the "ETH" port.
- PIN Pad Connection: If an external PIN pad is used, its cable is connected to the "USB" port.
- Power Connection: The power cord is inserted into the round port near the lightning bolt symbol.
- Cable Management: All cords are designed to lay flat and feed into provided channel guides before reattaching the back cover, ensuring a tidy and secure setup.
- Powering On: The terminal is powered on by pressing and holding the on/off button on the left side of the unit for 3-4 seconds until the Verifone screen appears.
- Language Selection: Upon startup, a "Welcome" screen prompts the user to select their preferred language before proceeding.
- Network Setup:
- Ethernet (Dynamic IP): If connected via Ethernet, the terminal will automatically detect the connection. Users can then press "Next" to establish the network connection.
- Ethernet (Static IP): For static IP configurations, users select the "Ethernet" option, then "Static" radio button, and manually enter IP address details (IP ADDRESS, GATEWAY, NETWORK PREFIX LENGTH, DNS 1, DNS 2).
- Wi-Fi Connection: For wireless connectivity, the terminal scans for available Wi-Fi networks. Users select their network from the list, enter the password if prompted, and press "Next" to connect.
- Software Updates: After establishing a network connection, the terminal automatically searches for and downloads the latest software and firmware updates. This process may involve multiple reboots and "PLEASE WAIT" screens, ensuring the device is running the most current and secure software.
- Tax Input Setup: A "Setup Tax input" screen allows users to enter their local sales tax rate. This rate is then automatically applied to future transactions, though it can be changed later in the settings.
Transaction Processing:
- Initiating a Sale: Once the terminal is ready, users can initiate a test transaction by clicking "OK" on the "Device is ready to use" screen.
- Entering Amount: The transaction amount is entered using the on-screen keypad.
- Payment Methods:
- Chip Card: Cards with a chip are inserted into the slot at the bottom of the screen.
- Magnetic Stripe Card: Cards without a chip are swiped through the designated reader.
- Contactless Payment: Contactless cards or mobile devices are placed over the top of the screen (NFC area).
- PIN Entry/Signature Capture: Depending on the card type and transaction, the terminal will prompt for PIN entry on the screen or for a signature capture directly on the touchscreen.
- Receipt Generation: After a successful transaction, the terminal prints a receipt. Users should verify the DBA Name, Phone #, and date/time on the receipt for accuracy.
Transaction Management:
- Voiding Transactions: To void a transaction (e.g., a test transaction), users navigate to the "Order History" screen, select the transaction, and choose the "Return/Void" option. This ensures that test charges do not settle.
- Returns: The terminal supports processing returns, allowing users to select full or partial refund amounts and specify a reason.
Maintenance Features
The Trinity T650c is designed with ease of maintenance in mind, focusing on simple procedures to keep the device operational.
- Paper Roll Replacement: The most frequent maintenance task is replacing the paper roll. The design allows for quick and easy access to the paper tray, minimizing disruption during busy periods. The clear instructions for feeding the paper ensure that even new users can perform this task without difficulty.
- Software Updates: The terminal's ability to automatically search for and install software and firmware updates is a critical maintenance feature. This ensures that the device always has the latest security patches, bug fixes, and feature enhancements without requiring manual intervention from the user. The system handles reboots and progress indicators, making the process largely hands-off.
- Connectivity Management: The terminal's flexible connectivity options (Ethernet and Wi-Fi) allow for easy troubleshooting of network issues. If a wired connection is unstable, switching to Wi-Fi can provide an alternative, and vice-versa. The clear display of network status helps in diagnosing connection problems.
- Disposal of Old Terminals: While not a direct maintenance feature of the T650c itself, the guide emphasizes the importance of securely disposing of old terminals and PIN pads according to company policy. This highlights a broader security and maintenance best practice for electronic devices containing sensitive data.
- Batch Settlement: Before installing a new terminal, the guide instructs users to "settle" or "batch out" their existing terminal. This is a crucial maintenance step to ensure all pending transactions are processed and funds are received, preventing financial discrepancies.
- Cleaning: Although not explicitly detailed in the provided text, typically, payment terminals require regular cleaning of the screen and card readers to ensure optimal performance and hygiene. The durable design of such devices usually allows for gentle cleaning with appropriate materials.
- Troubleshooting Support: The guide advises users to contact support if information on the receipt (like DBA Name, Phone #, date, or time) is incorrect, indicating a clear path for resolving operational issues that cannot be fixed through simple user actions. This emphasizes the availability of external support for more complex maintenance needs.