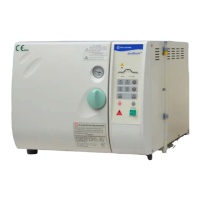
The SterilElite24™ and SterilElite16™ are automatic steam sterilizers designed for laboratory use, offering a reliable and user-friendly solution for sterilizing various items. These autoclaves are table-top units, making them suitable for a range of laboratory environments where space might be a consideration. The design emphasizes ease of operation, with clear indications and automated processes to ensure effective sterilization and minimize user intervention.
Function Description
At its core, the SterilElite autoclave functions as an automatic steam sterilizer. The sterilization process involves several key steps:
- Water Addition: The unit features an auto-fill water system, which automatically adds distilled water to the sterilization chamber. Users are reminded to use only distilled water to prevent damage and voiding the warranty. The water level in the reservoir is monitored, and a "LOW WATER" indicator light will illuminate if the tank needs refilling. It's crucial to ensure the water level stays within the min/max indications to prevent overflow, especially considering that condensate will return to the reservoir after sterilization.
- Heating: Once water is added, the main heater engages, raising the temperature within the chamber. A "HEAT" indicator light illuminates during this phase, which typically takes around 20 minutes.
- Sterilization: When the desired temperature and pressure are reached, the sterilization timer begins its countdown. The "STERI" indicator light illuminates, signifying that the sterilization process is active. The autoclaves offer different sterilization programs, including options for wrapped or unwrapped items and liquid sterilization.
- Exhaust: After the sterilization phase, the "EXHAUST" indicator light illuminates. During this step, the airlock valve opens to release pressure and steam, and water in the chamber is pressed back into the water reservoir. This process continues until the chamber pressure reaches ambient pressure.
- Drying (Optional): If a drying cycle is selected, the "DRY" indicator light illuminates, and the drying process begins. The built-in drying time is fixed at 30 minutes for standard programs. After the drying phase, an acoustic signal (a row of beeps) reminds the user to open the door slightly to facilitate perfect drying results within the sterilization box.
- Completion: The entire sterilization cycle is complete when the "COMPLETE" indicator light illuminates, and the unit enters stand-by mode. A continuous beep of 40 seconds signals completion.
The device incorporates a control panel with various indicator lights and keys to guide the user through the process and provide feedback on the unit's status. An alarm for over temperature or over pressure is also integrated, which will cause the autoclave to shut down immediately, requiring the power plug to be pulled and technical support to be contacted.
Usage Features
The SterilElite autoclaves are designed for straightforward operation, with several features enhancing user experience and safety:
- Program Selection: Users can select from various sterilization programs based on temperature (121°C or 135°C), item type (wrapped or unwrapped), and drying preference (dry or un-dry). A dedicated "LIQUID" program is available for liquid sterilization, which has fixed parameters (121°C, 40 minutes, no dry/exhaust function).
- Control Panel: The control panel includes indicator lights for "POWER," "ADD WATER," "HEAT," "STERI," "EXHAUST," "DRY," "COMPLETE," "DOOR," and "LOW WATER." These lights provide real-time status updates on the sterilization cycle. Keys for "STERI. TEMP," "STERI. ITEM," "LIQUID," "DRY TIMER," "RESET," "START," and "VACUUM RELEASE" allow for program configuration and control.
- Door Mechanism: The door must be closed and the handle turned 90° to latch it completely for operation. A "DOOR" indicator light warns if the door is not properly locked. Crucially, the door cannot be opened if the chamber is under vacuum; the "VACUUM RELEASE" button must be pressed to equalize pressure before opening.
- Safety Interlocks: The system includes safety devices such as a pressure safety valve, over-temperature protection, electric overload protection (15 A circuit breaker), and a pressure protection switch. A micro-switch with an integrated door lock sensor prevents the door from being opened during a cycle if pressure is present.
- Acoustic Signals: The unit provides distinct acoustic signals for the drying phase (short succession of beeps) and cycle completion (continuous beep).
- Sterilization Box: Items to be sterilized are placed in a sterilization box. It is important to ensure items are level and below the edges of the box so the lid can be properly closed. Side vents on the sterilization box should be opened before sterilization for proper steam penetration and closed afterward to prevent contamination. The heater cover and sterilization box must be correctly positioned to ensure proper operation and prevent damage to the heater coil.
- Sterilization Indicators: The manual recommends using sterilization indicator strips with the products to confirm a successful sterilization result.
Maintenance Features
Regular maintenance is crucial for the longevity and proper functioning of the SterilElite autoclaves. The manual outlines daily, weekly, monthly, and yearly maintenance tasks:
- Daily Maintenance:
- Wipe the gasket, chamber rim, and the inside of the chamber and door with a damp cloth. Users are cautioned about hot surfaces.
- Check the water level in the reservoir and replenish with distilled water only.
- Weekly Maintenance:
- Clean the rack and trays.
- Clean the filter at the exhaust port in the chamber.
- Clean the water level sensor in the chamber (located on the aft side, 1 inch above the bottom).
- Exchange the feeding water (distilled water only).
- Monthly Maintenance:
- Empty the water tank and flush it twice with boiling water.
- Refill with distilled water.
- Clean the wire mesh filter at the bottom rear side of the housing.
- Yearly Maintenance:
- Remove, clean, and replace the wire mesh filter at the downside of the case.
- Check the electric wire system, fuse, and connectors.
- Check the tubing system.
- Clean the solenoid valve.
- Check the indication lamps and all cycle functions.
- Check the door gasket (suggestion: replace it per year).
The manual also provides troubleshooting guidance for common issues, such as the power light not coming on, the "LOW WATER" indicator light being on with an alarm, water not returning to the reservoir automatically, and chamber pressure not increasing. These sections offer steps like checking power connections, cleaning sensors and filters, and replacing specific components. Users are advised to contact technical support for more complex issues.
For transportation, it is strongly recommended to retain all original packing material, including the carton, to ensure safe movement of the unit. The re-packing instructions detail how to prepare the autoclave for transport, including draining all water, placing accessories in the chamber, and securing the unit within its packaging.