Instruction Manual
D102005X012
846 Transducer
June 2017
17
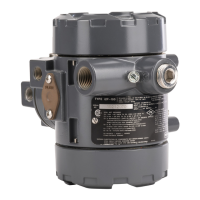
Figure 9. Connecting a Current or Voltage Source for Calibration
ADJUST THE CURRENT
SOURCE TO PROVIDE
THE 4 AND 20 mA
SET POINTS
CALIBRATION USING A CURRENT SOURCE
CALIBRATION USING A VOLTAGE SOURCE
TO OBTAIN THE 4 AND 20 mA
SET POINTS, ADJUST THE
VOLTAGE SOURCE (V
S
) SO
THE VOLTMETER (V
M
) READS
1 AND 5 VOLTS, RESPECTIVELY,
ACROSS THE 250 ohm RESISTOR
A6644‐1
CAUTION
Excessive current can damage the transducer. Do not connect an input current of more than 100 mA to the transducer.
Table 3 lists the various input and output ranges over which the unit may be calibrated.
The input range is selected by changing the position of a jumper located on the electronic circuit board.
Refer to Electronic Circuit Board in the Maintenance section, and figure 18 for the location and instruction on
placement.
Table 3. Fisher 846 I/P Rangeability Matrix
Input
Range
Output Pressure Range (psi) (Performance Code)
Common Ranges Misc. Std. Split High Range Splits
3-15
(S,M)
.5-30
(M)
3-27
(M)
6-30
(M)
5-25
(M)
0.5-6
(S,M)
.5-18
(S,M)
3-9
(S,M)
9-15
(S,M)
.5-15
(S,M)
15-30
(M)
15-27
(M)
6-18
(S,M)
18-30
(M)
5-15
(S,M)
15-25
(M)
4-20 n n n n n D n D D n U U n U n U
4-12
12-20
n
n
n n
J
n
J
n
J
D
D
n
J
D
D
D
D
n
J
U
n
U
n
n
n
U
n
n
n
U
n
4-8
8-12
12-16
16-20
n
n
J
J
n
n
J
J
n
n
J
J
n
n
n
J
n
n
J
J
n
n
J
J
S=Standard Performance Unit
M=Multirange Performance Unit
n=Available in Direct or Reverse Action
D=Available in Direct Action Only
J=Available, but if the desired calibration cannot be achieved by adjusting the zero/span screws, unit may require Hi/Lo jumper to be moved. The jumper is located on the circuit board assembly,
and is usually in the Hi position. Disengaging the master module and moving the jumper to the Lo position will allow calibration to the desired range.
U=Special Build Required.
 Loading...