2 EN-US English
2.1 Thank you!
Thank you for choosing a product from FLIR Systems. We hope that the product
will meet your expectations and that you will consider us again for your future
needs.
2.2 List of contents
• Infrared camera.
• Pouch.
• USB cable.
Note FLIR Systems reserves the right to discontinue models, parts or accesso-
ries, and other items, or to change specifications at any time without prior notice.
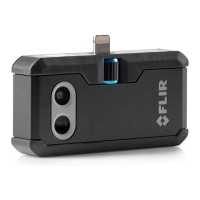
2.3 View from the front
See Figure 1.1 View from the front, page 1.
1. Visual camera.
2. Thermal camera.
3. Phone connector.
4. OneFit height control.
2.4 View from the bottom
See Figure 1.2 View from the bottom, page 1.
1. On/off switch and Power indicator.
2. Charge indicator LED.
3. USB-C power connector.
2.5 Quick start guide
1. Charge the FLIR ONE camera for approximately 1 hour.
2. Download and install the FLIR ONE app on your phone. The app is available
on the Apple App Store and the Google Play Store.
3. Push the On/off button on the bottom of the FLIR ONE camera to turn it on.
The indicator will flash green when the FLIR ONE camera is ready.
4. Connect the FLIR ONE camera to your phone. If needed, adjust the blue dial
of the OneFit and extend the connector to the appropriate length to fit your
phone’s protective case.
#T810402; r. AB/51263/51263; mul 2

 Loading...