INSTALLATION, OPERATION, &
MAINTENANCE MANUAL
TITLE: F7000 / 8000 Series Rev. V
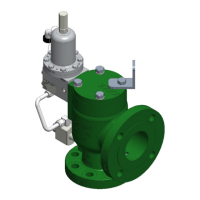
Pilot-Operated Safety Relief Valve Page 24 of 41
17) Low Pressure: Place piston into the spindle spring and over the end of the spindle. Install
diaphragm fastener seal in top of piston and place the diaphragm on top of the piston. Put the
diaphragm washer on top of diaphragm. Place the reducer ring on top of the diaphragm, around
the diaphragm washer.
Intermediate Pressure and High Pressure: Lightly lubricate piston seal and install onto piston.
Place the piston into the spindle spring and over the end of the spindle. Lightly lubricate diaphragm
fastener seal and install it onto diaphragm fastener.
18) Apply a small amount of Loctite (or equivalent) onto the threads of the diaphragm fastener. Tighten
the diaphragm fastener into the top of the spindle using a 3/16” Allen wrench in the bottom of the
spindle and a 9/16” wrench on the diaphragm fastener.
19) All except IM High Pressure: Install inlet screen into bushing. Lightly lubricate bushing seal and
spindle seal and install them into bushing.
IM High Pressure: Install inlet screen into inlet port of body. Lightly lubricate bushing seal, spindle
seal, lower bushing seal, and lower bushing seal backup ring and install them into bushing.
20) Install the bushing into the bottom of the pilot body and tighten securely.
21) Low Pressure: Lightly lubricate diaphragm support ring seal and install it onto top of pilot body.
Intermediate Pressure and High Pressure: Lightly lubricate piston ring seal and install it into piston
ring.
22) Low Pressure: Place the diaphragm support ring underneath the diaphragm and onto the top of the
pilot body. Align the four unthreaded clearance holes in the ring with the four threaded holes in the
pilot body. The small lockwire hole in the ring should overhang the edge of the body where it will
align with a lockwire hole in the bonnet.
Intermediate Pressure: Place the piston ring around piston and onto the top of the pilot body.
Align the four unthreaded clearance holes in the ring with the four threaded holes in the pilot body.
The small lockwire hole in the ring should overhang the edge of the body where it will align with a
lockwire hole in the bonnet.
High Pressure: Place the piston ring around piston and onto the top of the pilot body. Install four
socket head cap screws through ring into body and tighten securely.
23) Apply lubricant to center of each spring washer. Insert the small end of the spring washers into
each end of the spring and place onto top end of diaphragm fastener.
24) Low Pressure and Intermediate Pressure: Place bonnet over spring and down onto top of
diaphragm support ring or piston ring. Align bolt holes in bonnet with the bolt holes in the ring. The
bonnet vent hole should be facing away from the front (mounting face) of the pilot. The lockwire
holes in the bonnet and ring should be aligned.
High Pressure: Place bonnet over spring and down onto top of piston ring. Screw bonnet onto ring
until tight, then adjust position of bonnet until vent hole is facing away from the front (mounting
face) of the pilot.
25) Low Pressure and Intermediate Pressure: Install the short bonnet bolts into the holes aligned with
the threaded holes in the diaphragm support ring or piston ring. Install the long bolts into the holes
aligned with the clearance holes in the ring and into the threaded holes in the body. Snug the
bonnet bolts in an alternating pattern and then gradually tighten them securely in an alternating
pattern.
High Pressure: Apply Loctite to the two set screws, install them into the bonnet, and tighten them
securely.
26) Install the vent / bug screen into the bonnet, ensuring that the male NPT end does not contact the
spring. Apply Teflon tape to threads before installing.
27) Assemble the PA screw and lock nut into the top of the bonnet.
28) Attach the cap to the PA screw, but do not tighten.
29) Install the face seals onto the external mounting face of the body.
30) The pilot valve is now completely assembled and ready to be set per Section 5.0.
31) If applicable, install lockwire and lead seal between PA screw cap, bonnet and inlet bushing.
Repair tag may be attached to wire.
 Loading...