INSTALLATION, OPERATION, &
MAINTENANCE MANUAL
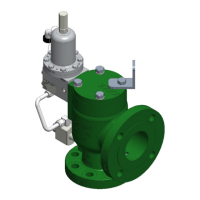
TITLE: F7000 / 8000 Series Rev. V
Pilot-Operated Safety Relief Valve Page 16 of 41
4.2 F200 PILOT VALVE (See Illustrations on Page 17)
A. F200 Disassembly
CAUTION: It is extremely dangerous to attempt to disassemble any valve while it remains in
service with incoming line pressure.
1) Remove the pilot valve from the main valve, or safely block the incoming pressure before
disassembling the valve and performing maintenance.
2) Unscrew the pressure adjustment (PA) screw cap from the PA screw. Loosen the lock nut.
3) Loosen, but do not remove the pressure adjustment screw from the bonnet.
4) Further disassembly can proceed in the reverse order from the below assembly instructions.
5) Replacement soft goods are listed in Section 8.0 of this manual.
B. F200 Assembly
NOTE: Exercise care in handling softgoods, nozzles, and other sealing surfaces.
1) Confirm pressure setting and associated parts required.
2) Place the valve body in a vise.
3) Place the seat onto the seating surface of the upper spindle.
4) After applying Vibra-tite to upper spindle threads, install upper spindle w/seat into upper piston and
tighten. Check to ensure that seat is correctly retained and is not misaligned.
5) Lightly lubricate the upper nozzle seal with Dow Corning Molykote 33 or equivalent, and install it
into the groove on the upper nozzle.
6) Place upper spindle / piston assembly onto upper nozzle and check for adequate seat squeeze.
7) Install upper spindle / piston / nozzle assembly into the valve body using a 5/16 wrench and
tighten. Check to ensure that the upper spindle / piston moves freely in the valve body.
8) Install inlet screen into the bushing or body (for ‘IM’ style).
9) Install seat onto the lower retainer.
10) Insert lower retainer / seat into the lower piston.
11) Insert lower retainer / piston assembly into the bushing.
12) Install the lower nozzle into the bushing and tighten.
13) Assemble jam nut and bushing seal onto the lower nozzle / bushing assembly. For IM
construction, also install ‘IM’ bushing O-ring onto the OD of the bushing.
14) Place the spacer into the opening of the lower nozzle / bushing assembly.
15) Install spacer / lower nozzle / bushing assembly into valve body, ensuring that the spacer enters
the opening of the previously installed upper piston / spindle / nozzle assembly.
16) Install pipe plugs into valve body as shown in the illustration. For optional manual blowdown,
replace 3/8” NPT plug with reducing bushing and 1/4” NPT ball valve.
17) Assemble spring and spring washers onto the upper spindle top which protrudes through the valve
body.
18) Install bonnet over spring / washers and onto valve body and tighten. For the high-pressure model,
also install the bonnet cap and set screw.
19) Assemble lock nut onto the pressure adjustment (PA) screw and then install the PA screw into the
bonnet.
20) Attach the cap to the PA screw but do not tighten.
21) Install backflow preventer (BFP) O-ring onto BFP piston.
22) Insert BFP piston assembly into valve body.
23) Install BFP body and face seals into valve body.
24) The pilot valve is now completely assembled and ready to be set per Section 5.0.
25) If applicable, install lockwire and lead seal. Repair tag may be attached to wire.
 Loading...