PREPARATION
INSTALLATION
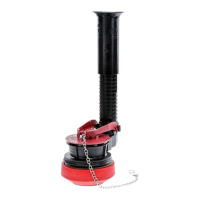
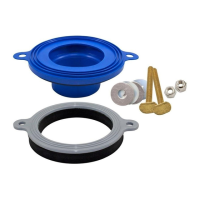
7530
TOILET SEAL KIT
BETTER
THAN WAX™
PART# 7-1338, Grev. 3, 06/19
Prepare
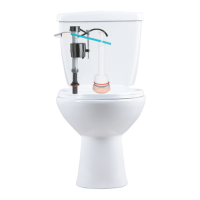
Remove toilet.
Clean flange and bottom
of toilet by scraping off
wax with putty knife and
wiping clean. No wax
residue should remain.
Remove and Install
A. Remove old bolts.
B. Install new bolts by placing bolt heads in flange
slots. Slide to secure.
C. Slide plastic washers down to base of bolts to
hold bolts upright for installation.
Toilet Install
A. Position toilet over seal, guiding holes in toilet
base over bolts.
Note: Toilet can be repositioned on seal, if
needed, unlike traditional wax rings.
B. Install metal washers & hex nuts. Apply downward
pressure to bowl while tightening hex nuts (alternate
sides while tightening).
Caution: Do not overtighten; bowl or flange may
crack. May need to cut bolts with hacksaw to replace
toilet bolt caps.
Check
Flush toilet and
check for leaks.
3 4
6 7
1. Determine if flange is above, even with, or
below floor. If flange is below floor, use ruler to
determine flange depth.
2. Proceed to corresponding step for your flange
height.
5B. Flange Even With or Up To 1/4” Below Floor
1. Install spacer over flange by sliding bolt holes over
bolts.
IMPORTANT- Foam side of spacer must face
down as pictured or leaks may occur.
2. Install seal on top of spacer by sliding bolt holes
over bolts.
3. Proceed to Step 6.
5C. Flange More Than 1/4" Below Floor
(For a flange depth greater than 1/2” a flange extender is
required)
1. Install spacer over flange by sliding bolt holes over bolts.
IMPORTANT- Foam side of spacer must face down as
pictured or leaks may occur.
2. Install two seals (2nd seal purchased separately) on top of
spacer by sliding bolt holes over bolts.
3. Proceed to Step 6.
If questions or
concerns please
call Fluidmaster at
1-800-631-2011
M-F 5:30am - 5:00 pm (PST)
30800 Rancho Viejo Rd.,
San Juan Capistrano, CA 92675
www.fluidmaster.com
800.631.2011
M-F 5:30 am - 5:00 pm (PST)
5A. Flange Above Floor
1. Remove spacer from seal. Spacer will not be used for above floor
installs and can be discarded.
2. Install seal over flange by sliding bolt holes over bolts.
3. Proceed to Step 6.
Determine Flange Height
5
Rubber Seal Installation
Limited 10 Year Express Warranty
For complete warranty details, please visit our website at www.fluidmaster.com
DO NOT USE IN-TANK DROP-IN TOILET BOWL CLEANERS CONTAINING BLEACH OR CHLORINE. Use of
such products will: (1) RESULT IN DAMAGE to tank components and MAY CAUSE FLOODING and PROPERTY
DAMAGE and (2) VOID FLUIDMASTER WARRANTY.
Fluidmaster Flush 'n Sparkle Toilet Bowl Cleaning System is recommended for those choosing to use
in-tank bowl cleaners and WILL NOT VOID the FLUIDMASTER WARRANTY because it will not damage the
components. DO NOT overtighten nuts or tank/bowl may crack. Always use quality Fluidmaster parts when installing or repairing.
Fluidmaster will not be responsible or liable for use of non-Fluidmaster parts during installation or repair.
WARNING
1 2
(1) Rubber Seal
(1) Slide-on Spacer
(2) Brass Bolts
(2) Hex Nuts
(2) Metal Washers
(2) Plastic Washers
PARTS IN THIS KIT:
Toilet
Flange
Before you begin, watch
our installation video:
http://opn.to/a/TG5QP
RUBBER
SEAL
SLIDE-ON
SPACER
(Optional)
TOOLS NEEDED
Putty Knife
(Optional)
Wrench Hack Saw
(Optional)
Ruler
Plastic
Washer
C
Bolt
holes
2
B
B
Proceed to
Step 5A.
Above
Proceed to
Step 5B.
Even with or up
to 1/4” below
Proceed to
Step 5C.
More than 1/4”
below floor
Ruler
1
B
Seal
Spacer
1
Spacer
Foam side
down
Bolt
holes
1
A
Spacer
Foam side
down
Bolt
holes
1
Seal Bolt
holes
2
2
SCAN HERE!