Model 187 & 189
Getting Started
4
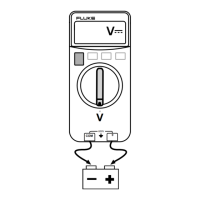
Rotary Switch
Turn the meter on by selecting any measurement function
(identified with white letters around the rotary switch). The
meter presents a standard display for that function
(range, measurement units, modifiers, etc.) The display
may also be influenced by some of the choices made in
Setup.
Use the blue button to select any rotary switch alternate
function (labeled in blue letters). You can also use other
buttons to choose modifiers for the selected function.
When you turn the rotary switch from one function to
another, a display for the new function appears. Button
choices made in one function do not carry over into
another function.
With Model 189, a VIEW MEM switch position is
available.
Each position is described in Table 1.
Pushbuttons
The buttons activate features that augment the function
selected with the rotary switch. The buttons are described
in Table 2.
Use the blue button ( %) to access functions labeled in
blue for some of the rotary switch positions. Table 1
defines all blue button functions.
Use the yellow button ( O) followed by other buttons
to access additional features. These features appear in
yellow above the appropriate keys. Table 2 defines yellow
button features. This manual identifies the yellow button
feature in parentheses following the button sequence .
For example, activating the FAST MN MX mode appears
as O M (FAST MN MX).
The following yellow button features are not available on
Model 187:
(
YES),
(
NO), (LOGGING), and (SAVE).

 Loading...