Do you have a question about the Fluke 101 and is the answer not in the manual?
Provides contact details and website for Fluke Corporation support and registration.
Explains the function of the common (return) and input terminals on the multimeter.
Explains the automatic power-off function and how to disable or restart the product.
Details how to use the HOLD function to freeze readings and avoid electrical shock hazards.
Step-by-step guide on connecting the multimeter and measuring AC and DC voltage values.
Instructions for measuring electrical resistance using the multimeter, ensuring power is disconnected.
Explains how to activate and interpret continuity tests, including beeper feedback for short circuits.
Procedure for testing diodes, including connecting probes and reading forward bias voltage.
Steps to measure capacitance, including connecting probes and allowing readings to stabilize.
Guide for measuring frequency and duty cycle using the multimeter's Hz function.
Outlines cleaning instructions for the multimeter case and advises against abrasives or solvents.
Illustrates the process for safely opening the product and replacing the batteries.
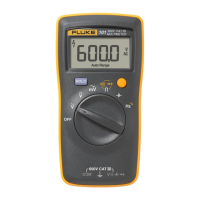
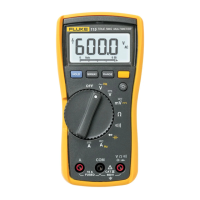
The Fluke 101 Digital Multimeter is a battery-powered, 6000-count instrument designed for a variety of electrical measurements. Its digital display provides clear readings, making it suitable for both professional and general use.
The Fluke 101 is capable of performing several key electrical measurements:
AC and DC Voltage Measurement: The device can measure both alternating current (AC) and direct current (DC) voltages. Users can select the appropriate mode (AC Volts, DC Volts, or AC millivolts) using the rotary switch. To take a measurement, the red test lead is connected to the VΩ→+ terminal and the black test lead to the COM terminal. Probes are then touched to the test points of the circuit, and the voltage is read on the display.
Resistance Measurement: The multimeter can measure resistance. Before measuring, it's crucial to ensure power is disconnected from the circuit. The rotary switch is set to the Ohms position, and the test leads are connected as for voltage measurement (red to VΩ→+ and black to COM). The resistance is measured by touching the probes to the desired test points, and the value is displayed.
Continuity Test: This function is used to check for a continuous electrical path. With the resistance mode selected, the YELLOW button is pressed once to activate continuity mode. If the resistance is less than 70 Ω, a beeper sounds continuously, indicating a short circuit. If the display shows "OL," the circuit is open.
Diode Test: The device can test diodes. To activate this mode, the rotary switch is set to the Ohms position, and the YELLOW button is pressed twice. The red test lead connects to the VΩ→+ terminal and the black test lead to the COM terminal. The red probe is then connected to the anode and the black test lead to the cathode of the diode. The forward bias voltage value is displayed. If the test leads' polarity is reversed relative to the diode's polarity, the display will show "OL," which helps distinguish the anode and cathode sides.
Capacitance Measurement: The Fluke 101 can measure capacitance. The rotary switch is turned to the capacitance symbol. Test leads are connected (red to VΩ→+ and black to COM), and the probes are touched to the capacitor leads. Users should allow the reading to stabilize for up to 18 seconds before reading the capacitance value on the display.
Frequency and Duty Cycle Measurement: The multimeter can measure both frequency and duty cycle. To measure frequency, the rotary switch is set to the Hz % position. Test leads are connected (red to VΩ→+ and black to COM), and the probes are touched to the circuit's test points. The frequency is then read on the display. To measure duty cycle, the rotary switch is again set to Hz %, and the YELLOW button is pressed to switch to the duty cycle function. After connecting the test leads as before, the probes are touched to the circuit, and the percent of duty cycle is read.
The Fluke 101 is designed with user convenience in mind, incorporating several features to enhance its usability:
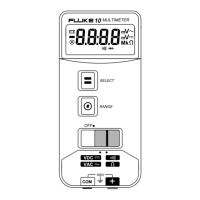
Digital Display: The clear digital display shows measurement values and various indicators such as "HOLD," "%," "MkΩ," "Hz," "nF," "mV," "V," "A," "DC," "AC," "Auto Range," and a low battery indicator. This comprehensive display ensures that users have all necessary information at a glance.
Rotary Switch: A central rotary switch allows for easy selection of different measurement functions, including Power Off, AC Volts, DC Volts, Ohms (with shift for continuity and diode test), Capacitance, and Frequency (with shift for duty cycle).
Data Hold Function: The "HOLD" button allows users to freeze the current reading on the display. This is particularly useful when taking measurements in hard-to-reach areas or when needing to record a value without immediately looking at the display. A warning is provided to prevent using this function for unknown potentials, as the display will not change even if the potential does.
Auto Power Off: To conserve battery life, the Product automatically powers off after 20 minutes of inactivity. It can be restarted by turning the rotary switch to the OFF position and then to a desired measurement position. This feature can also be disabled by holding down the YELLOW button during power-on until "Poff" appears on the display.
Shift Function (YELLOW Button): The YELLOW button serves as a shift key, allowing access to secondary functions associated with certain rotary switch positions, such as continuity and diode test under the Ohms setting, and duty cycle under the Frequency setting.
Maintaining the Fluke 101 is straightforward, focusing on battery replacement and general cleaning to ensure longevity and accurate readings:
Battery Replacement: The manual provides clear instructions and an illustration for replacing the batteries. The device uses 2 AAA, IEC LR03 batteries. The battery door and specific Fluke part numbers for replacement batteries are listed. A low battery indicator on the display alerts the user when batteries need to be changed.
General Maintenance: The Product's case should be periodically wiped with a damp cloth and mild detergent. Abrasives or solvents should not be used. Keeping the terminals free from dirt or moisture is important, as these can affect measurement readings.
Service and Parts: In case of product failure, users are advised to first check the batteries and then review the manual to ensure correct operation. A list of replacement parts, including batteries, battery door, test leads (TL175), and screws, along with their respective Fluke part numbers, is provided.
Calibration Cycle: The recommended calibration cycle for the Fluke 101 is 12 months, ensuring continued accuracy over time.
Safety in Maintenance: The manual emphasizes safety during maintenance, warning users to remove input signals before cleaning and to use only specified replacement parts. It also states that only an approved technician should repair the Product. If the batteries leak, the Product should be repaired before use to ensure safe operation.
| Display Type | Digital |
|---|---|
| True RMS | No |
| DC Voltage Range | 0.1 mV to 600 V |
| AC Voltage Range | 0.1 mV to 600 V |
| DC Current Range | Not available |
| AC Current Range | Not available |
| Resistance Range | 0.1 Ω to 40 MΩ |
| Continuity | Yes |
| Diode Test | Yes |
| Display | 6000 counts |
| Safety Rating | CAT III 600 V |
| Battery Type | 2 x AAA |
| Weight | 160 g |