www.fmiproducts.com
124387-01D18
FIREBRICK WALLS
IMPORTANT:Installationofbrick
should be done after the re-
placeisplacedinapermanent
location.
1. The rebox is shipped with the rebrick
wall retaining brackets preinstalled. There
are a total of six (6) brackets. Remove
these brackets before installing any of the
rebrick walls.
2. Place the hearth into the rebox. This
may require two people. The hearth is
wider than the replace opening and will
need to be tilted to get it inside the rebox.
The ash lip needs to be pulled all the way
forward toward the front of the rebox.
3. It is critical the hearth is center in the
replace before installing any of the other
rebrick walls. There are four slots on the
rebox oor. These slots (two on the left
and two on the right) will be visible when
the hearth is center. Cover the hearth with
a piece of cardboard for protection during
the rest of installation of the rebrick walls.
Hearth
Right Face
Slot
Figure 27 - Slots for Firebrick Walls
Figure 26 - Installing Leading Bricks
INSTALLATION
Continued
4. Install the left and right leading bricks.
Set the rebrick wall on the hearth with
the sheet metal side toward the rebox
surround. The bricks will be ush with the
face of the replace. Secure with screws
provided as shown in Figure 26.
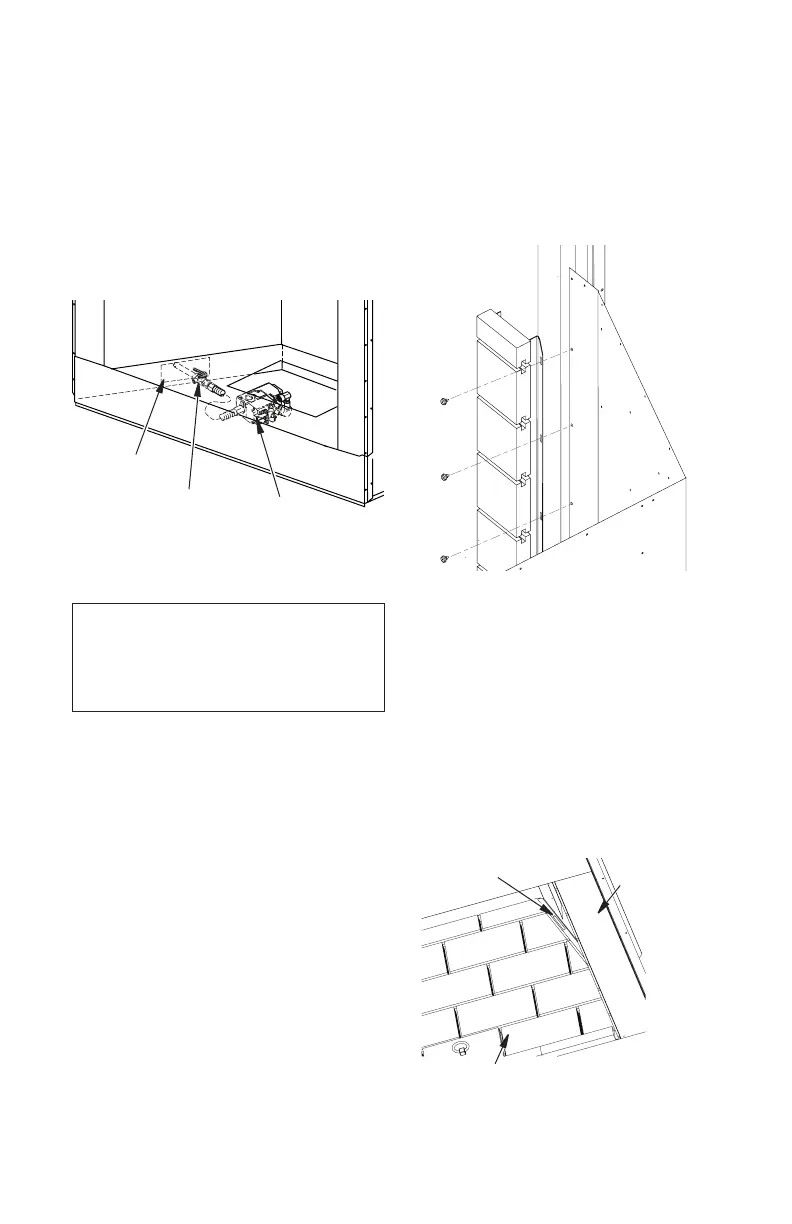
Figure 25 - Installing Gas Line
Gas Line
Opening
Equipment
Shutoff Valve
Valve on
Module
Install incoming 1/2" gas line (as permitted
by local codes) through the gas line opening
on left or right side of the replace chassis
(Figure 25). The pipe should extend to around
the middle of the replace in order to be long
enough to connect to the exible gas line
with shut off valve that is supplied with the
log/burner module. Prepare incoming gas
line with teon tape or pipe joint compound.
5. Install the left and right rebrick walls.
There is a bracket with 2 tabs on the
bottom of each rebrick wall. Angle the
wall into the replace opening and into
the slots on the side of the hearth (Figure
27), then tilt the top of the panel toward
the rebox surround.
6. Secure the rebrick wall using 2 of the
retainers provided. The bracket will slip
underneath the metal lip on the top of the
wall and screw into the inner dome of the
replace (Figure 28, page 19).