EasyManuals Logo

Frigidaire MWV150KB User Manual

Frigidaire MWV150KB
72 pages
To Next Page IconTo Next Page
To Previous Page IconTo Previous Page
Page #44 background imageLoading...
Page #44 background image
Instrucciones de instalación
C1.
1
2
C
NOTAS IMPORTANTES:
RECIRCULACIÓN (Sin Conducto De Extracción)
DESCRIPCIÓN GENERAL DE LA INSTALACIÓN
C1. Montaje de la placa de instalación en la pared
C2. Preparación del gabinete superior
C3. Verificación del conjunto del Placa del Ventilador
C4. Instalación del horno microondas
C5. lnstalación o cambiar del filtro de carbón
Asegúrese de que los tornillos del motor del ventilador y la
placa del ventilador queden firmemente apretados al volver a
instalarlos. Esto ayudará a prevenir el exceso de vibraciones.
Asegúrese de que el cableado del motor quede debidamente
orientado y asegurado, y que los cables no queden atrapados.
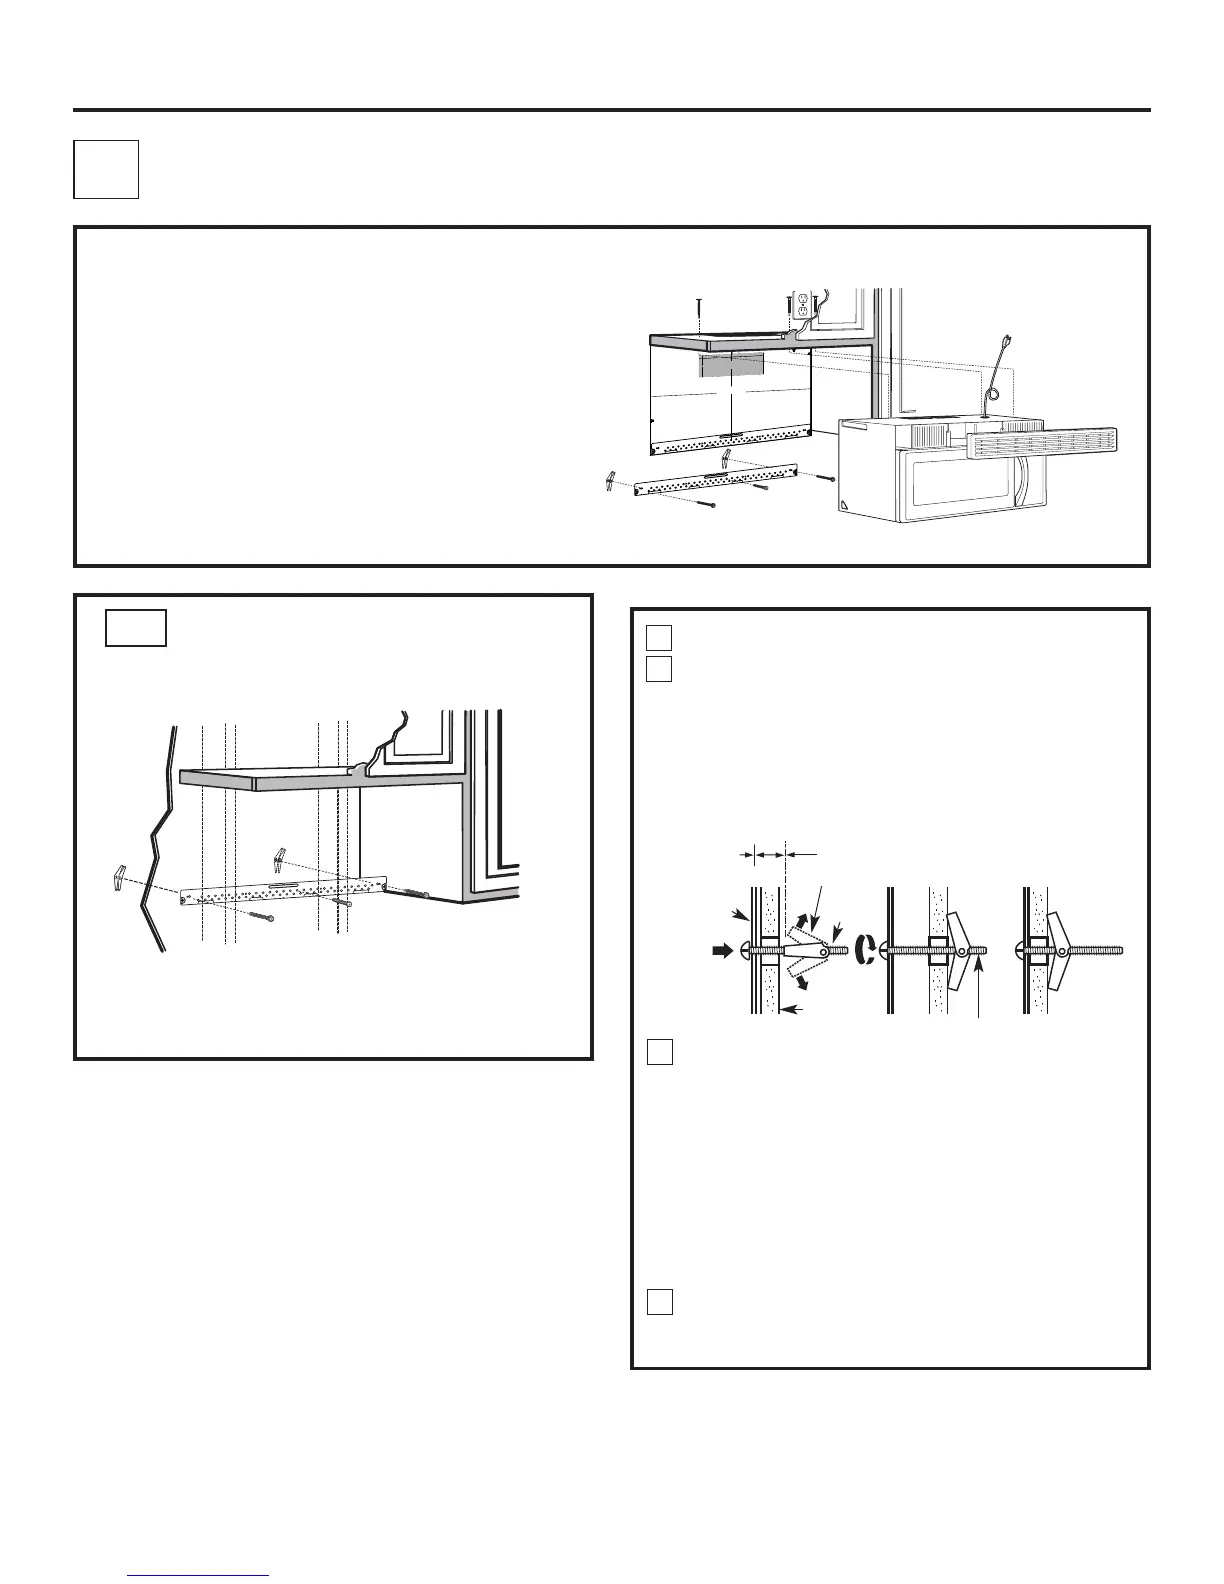
Fije la placa en la pared con los tornillos de fiador.
Al menos un tornillo para madera debe ser utilizado para
fijar la placa a una viga de la pared.
MONTAJE DE LA PLACA DE
INSTALACIÓN EN LA PARED
Quite las tuercas de mariposa de los tornillos.
Inserte los tornillos en la placa de instalación, a través de los
agujeros taladrados en las partes de la pared que no son
viga (los paneles) y vuelva a insertar las tuercas de mariposa
hasta 3/4” (19 mm) de cada tornillo.
3
4
Pared
Mounting
Plate
El espacio que ocupan los tornillos
fiadores es superior al grueso de la pared
Extremo de tornillo
Tornillo
fiador
Tuercas de mariposa
Para utilizar tornillos de fiador:
Coloque la placa de instalación contra la pared e inserte las
tuercas de mariposa en los agujeros de la pared, a fin de
instalar la placa.
NOTA: Antes de apretar los tornillos de fiador y el tornillo para
madera, asegúrese de que las lengüetas de la placa de
instalación toquen la parte inferior del gabinete cuando sean
empujadas a ras contra la pared, y que la placa quede
debidamente centrada bajo el gabinete.
PRECAUCIÓN: Tenga cuidado de evitar que sus dedos queden
atrapados entre la parte trasera de la placa de instalación y la
pared.
Apriete todos los tornillos. Tire de la placa alejándola de la
pared, a fin de que resulte más fácil apretar los tornillos.
SP-20
3
/
8"
T
O
E
DGE









































NOTE
:
IT
IS VER
Y IMPO
RT
ANT
T
O
READ AN
D F
O
LLOW
THE
DIRECT
I
O
NS
IN T
HE INS
T
ALLAT
IO
N
I
NSTRU
CT
IO
NS
BEF
O
R
E PRO
C
EEDI
NG
W
IT
H T
HIS
REAR W
A
LL TEMP
L
A
T
E
.
Th
is Re
a
r
Wa
ll
Te
mp
la
te
se
rve
s
t
o
p
o
sit
io
n
t
h
e
b
o
tto
m
mo
u
n
tin
g
p
l
a
t
e
a
n
d
t
o
lo
ca
te
th
e
h
o
riz
o
n
t
al e
xh
a
u
s
t
o
u
t
le
t
.
1
.
Use
a
le
v
e
l
to
c
he
ck
t
h
a
t
t
h
e
te
mp
la
t
e i
s
p
o
sit
io
n
e
d
a
cc
u
ra
t
e
ly.
2
.
L
o
ca
t
e
a
n
d
ma
rk
a
t
l
e
a
st o
n
e
s
tu
d
o
n
th
e
le
f
t
o
r
r
i
g
h
t
sid
e
o
f
th
e
ce
n
te
rlin
e
.

I
t
is
imp
o
rta
nt
to
u
s
e
a
t
le
a
st
o
n
e
wo
o
d
scre
w
mo
u
n
te
d
f
irmly
in
a
st
u
d
to
su
p
p
o
rt
t
h
e
we
ig
h
t
o
f
t
h
e
micro
wa
v
e
.
Ma
rk
t
wo
a
d
d
itio
n
a
l,
e
v
e
n
ly
sp
a
ce
d
lo
c
atio
n
s
fo
r t
h
e
su
p
p
lie
d
t
o
g
g
le
b
o
lts
.
3
.
Drill
h
o
le
s
in
th
e
ma
rke
d lo
c
a
t
io
n
s
.
Wh
e
re
t
h
e
re
i
s
a
s
tu
d
,
d
r
ill
a
3
/
1
6
"
h
o
l
e
fo
r w
o
o
d
sc
re
ws.
F
o
r
ho
le
s
th
a
t
do
n
o
t
lin
e u
p
wit
h
a
st
u
d
,
d
rill
5
/
8
"
h
o
l
e
s
f
o
r
to
g
g
le
b
o
lt
s.

DO
NO
T
I
NS
TA
L
L
TH
E
M
O
U
NTIN
G
P
L
A
TE
A
T
T
HIS
TI
ME
.
4
.
Re
mo
ve
t
h
e
t
e
mp
l
a
t
e
f
ro
m
t
h
e
re
a
r w
a
ll.
5
. Re
vie
w
th
e
I
n
s
ta
lla
t
io
n
In
st
ru
ct
io
n
b
o
o
k
f
o
r
y
o
u
r
in
st
a
lla
t
io
n
situ
a
t
io
n
.
Loc
ate
and
mark
hol
es to
al
i
gn wi
t
h hol
es
i
n the
mount
i
ng pl
ate.
IMPO
RT
ANT
:
LO
CA
T
E AT
LEAST
O
NE
STUD O
N
EI
T
HER SIDE
O
F
TH
E
CENT
ERLI
NE.
MARK T
HE
LO
CA
T
IO
N F
O
R
2 ADDIT
IO
N
AL, EVENLY
SPACE
D TO
G
GLE
BO
LT
S
IN TH
E
MO
UN
T
ING
PLATE
AREA.
Loc
ate and
mark hol
es to
al
i
gn
wit
h hol
es
i
n
the
moun
ti
ng pl
ate.
IMPO
RT
A
NT
:
LO
CA
T
E AT
LEAST
O
NE
STUD
ON EI
THE
R SIDE
O
F
TH
E
CENT
ERLIN
E.
MARK T
H
E
LOCA
TIO
N F
O
R
2 ADDIT
ION
AL, EVENLY
SPACED T
O
G
G
LE
BO
LT
S
IN
T
H
E
MO
UNT
ING
PLAT
E
AREA.
Trim
th
e rear
w
all t
em
p
lat
e al
on
g
t
h
e d
o
t
ted
lin
e.
Trim
th
e rear w
all
t
em
p
late a
l
on
g
t
he
d
otted
lin
e.















1
2
"
4
"
D
a
r
le
v
ue
l
t
a
a
la
ho
ja
par
a
c
on
s
u
lt
a
r
la
v
e
r
s
n
e
n
Es
p
a
ño
l.

Table of Contents

Questions and Answers:

Question and Answer IconNeed help?

Do you have a question about the Frigidaire MWV150KB and is the answer not in the manual?

Frigidaire MWV150KB Specifications

General IconGeneral
BrandFrigidaire
ModelMWV150KB
CategoryMicrowave Oven
LanguageEnglish

Related product manuals