6-1. Terminal Connection Diagram (Without alarm functions 8-pin socket)
Thermocouple
Universal input
–
+
A
B
B
–
+
+
–
CurrentVoltage
Process value input
(When the 5th code is “A”)
RTD*
1
Universal input
RTD
CurrentVoltage
(When the 5th code is “N”)
–
+
A
B
B
–
+
+
–
Thermocouple
*
1
Control output 1
SSR drive
output
Relay
output
Current
output
–
+
–
+
50/60Hz*
2
50/60Hz*
2
100 to 240V
AC
24V
DC/AC
Power supply
*1: The terminal layout differs from that of PXW4/PXZ4/PXV4.
6-2. Terminal Connection Diagram (With alarm functions 11-pin socket)
Process value input
–
+
–
+
Control output 1
SSR drive
output
Relay
output
Current
output
Alarm output
Common
Alarm output1
(AL1)
Alarm output2
(AL2)
50/60Hz*
2
50/60Hz*
2
100 to 240V
AC
24V
DC/AC
Power supply
(When the 5th code is “N”)
Thermocouple
Universal input
RTD
CurrentVoltage
–
+
A
B
B
–
+
+
–
*
1
(When the 5th code is “A”)
Thermocouple
Universal input
–
+
A
B
B
–
+
+
–
RTD*
1
CurrentVoltage
*2: Check the power supply voltage before installation.
6. Wiring
5. Installation and Mounting
5-1. External Dimensions (unit: mm)
48
48
Panel
Panel thickness 1 to 8
mm*
44.8
44.8
92.4
78.2
85.7
71.5
7.7
1
44.8
57
48
Mounting bracket
Packing
* :KHQXVLQJWKHSDUDPHWHUORDGHUZLWK3;)EHLQJPRXQWHGRQDSDQHOWSDQHOWKLFNQHVVW
5-2. Panel Cut Dimensions (unit: mm)
+0.5
a 0
73 or more
63 or more
45 0
+0.5
Number
of units
23456
93 141 189 237 285a
Side stick mounting (n units)
45 0
+0.5
45 0
+0.5
●
Panel cut dimensions should also meet the above dimensions after the panel is coated.
●
Cautions when Side stick mounting:
In this installing, the waterproof of PXF is lost.
When the power supply is 200 V AC, keep the maximum ambient temperature at 45°C. (We recommend use of a fan, as a heat
radiating measure.)
If any equipment or walls which have a depth of 70 mm exist around this instrument, keep a clearance of at least: 30 mm on the
both sides, 50 mm below, 30 mm above.
7-1. Operation keys
Operation keys
Key Name Allows you to…
USER
●
switch between SV and MV, in the operation mode or during standby.
●
return to the operation mode from the parameter setup mode.
SEL
●
enter the parameter setup mode from the operation mode or standby.
●
finish selecting and save change.
LEFT
●
move the digit when you editing the numerals.
UP
●
change the set value when PXF is in the operation mode or standby.
●
select a parameter in the parameter selection mode.
●
change a parameter setpoint in the parameter editing mode.
DOWN
7. Part names and functions
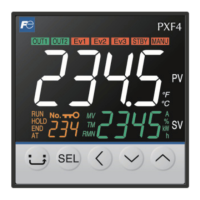
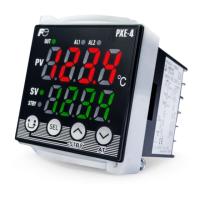
7-2. Display
(1)
(2) (3) (4) (5)
(6)
(7)
(8)
(9)
(10)
(11)
(12)
(1) Process variable (PV)
●
Indicates the measured value.
●
In the Operation control mode and the Setup mode, the
parameter name is displayed.
●
In the Channel selection mode, the channel number is
displayed.
(2) OUT1 indicator
Lights during control output is ON.
(3) EV1, EV2 indicators
Lights during digital output 1 to 2 are ON.
(4) STBY indicator
Lights during standby.
(5) MANU indicator
Lights during manual mode.
(6) °C/°F indicator
Shows the temperature unit under use.
(7) A, % indicator
Sho
ws the unit being applied to values on SV screen
during the
operation mode.
(8) Set Value (SV)/Manipulated variable (MV)
Indicates the set value or the manipulated variable. The
MV indicator lights during MV display.
(9) Screen No.
Shows screen No. when in parameter setting.
(10) AT indicator
Lights during auto tuning.
(11) RUN/HOLD/END indicators
Lights during ramp/soak operation.
(12) Lock indicator
Lights during key lock.
4. Specifications
Power supply voltage
●
100 (-15%) to 240 (+10%) V AC, 50/60 Hz
●
24 (±10%) V DC/AC, 50/60 Hz
Power consumption 10 VA MAX. (100 to 240 V AC), 5 VA MAX. (24 V DC/AC)
Control output Relay contact output
●
1 SPDT contact, 250 V AC/ 30 V DC, 5 A (resistive load)
SSR drive output (voltage pulse output)*
●
ON voltage: 12 V DC (10.7 to 13.2 V DC)
●
OFF voltage: 0.5 V DC or lower
●
Maximum current: 20 mA DC
●
/RDGUHVLVWDQFHȍ0,1
Current output
●
0 to 20 mA DC/4 to 20 mA DC
●
Accuracy ±5%FS
●
/RDGUHVLVWDQFHȍ0$;
Process value input Accuracy
●
Thermocouple input: 0.5
%
FS±1digit±1
°C
*except: Thermocouple B: 0 to 400°C: no accuracy assurance
Thermocouple R: 0 to 500°C: 1
%
FS±1digit±1
°C
Other thermocouples: -200 to -100°C: ±2°C ±1 digit
●
RTD: either ±0.8°C ±1 digit or ±0.2% ±1 digit, whichever is larger
●
mV input, voltage input, current input: ±0.3%FS ±1 digitmV
* Note that the sensor should be sufficiently warmed up to secure the accuracy.
Alarm output Relay contact output (AL1 to AL2)
●
1 SPST contact, 250 V AC/30 V DC, 1 A (resistive load)
Loader interface TTL Level
●
Connection method: dedicated cable
●
Communication method: Half-duplex bit serial, asynchronous communication
●
Transmission rate: 38400 bps, no parity
●
Protocol: Modbus RTU compatible
Storage temperature and humidity
-20 to 60°C, 90%RH or less (no condensation)
Operating temperature and humidity
-10 to 50°C, 90%RH or less (no condensation)
Altitude
up to 2000 m
Recommended fuse
250 V AC, 0.1A T(Time-Lag) for 100 to 240 V AC Power supply,
400 V DC/AC, 1 A T(Time-Lag) for 24 V DC/AC Power supply
Service life
Service life: 10 years (at an average temperature of 25°C)
The life is shortened by half when the temperature rises by 10°C (Arrhenius’ law). If you
use the controller inside a cabinet or the like, please note that the ambient temperature
can rise.
* The following table shows the difference of outputs among other micro-controller X series models.
SSR driving output Allowable load resistance for
4 to 20mA DC output
Voltage Maximum current
PXR3 15 V DC 20 mA 100WRȍ
PXR4/5/7/9 24 V DC 20 mA 600 ȍRUOHVV
PXV3 5.5 V DC 20 mA 600 ȍRUOHVV
PXV/W/Z 24 V DC 20 mA 600 ȍRUOHVV
PXF 12 V DC 20 mA ȍRUOHVV
 Loading...