EasyManua.ls Logo

Fuji Electric PXG9 User Manual

Fuji Electric PXG9
20 pages
To Next Page IconTo Next Page
Page #1 background imageLoading...
Page #1 background image
– 1 –
Thank you for purchasing the Fuji Digital temperature Controller.
Once you have confirmed that this is the product you ordered, please use it in accordance with the following instructions.
For detailed information on operating this equipment, please refer to the separate operations manual.
In addition, please keep this instruction manual within easy reach of the actual person using this equipment.
CAUTION
The contents of this manual are subject to change without notice.
This manual is complied with possible care for the purpose of accuracy, however, Fuji Electric
Systems shall not be held liable for any damages, including indirect damage,
caused by typographical errors, absence of information or use of information in this manual.
Please Read First (Safety Warnings)
Please read this section thoroughly before using and observe the mentioned safety warnings
fully. Safety warnings are categorized as “Warning” or “Caution”.
1
Warning
1-1
Limitations in Use
This product was developed, designed and manufactured on the premise that it would be used
for general machinery.
In particular, if this product is to be used for applications that require the utmost safety as
described below, please take into consideration of the safety of the entire system and the
machine by adopting such means as a fail-safe design, a redundancy design as well as the
conducting of periodical inspections.
Safety devices for the purpose of protecting the human body
Direct control of transportation equipment
Airplanes
Space equipment
Atomic equipment, etc
Please do not use this product for applications which directly involve human lives.
1-2
Installation and Wiring
This equipment is intended to be used under the following conditions.
Between the temperature sensor and the location where the voltage reaches or generates
the values described below, secure clearance space and creepage distance as shown in
the table below.
If such space cannot be secured, the EN61010 safety compliance may become invalid.
For the above, if voltage exceeds 50Vdc (called danger voltage), grounding and basic insulation
for all terminals of the equipment, and auxiliary insulation for digital outputs 1 to 3 is required,
Note that the insulation class for this equipment is as follows. Before installing, Please confirm
that the insulation class for equipment meets usage requirements.
Basic insulation (1500VAC)
Functional insulation (500VAC)
No insulation
In cases where damage or problems with this equipment may lead to serious accidents,
install appropriate external protective circuits.
As this equipment does not have a power switch or fuses, install them separately as nec-
essary. Fuse should be wired between main power switch and this equipment. (Main
power switch: Bipolar breaker, fuse rating: 250V 1A)
For power supply wiring, use wire equal to 600V vinyl insulated wire or above.
To prevent damage and failure of the equipment, provide the rated power voltage.
To prevent shock and equipment failure, do not turn the power ON until all wiring is complete.
Before turning on power, confirm that clearance space has been secured to prevent shock
or fire.
Do not touch the terminal while the machine is on. Doing so risks shock or equipment errors.
Never disassemble, convert, modify or repair this equipment. Doing so risks abnormal
operation, shock or fire.
Output relay is the part has a limited life. When output relay contact comes to the end of
its life, it might remain on-state, or off-state. For safety, use a protective circuit outside.
1-3
Maintenance
When installing or removing the equipment, turn the power OFF. Otherwise, shock, oper-
ational errors or failures may be caused.
Periodic maintenance is recommended for continuous and safe use of this equipment.
Some parts installed on this equipment have a limited life and/or may deteriorate with age.
The warranty period for this unit (including accessories) is one year, if the product is used
properly.
2
Caution
2-1
Cautions when Installing
Please avoid installing in the following locations.
Locations in which the ambient temperature falls outside the range of –10 to 50°C when
equipment is in use. (If the power supply is 200V AC, the recommended maximum ambi-
ent temperature is 45°C.)
Locations in which the ambient humidity falls outside the range of 45 to 90% RH when
equipment is in use.
Locations with rapid temperature changes, leading to dew condensation
Locations with corrosive gases (especially sulfide gas, ammonia, etc.) or flammable gases.
Locations with vibration or shock directly.
Locations in contact with water, oil, chemicals, steam or hot water.
(If the equipment gets wet, there is a risk of electric shock or fire, so have it inspected by
Fuji distributor.)
Locations with high concentrations of atmospheric dust, salt or iron particles.
Locations with large inductive interference, resulting in static electricity, magnetic fields or noise
Locations in direct sunlight.
Locations that build up heat from radiant heat sources, etc.
Warning Mishandling may lead to death or serious injury.
Caution Mishandling may cause injury to the user or property damage.
Fuji Electric Co., Ltd.
International Sales Div
Sales Group
Gate City Ohsaki, East Tower 11-2, Osaki 1-chome,
Shinagawa-ku, Tokyo 141-0032, Japan
http://www.fujielectric.com
Phone: 81-3-5435-7280, 7281 Fax: 81-3-5435-7425
http://www.fujielectric.com/products/instruments/
INP-TN1PXG5/9e-E
Confirming Specifications and Accessories
Before using the product, confirm that it matches
the type ordered.
(For model code, please refer to page 19.)
Confirm that all of the following accessories are
included.
Temperature Controller 1 unit
Instruction Manual 1 copy
Mounting Fixture 2 pcs
I/V Unit (250Ω Resistor) 1 pc
Waterproof packing 1 pc
Unit nameplate 1 pc
Option
Name Order No.
Terminal cover ZZPPXR1-B230
PC loader
communication cable
ZZPPXH1
*
TK4H4563
Related Information
Refer to the following reference materials for
details about the items described in this manual.
The latest materials can also be downloaded at
the following URL: http://www.fic-net.jp/eng
Document
Reference
No.
Catalog
ECNO:1125
Micro Controller (Model: PXG)
Operation Manual
ECNO:1411
Micro Controller (Model: PXG)
Communication Functions
Manual (MODBUS)
INP-
TN514450-E
Ambient temperature -10 °C to 50 °C
Ambient humidity 90% RH or below (with no condensation)
Installation category
II
by IEC 1010-1
Pollution level 2
Voltage used or generated
by any assemblies
Clearance Space (mm) Creepage Space (mm)
Up to 50 Vrms or Vdc 0.2 1.2
Up to 100 Vrms or Vdc 0.2 1.4
Up to 150 Vrms or Vdc 0.5 1.6
Up to 300 Vrms or Vdc 1.5 3.0
Above 300 Vrms or Vdc Please consult our distributor
Power
Internal circuit
Measurement input
Control output 1 (Relay contact)
or
Motorized valve OPEN output
Valve opening feedback input
Auxiliary analog input (remote SV)
Heater current detector input
Control output 1 (SSR drive, current, voltage)
Control output 2 (Relay contact)
or
Motorized valve CLOSE output
Control output 2 (SSR drive, current, voltage)
or Auxiliary analog output (Re-transmission output)
or Transmitter power supply
Digital input 1 to 5Digital output 1 (Relay contact) Digital output 1 to 3
(Relay contact)
Digital output 4, 5
Digital output 2 (Relay contact) (Transistor output)
Communication (RS-485)
When the ninth digit in the
model code is J
When the ninth digit in the
model code is not J
(Do1,2 are independent common) (Do1 to 3 shared common)
Instruction Manual
Micro Controller X
Model: PXG5/9
hazardous
voltage

Table of Contents

Question and Answer IconNeed help?

Do you have a question about the Fuji Electric PXG9 and is the answer not in the manual?

Fuji Electric PXG9 Specifications

General IconGeneral
CommunicationRS-485 (Modbus RTU)
Control MethodPID control
Input TypeThermocouple, RTD, DC Voltage, DC Current
Output TypeRelay, voltage, current
Power Supply100 to 240 VAC, 50/60 Hz or 24 VAC/VDC
Accuracy±0.3% of full scale
Operating Humidity35 to 85% RH (non-condensing)

Summary

1-2 Installation and Wiring

Environmental Conditions

Specifies ambient temperature and humidity for intended use.

Clearance and Creepage Distances

Details required spacing for safe installation.

Insulation Requirements

Defines insulation classes for safety.

Safety Warnings and Precautions

Warning: Severe Injury Risk

Indicates serious consequences from mishandling.

Caution: Injury/Property Damage Risk

Indicates potential harm from mishandling.

1-1 Limitations in Use

Critical Application Safety

Highlights need for fail-safe in life-critical uses.

Prohibited Use Cases

Forbids use in applications directly involving human lives.

1-3 Maintenance

Periodic Maintenance Importance

Recommends regular checks for continued safe operation.

Warranty Period Overview

States the standard warranty duration.

2-2 Panel Mounting Precautions

Waterproof Attachment

Guides on attaching packing for waterproof integrity.

Fixture Tightening Torque

Advises on correct torque to prevent damage.

2-3 Wiring Precautions

Input Signal Wiring

Covers compensation leads and noise separation.

Noise Reduction Measures

Suggests insulation transducers and noise filters.

Output Relay Considerations

Notes on output relay life and external protection.

For Proper Usage

Model Code Confirmation

Advises checking the delivered model against the order.

Installation and Mounting Guide

Points to sections for installation details.

Wiring Connection Guide

Points to sections for wiring diagrams.

Power On Procedure

Instructions for turning on the unit.

Display and Operations Overview

Guides to sections on unit operation.

Advanced Usage and Settings

Points to sections for advanced features.

Error Indications

Guides to sections on error handling.

Thermal Stabilization Time

Advises waiting for thermal stabilization before measurements.

3 Installation and Mounting

External and Panel Cut Dimensions

Provides dimensions for unit and panel cutouts.

Mounting Fixture Details

Explains how to use mounting fixtures.

Waterproof Packing Installation

Details packing placement for waterproofing.

Heat Dissipation Considerations

Advises on keeping sides unobstructed for cooling.

Close Fit Mounting Cautions

Notes on ambient temperature and spacing for close mounting.

Wiring Cautions

Provides advice on terminal screw size and torque.

4 Wiring

Terminal Connection Diagram (Standard Type)

Shows wiring for standard model.

Terminal Connection Diagram (Motorized Valve Type)

Shows wiring for motorized valve model.

Wiring Notes

Important notes regarding wiring connections.

5 Display and Operations

Part Names and Functions

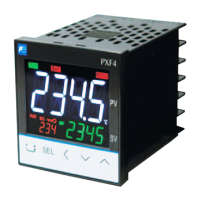
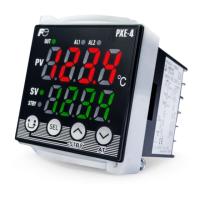
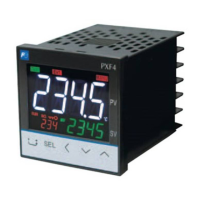
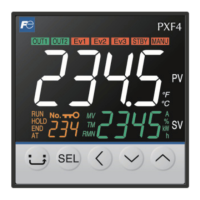
Identifies and explains unit components and indicators.

Monitor Display and Status Display

Describes monitor mode and its displays.

Basic Operations

Explains mode switching and basic key functions.

General Operations

Covers changing SV, MV, and other operational modes.

Parameter Setting Procedures

Setting Parameters Guide

Step-by-step instructions for setting parameters.

Key Lock and Password

Procedures for setting and using passwords.

6 Parameter List

Operation Parameters (Ch1)

Lists and explains parameters for operation control.

PID Parameters (Ch2)

Lists and explains parameters for PID control.

PID Palette and Ramp Soak

PID Palette Setup (Ch3)

Describes saving PV and PID values.

Ramp Soak Control (Ch4)

Details creating temperature patterns.

Output and Input Limit Settings

Output Limit Settings (Ch3)

Parameters for controlling output limits.

Input Limit Settings (Ch3)

Parameters for setting input limits.

Monitor and Setup Functions

Monitor Parameters (Ch5)

Lists parameters for monitoring various statuses.

Setup Parameters (Ch6)

Parameters for configuring input/output ranges.

System Configuration (Ch7)

Parameters for DI/DO, LEDs, and other controls.

Alarm and Communication Settings

Alarm Functions (Ch8)

Configures alarm detection conditions.

Communication Settings (Ch9)

Sets parameters for host communication.

PFB Control Settings (Ch10)

Parameters for valve control using PFB.

Password and Display Settings

Password Setup (Ch11)

Procedures for setting user passwords.

Display Masking (Ch12)

How to hide specific parameters from display.

Temperature Control Functions

ON/OFF (2-position) Control

Basic ON/OFF control method.

PID Control Basics

Explains PID control principles.

Fuzzy PID Control

PID control with reduced overshoot.

Advanced Control Modes

Self-tuning Control

Automatic PID calculation for changing conditions.

PID2 Control

PID control for overshoot suppression on power cycle.

Auto-tuning Procedure

Steps to automatically set PID parameters.

Valve Control: Servo and PFB

Explains servo and PFB valve control methods.

Valve Stroke and Feedback Control

Setting Valve Stroke Time

How to set the valve stroke time for servo control.

Position Feedback Control (PFB)

Detailed valve control using position feedback.

Manual Output Operation

How to manually set control output.

Ramp Soak and Digital Input

Ramp Soak Function

Setting up temperature patterns with steps.

Digital Input Function Assignment

Assigning functions to digital inputs.

Digital Output and Alarm Settings

Digital Output Function Settings

Configuring digital outputs for events and alarms.

Alarm Delay and Hysteresis

Setting delay and hysteresis for alarms.

Communication and Special Functions

Remote SV Function

Using analog input as the set value (SV).

Heater Break Alarm

Detecting heater burnout via CT.

Loop Break Alarm

Detecting control loop open circuits.

Load Short-circuit Alarm

Detecting load short circuits via CT.

Other Functions Overview

Introduces additional functions like soft start.

Specific Function Settings

Soft Start Function

Suppressing MV output during startup.

Error Output Function

Halting control and maintaining output on error.

Standby Output Function

Setting outputs for standby mode.

Ramp SV Function

Smoothly changing SV based on slope.

SV Selection Function

Switching between multiple SV settings.

PID Selection and Startup Modes

PID Selection Function

Switching PID parameters using palette or user key.

Startup Mode Settings

Configuring controller startup mode (Auto/Manual).

User Function Key Assignment

Assigning functions to the user key.

8 Setting the Temperature Controller

8-1 Input Setting

Setting sensor type, range, and decimal point.

Output and Control Settings

8-2 Output Setting

Configuring control output range (current/voltage).

8-3 Controls Setting

Setting normal or reverse control operation.

9 Error Indications

Display During Equipment Error

Lists error codes and possible causes.

10 Input Range and Codes

Standard Input Range Table

Table of input types, ranges, and codes.

11 Alarm Action Type Codes

Alarm Action Type Table

Codes for alarm types and action diagrams.

Alarm Codes and Model Specifications

Dual Set Value Alarm Codes

Codes for dual set value alarms.

12-1 PXG5/9 Standard Model List

Lists model numbers and their specifications.

Digit Specifications

Details the meaning of each digit in the model number.

Timer Code Assignments

Codes for timer functions assigned to DO.

13 Specifications

Power Supply and Consumption

Details power requirements and consumption.

Control Output Specifications

Electrical ratings for control outputs.

Process Value Input Specifications

Input accuracy and resolution details.

Digital Output and Input Specs

Specifications for digital outputs and inputs.

Communication and Interface Specs

Details for communication interfaces.

Operation and Storage Conditions

Environmental requirements for operation and storage.

Related product manuals