COMMON SENSE CAMERA CARE
CAMERA CARE
1 Your camera is a precision instrument. Do not get it wet or drop it. Also, do not expose to sand.
2 Do not use a strap made for cellular phones or other similar
electronic products. These straps are usually too weak to hold your camera securely. For safety, use only straps
designed for your camera, and use only as specifi cally intended and instructed.
3 If you are not using your camera for a long interval, unload the batteries and keep it where it will be safe from heat, dust,
and moisture.
4 Remove soil and dust from the lens, viewfi nder window, etc. with an air blower and by wiping lightly with a piece of soft cloth.
5 Do not use solvent such as thinner and alcohol to remove soil.
6 Keep the fi lm chamber and camera interior clean to avoid damaging
lms.
7
In hot weather, do not leave your camera in a closed car or on the beach, and do not leave it in moist places.
8 Moth repellent gas such as naphthalene adversely aff ects your camera and fi lms. Avoid keeping your camera or lms in a chest with mothballs.
9
Your camera is computer-controlled. If you should experience an operational issue, remove the batteries and then reload
them
.
0 Note that the temperature range within which your camera can be used is +5°C/+41°F to +40°C/+104°F.
INSTAX mini FILM AND PRINT CARE
See FUJIFILM INSTAX mini fi lm for fi lm use instructions. Follow all instructions for safe and proper use.
1
Keep the fi lm in a cool and dry place. Do not leavee the lm in a place where the t
emperature is extremely high (e.g., in a closed car).
2
When you load a fi
lm pack, use the fi
lm as soon as possible.
3
If
the
film has been kept in a place where the temperature is extremely high or low, bring it to room temperature before starting to take pictures.
4
Be sure to use the fi lm before the expiration or “Use Before” date.
5
Avoid airport checked luggage inspection and other strong X-ray illumination. The eff ect of fogging, etc. may appear on unused film. We recommend that you carry
the camera and/or the film onto the aircraft as carry-on luggage. (Check with eacairport for more information).
6
Avoiding strong light, keep the developed prints in a cool and dry place.
7
Do not puncture, tear, or cut INSTAX mini fi lm. If fi lm becomes damaged, do not use.
Cautions on handling the lm and prints
For details, refer to the instructions and warnings on FUJIFILM INSTAX mini lm.
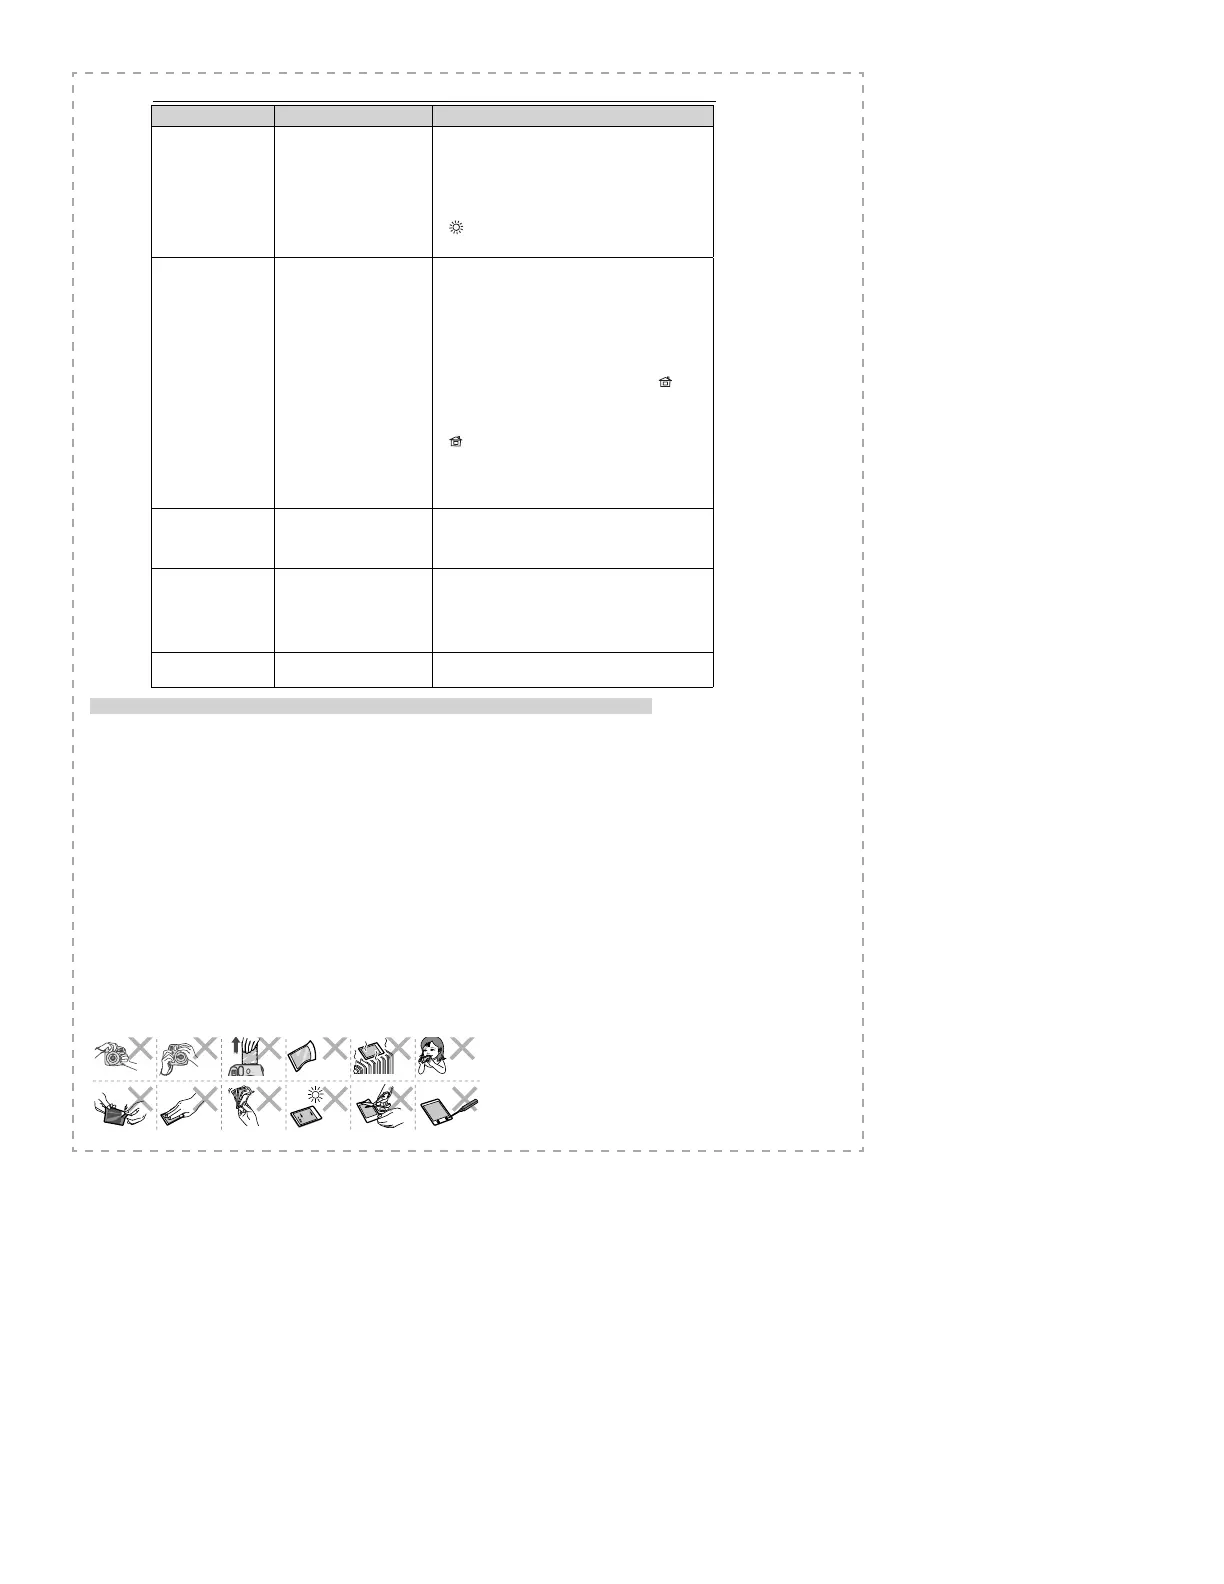
Problems Possible Causes Solutions
The nished print looks
over exposed. (White in
color)
1 The method of measuring
the subject brightness is
unsuitable.
2 Brightness adjustment dial
setting is incorrect.
3 The ambient temperature is
low (below +5°C/+41°F).
4 The background is too dark in
comparison with the subject.
5 The light sensor or ash sensor
window is blocked.
1 Point the lens toward the center of the subject and
measure the subject brightness.
2 While pointing the lens toward the subject, turn the
brightness adjustment dial to set the brightness to that for
which the lamp lights.
3 Before taking pictures, place your camera in a warm place
to bring it to room temperature.
4 Turn the brightness adjustment dial one step toward the
direction.
5 When taking a picture, be careful not to cover the two small
windows next to the ash on the camera.
The nished print looks
under exposed. (Dark)
1 The method of measuring
the subject brightness is
unsuitable.
2 Brightness adjustment dial
setting is incorrect.
3 The ambient temperature is
high (above +40°C/+104°F).
4 The picture was taken with
direct light in front of you.
5 The ash lampface was
blocked.
6 The background is too bright
in comparison with the
subject.
7 The ash did not reach the
subject.
8 The ash re ected back from a
mirror or window glass.
9 Grasping the lens barrel
did not let the shutter work
properly.
1 Point the lens toward the center of the subject and
measure the subject brightness.
2 While pointing the lens toward the subject, turn the
brightness adjustment dial to set the brightness to that for
which the brightness adjustment dial lamp lights.
3 Before taking pictures, place your camera in a cool place.
When the picture comes out from your camera, keep
it away from places or objects with excessively high
temperature.
4 Take a picture with the light behind you, or turn the
brightness adjustment dial one step toward the
direction.
5 When holding your camera, be careful not to block the
ash lampface with your nger or strap.
6 Turn the brightness adjustment dial one step toward the
direction.
7 Take pictures within 0.6 m to 2.7 m from the subject.
8 Adjust your position in taking the picture away from the
mirror or window glass.
9 Do not grasp the lens barrel when you take pictures.
The picture is out of focus.
1 The shooting range is too close
to the subject.
2 The lens is not clean.
3 Your camera was shaken when
taking pictures.
1 Take pictures with a distance of at least 0.6 m between you
and your subject.
2 Clean the lens.
3 Hold your camera rmly and press the shutter release
button gently.
The picture is blurred.
1
Picture was not permitted to
develop without touching,
pressure being applied or other
interference once it ejected
from the camera.
2 The picture did not come out
smoothly.
1 Do not press onto or fold the picture.
2 Do not block the lm exit with your nger.
The subject in the
view nder has shifted in
nished print.
● The shooting range is too close
to the subject.
● Take pictures with a distance of at least 0.6 m between you
and your subject.
Printed pictures
 Loading...