En-7
10. TEST RUN
Check items
(1) Isoperationofeachbuttonontheremotecontrolunitnormal?
(2) Doeseachlamplightnormally?
(3) Doairowdirectionlouversoperatenormally?
(4) Isthedrainnormal?
(5) Donothaveanabnormalnoiseandvibrationduringoperation?
•Donotoperatetheairconditionerintestrunforalongtime.
[Operation method]
• Fortheoperationmethod,refertotheoperatingmanual.
• Theoutdoorunit,maynotoperate,dependingontheroomtemperature.Inthiscase,
keeponpressingthe“MANUALAUTO”buttonoftheindoorunitformorethan10
seconds.TheOPERATIONindicatorlampandTIMERindicatorlampwillbegintoash
simultaneouslyduringcoolingtestrun.
Then,heatingtestrunwillbegininabout3minuteswhenHEATisselectedbythe
remotecontrolleroperation[reversecyclemodelonly].
(Pleasefollowtheoperatingmanualforremotecontrolleroperation.)
• Toendtestoperation,presstheremotecontroller“Start/Stop( )”button.
(Whentheairconditionerisrunningbypressingthe“TESTRUN“button,the
OPERATIONLampandTIMERLampwillsimultaneouslyashslowly.)
11. REMOTE CONTROLLER INSTALLATION
Checkthattheindoorunitcorrectlyreceivesthesignalfromtheremotecontroller,then
installtheremotecontrollerholder.
CAUTION
Donotinstalltheremotecontrollerholderinthefollowingconditions:
•Anyplacesexposedindirectsunlight
•Positionsaffectedbytheheatfromastoveorheater
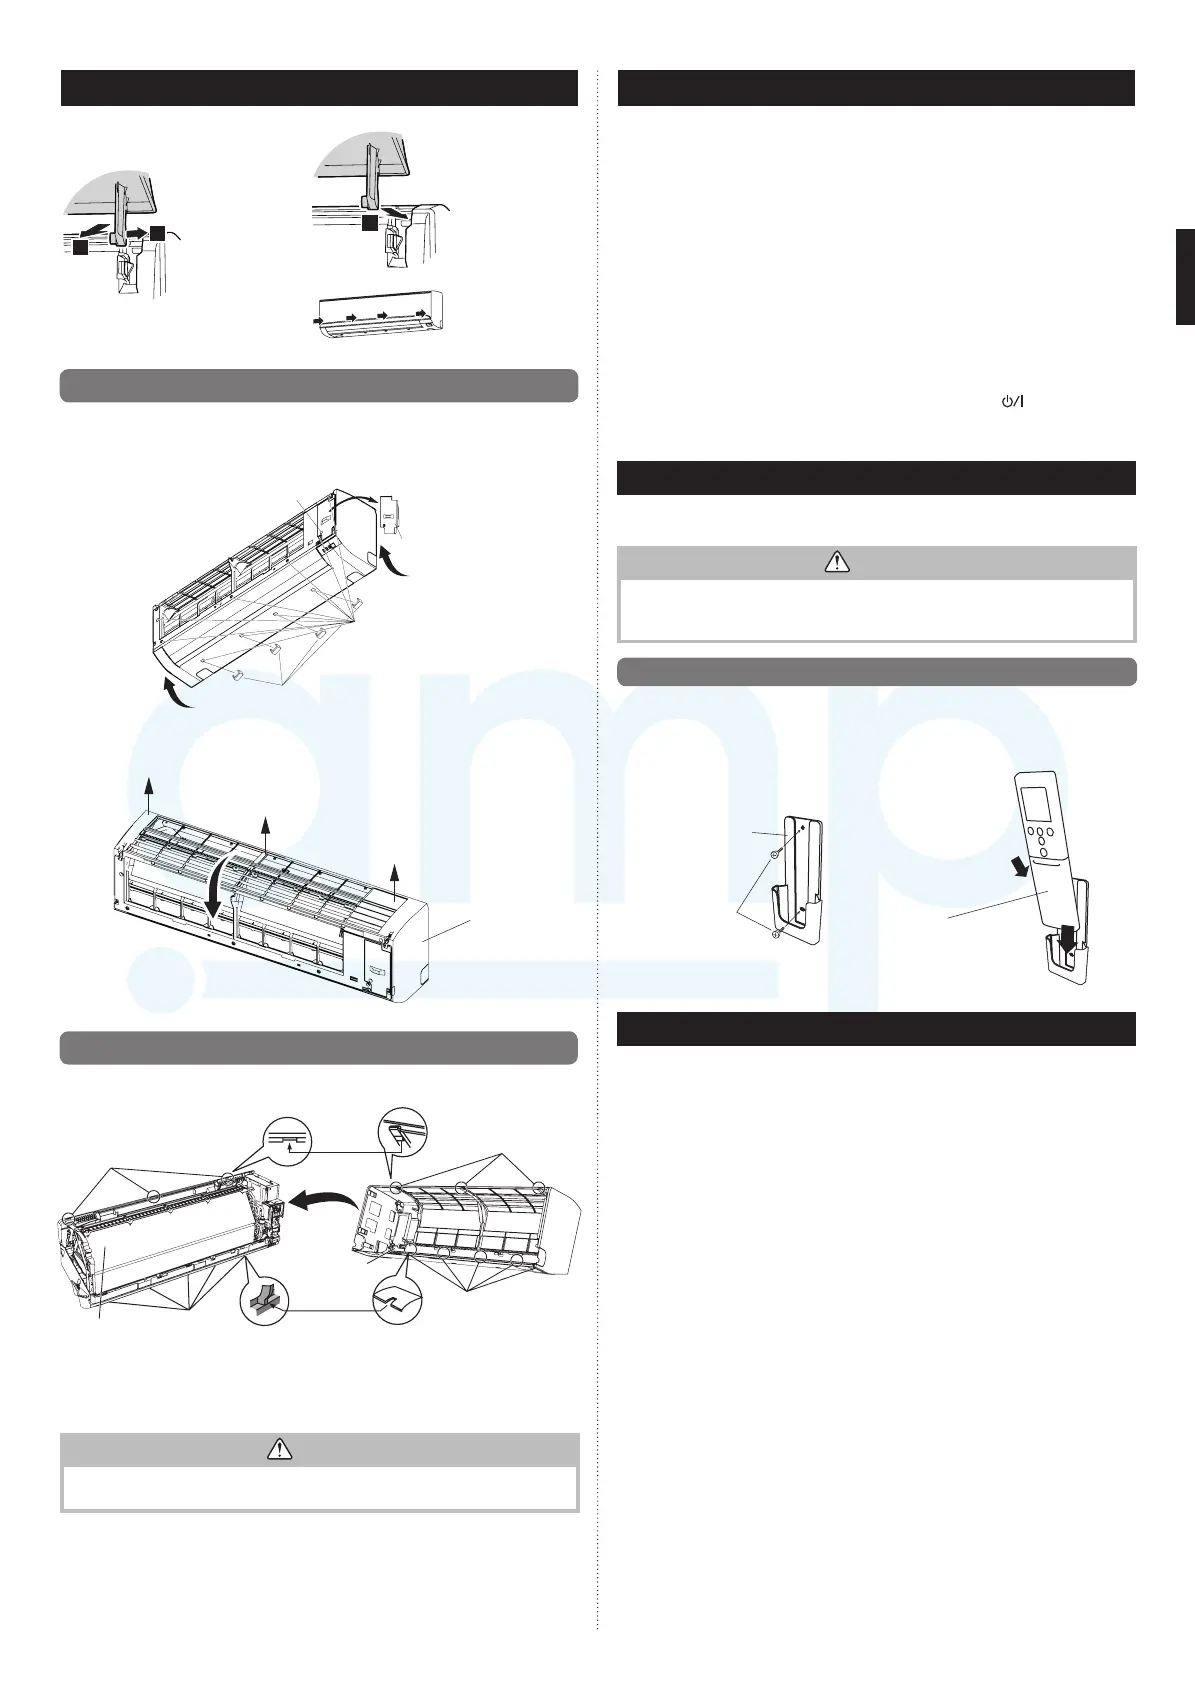
11.1. Remote controller holder installation
• Installtheremotecontrolleramaximumdistanceof7mfromtheremotecontrolsignal
receiver.Afterinstallingtheremotecontroller,checkthatitoperatescorrectly.
•I
nstalltheremotecontrollerholdertoawall,pillar,etc.withthetappingscrew.
Remote controller
holder xing
Remote controller
mounting
Remotecontroller
holder
Tapping
screw
(small)
(1)Set
Remote
controller
(2)Down
12. OPTIONAL KIT INSTALLATION
Thisairconditionercanbeconnectedwiththefollowingoptionalkits.
• Wiredremotecontroller
• Simpleremotecontroller
• Externalconnectkit
• ExternalinputandoutputPCB
9. FRONT PANEL REMOVAL AND INSTALLATION
Intake grill removal Intake grill installation
b
a
Opentheintake
grille.Whilegently
pressingtheleft
andrightmounting
shaftsoftheintake
grilleoutward“a”,
removetheintake
grilleindirectionof
thearrow“b”.
c
Whileholdingthe
grillehorizontal,set
theleftandright
mountingshaftsinto
thepillowblocksat
thetopofthepanel
“c”.
Tolatcheachshaft
properly,insertthe
shaftuntilitsnaps.
Press4placeson
theintakegrilleto
closeitcompletely.
9.1. Front panel removal
(1) Removeintakegrille(Referencetheintakegrilleremoval.)
(2) Remove4caps.
(3) Removewirecover.
(4) Remove10screws.
Screws(Wirecover)
Screws(10position)
Caps(4position)
Wirecover
NOTE :Whenreplacingthefrontpanel,donotscratchordamagethelouver.
(5) Thefrontpanelispulledtothefront,raisingtheuppersurface,thenthefrontpanelis
removed.
Frontpanel
9.2. Front panel installation
(1) First,tthelowerpartofthefrontpanel,andinserttopandmiddlehooks.(3topsides,
5middles)
Frontpanel
Tophooks
(3position)
Topholes(3position)
Indoorunit
Middlehooks
(5position)
Middlehooks
(5position)
(2) Attachthe10screws.
(3) Attachthewirecover.
(4) Attachthe4caps.
(5) Attachtheintakegrille.
CAUTION
Installthefrontpanelandintakegrillesecurely.Ifinstallationisimperfect,thefront
panelorintakegrillemayfalloffandcauseinjury.
9387082050_IM.indb 7 12/10/2015 13:33:26
www.ampair.co.uk | sales@ampair.co.uk

 Loading...