En-5
Pipeoutsidediameter
[mm(in.)]
DimensionA[mm]
DimensionB[mm]
FlaretoolforR410A,
clutchtype
6.35(1/4)
0to0.5
9.1
9.52(3/8) 13.2
12.70(1/2) 16.6
15.88(5/8) 19.7
19.05(3/4) 24.0
WhenusingconventionalaretoolstoareR410Apipes,thedimensionAshouldbeap-
proximately0.5mmmorethanindicatedinthetable(foraringwithR410Aaretools)to
achievethespeciedaring.UseathicknessgaugetomeasurethedimensionA.
Widthacross
flats
Pipeoutsidediameter[mm(in.)]
Widthacrossflats
ofFlarenut[mm]
6.35(1/4) 17
9.52(3/8) 22
12.70(1/2) 26
15.88(5/8) 29
19.05(3/4) 36
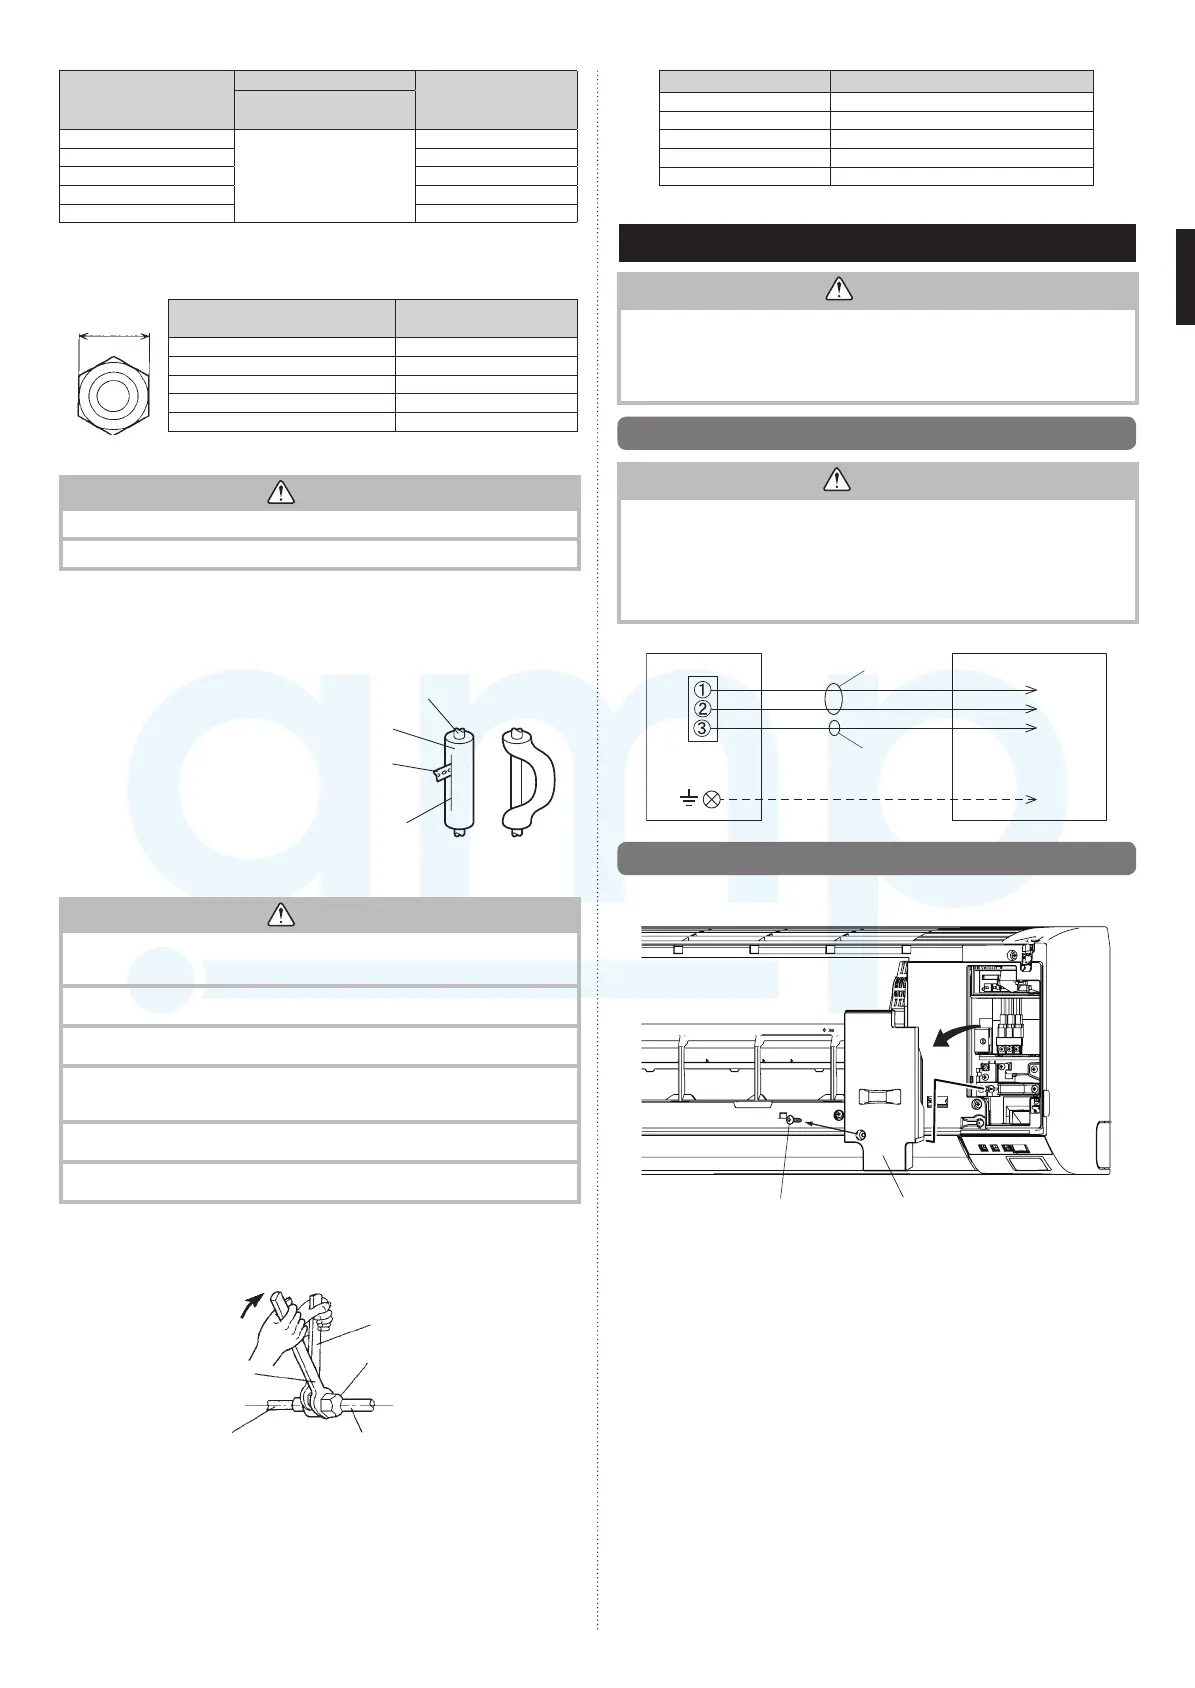
6.6.2. Bending pipes
CAUTION
Topreventbreakingofthepipe,avoidsharpbends.
Ifthepipeisbentrepeatedlyatthesameplace,itwillbreak.
• Thepipesareshapedbyyourhands.Becarefulnottocollapsethem.
• BendR70mmormorewithapipebender.
• Donotbendthepipesinananglemorethan90°.
• Whenpipesarerepeatedlybendorstretched,thematerialwillharden,makingitdifcult
tobendorstretchthemanymore.
• Donotbendorstretchthepipesmorethan3times.
• Whenbendingthepipe,donotbenditas
is.Thepipewillbecollapsed.Inthiscase,
cuttheinsulatingpipewithasharpcutter
asshownonthe right,andbendit after
exposingthepipe.Afterbendingthepipe
asyouwant,besuretoputtheheatinsu-
latingpipebackonthepipe,andsecureit
withtape.
Pipe
Insulating
Pipe
Cutter
Cutline
6.6.3. Pipe connection
CAUTION
BesuretoInstallthepipeagainsttheportontheindoorunitcorrectly.Ifthecentering
isimproper,thearenutcannottightensmoothly.Ifthearenutisforcedtoturn,the
threadswillbedamaged.
Donotremovethearenutfromtheindoorunitpipeuntilimmediatelybeforecon-
nectingtheconnectionpipe.
Holdthetorquewrenchatitsgrip,keepingitintherightanglewiththepipe,inorder
totightenthearenutcorrectly.
Tightenthe are nuts with a torque wrench using the specied tightening method.
Otherwise,thearenutscouldbreakafteraprolongedperiod,causingrefrigerantto
leakandgeneratehazardousgasiftherefrigerantcomesintocontactwithaame.
Connectthepipingsothatthecontrolboxcovercaneasilyberemovedforservicing
whennecessary.
Inordertopreventwaterfromleakingintothecontrolbox,makesurethatthepiping
iswellinsulated.
Whentheflarenutistightenedproperlybyyourhand,holdthebodysidecouplingwitha
wrench,thentightenwithatorquewrench.(Seethetablebelowfortheflarenuttightening
torques.)
Tightenwith2wrenches.
Holdingwrench
Flarenut
Connectionpipe
Torquewrench
Indoorunitpipe
(Bodyside)
Flarenut[mm(in.)] Tighteningtorque[N·m(kgf·cm)]
6.35(1/4)dia. 16to18(160to180)
9.52(3/8)dia. 32to42(320to420)
12.70(1/2)dia. 49to61(490to610)
15.88(5/8)dia. 63to75(630to750)
19.05(3/4)dia. 90to110(900to1,100)
Donotremovethecapfromtheconnectionpipebeforeconnectingthepipe.
7. ELECTRICAL WIRING
CAUTION
Becarefulnottogenerateasparkasfollowsforusingaammablerefrigerant.
• Donotremovethefusewhilethepowerison.
• Donotdisconnectthewiringwhilethepowerison.
• Itisrecommendedtopositiontheoutletconnectioninahighposition.Placethe
cordssothattheydonotgettangled.
7.1.
Wiring system diagram
WARNING
•Beforeconnectingthewires,makesurethepowersupplyisOFF.
•Everywiremustbeconnectedrmly.
•Nowireshouldbeallowedtotouchrefrigeranttubing,thecompressor,oranymov-
ingpart.
•Loosewiringmaycausetheterminaltooverheatorresultinunitmalfunction.Are
hazardmayalsoexist.Therefore,besureallwiringistightlyconnected.
•Connectwirestothematchingnumbersofterminals.
Earth(Ground)line
OUTDOORUNIT
Pleaseconnecttothe
speciedterminal.
INDOORUNIT
TERMINAL
Powerline
Controlline
7.2.
Indoor unit wiring
(1)Opentheintakegrille.Removethetappingscrewforthewirecoverandremovethe
wirecover.
Screw
Wirecover
9387082050_IM.indb 5 12/10/2015 13:33:22
www.ampair.co.uk | sales@ampair.co.uk

 Loading...