En-3
5. SELECTING THE MOUNTING POSITION
Decidethemountingpositionwiththecustomerasfollows:
5.1. Indoor unit
(1) Installtheindoorunitlevelonastrongwallwhichisnotsubjecttovibration.
(2) Theinletandoutletportsshouldnotbeobstructed:theairshouldbeabletoblowall
overtheroom.
(3)
Installtheunitadedicatedelectricalbranchcircuit.
(4)
Donotinstalltheunitwhereitwillbeexposedtodirectsunlight.
(5)
Installtheunitwhereconnectiontotheoutdoorunitiseasy.
(6) Installtheunitwherethedrainpipecanbeeasilyinstalled.
(7) Takeservicing,etc.intoconsiderationandleavethespacesshownin“6.1.Installation
dimensions”.Alsoinstalltheunitwheretheltercanberemoved.
Correctinitialinstallationlocationisimportantbecauseitisdifculttomovetheunitafterit
isinstalled.
WARNING
Installtheindoorunitwhereiscapabletosupporttheweightoftheunit.Securethe
unitrmlysothattheunitdoesnottoppleorfall.
CAUTION
Donotinstalltheunitinthefollowingareas:
•Areawithhighsaltcontent,suchasattheseaside.Itwilldeterioratemetalparts,caus-
ingthepartstofailortheunittoleakwater.
•Arealledwithmineraloilorcontainingalargeamountofsplashedoilorsteam,such
asakitchen.Itwilldeteriorateplasticparts,causingthepartstofailortheunittoleak
water.
•Areawhereisclosetoheatsources.
•Areathatgeneratessubstancesthatadverselyaffecttheequipment,suchassulfuric
gas,chlorinegas,acid,oralkali.Itwillcausethecopperpipesandbrazedjointstocor-
rode,whichcancauserefrigerantleakage.
•Areathatcancausecombustiblegastoleak,containssuspendedcarbonbersor
ammabledust,orvolatileinammablessuchaspaintthinnerorgasoline.
•Ifgasleaksandsettlesaroundtheunit,itcancauseare.
•Areawhereanimalsmayurinateontheunitorammoniamaybegenerated.
•Donotusetheunitforspecialpurposes,suchasstoringfood,raisinganimals,grow-
ingplants,orpreservingprecisiondevicesorartobjects.Itcandegradethequalityof
thepreservedorstoredobjects.
•Installtheunitwheredrainagedoesnotcauseanytrouble.
•Installtheindoorunit,outdoorunit,powersupplycable,transmissioncable,andre-
motecontrolcableatleast1mawayfromatelevisionorradioreceivers.Thepurpose
ofthisistopreventTVreceptioninterferenceorradionoise.
(Eveniftheyareinstalledmorethan1mapart,youcouldstillreceivenoiseunder
somesignalconditions.)
•Ifchildrenunder10yearsoldmayapproachtheunit,takepreventivemeasuressothat
theycannotreachtheunit.
•Installtheindoorunitonthewallwheretheheightfromtheoorismorethan1.8m.
6. INSTALLATION WORK
CAUTION
•Donothitorpushthehumansensor.Thismayleadtodamageormalfunction.
•Donottouchthehumansensor.Anyscratchesordirtmayleadtoincorrectdetection.
•Donotplacelargeobjectsnearthe
human
sensor.Alsokeepheatingunitsoutsidethe
sensor’sdetectionarea.
Detectionrangeofthe
human
sensorisasfollows.
Verticalangle90°(Sideview)
90°
50°50°
7m
7m
Horizontalangle100°(Topview)
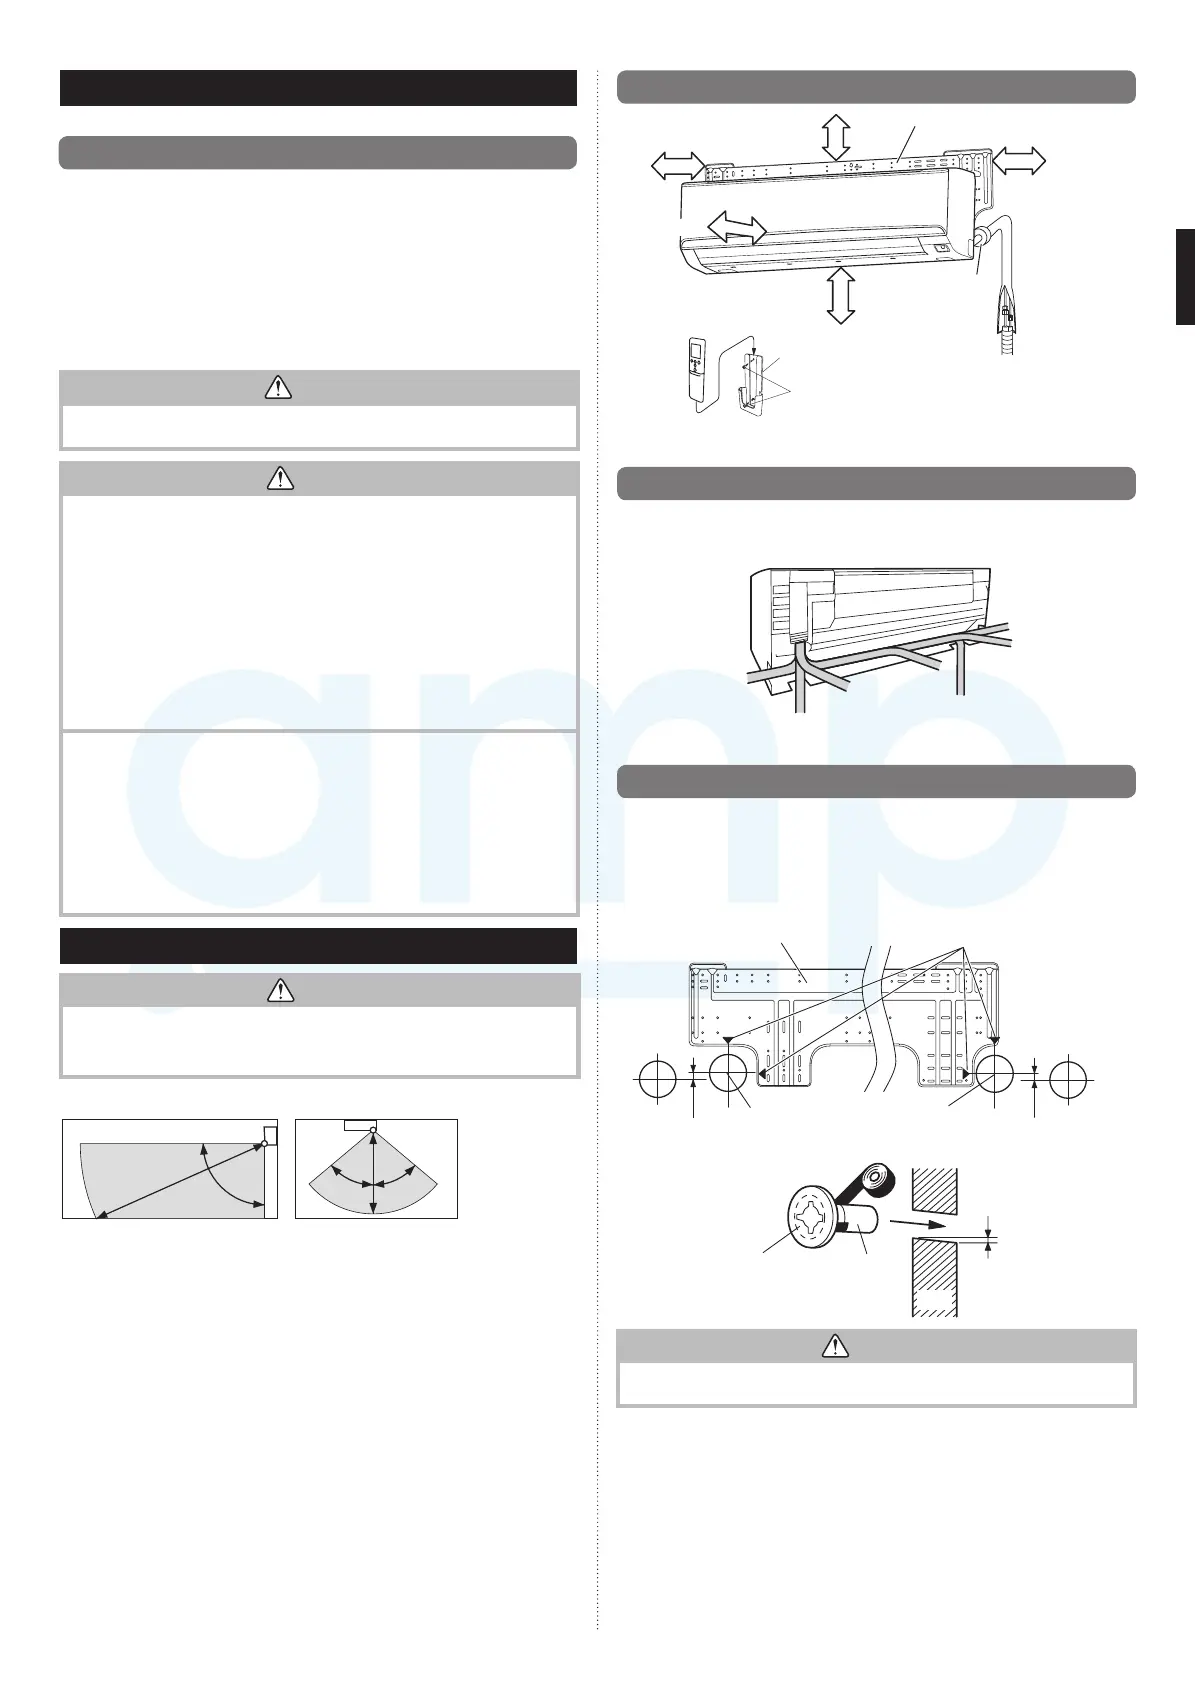
6.1. Installation dimensions
(Wallcap)
1.5morover
60mmorover**
80mmorover*
Wallhookbracket
130mm
orover**
1.8morover
*Thedistancebetweenthewallhook
bracketandtheceilingshouldbe
80mmormore.
**Thesidenexttothesidewallmust
followthesizeindicatedinfigure.
Remote
controller
Remote
controller
holder
Tappingscrew
(small)
6.2. Indoor unit piping direction
Thepipingcanbeconnectedinthe7directionsinthegure.Whenthepipingiscon-
nectedindirection(B),(C),(D)or(E),cutalongthepipinggrooveinthesideofthefront
panelwithahacksaw.
(B)Right
outlet
(A)Rear
outlet
(C)Bottom
outlet
(D)Leftbottom
outlet
(E)Left
outlet
(Rear)
(F)Centre
outlet
(G)Leftrear
outlet
6.3.
Cutting the hole in the wall for the connecting piping
(1) Cuta80mmdiameterholeinthewallatthepositionshowninthefollowing.
(2) Cuttheholesothattheoutsideendislower(5to10mm)thantheinsideend.
(3) Alwaysalignthecenterofthewallhole.Ifmisaligned,waterleakagewilloccur.
(4)
Cutthewallpipetomatchthewallthickness,stickitintothewallcap,fastenthecapwith
vinyltape,andstickthepipethroughthehole.
(5) Forleftpipingandrightpiping,cuttheholealittlelowersothatdrainwaterwillow
freely.
Wallhookbracket
Centringmarks
LowerLower
10mm
ormore
80mmhole
10mm
ormore
80mmhole
Fastenwithvinyltape
5~10mm
Wallpipe
(Fieldsupply)
Wallcap
(Fieldsupply)
(Inside)
(Outside)
Wall
WARNING
Alwaysusethewallpipe.Ifthewallpipeisnotused,thecablethatisconnectedbetween
theindoorunitandtheoutdoorunitmaytouchmetal,andcauseanelectricdischarge.
9387082050_IM.indb 3 12/10/2015 13:33:21
www.ampair.co.uk | sales@ampair.co.uk

 Loading...