WWW.FUNNMTB.COM
RIPPER CLIPLESS PEDALS 2024.05.01 / REV. 2
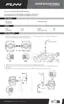
LEFT
RIGHT
4mm socket wrench
LEFT RIGHT
LEFT
RIGHT
8mm
34 Nm
34 Nm
Thank you for choosing Ripper clipless pedals for your mountain bike.
Proper installation is crucial for optimal performance and compliance with our warranty policy.
Follow these step-by-step instructions and illustrations carefully. Our product offers superior grip, durability, and performance.
Enjoy your new pedals and happy riding!
. Hex key 3mm
. Hex key 8mm
. Socket wrench 4mm
8mm
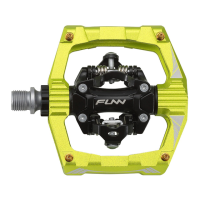
INSTALLATION AND USE
RIPPER CLIPLESS PEDALS
contents
tools required
. Pedals
. Traction pins
. Cleat kit
. Socket wrench 4mm
PEDAL installation
SET
PCS
1
16
1
1
SET
PC
Identify the left and right side axles. The left-side axle has
a lathed mark on the axle head, whereas the right-side
pedal has no markings.
1. Use the 4mm socket wrench to install the traction pins
according to your preference.
2.
Lightly lubricate the axle threads with anti-seize grease. Thread the axle into the crank hole with your fingers first. Please
follow the illustrated directions for tightening the left and right side pedals.
Insert a 8mm hex key to further tighten the screw to 34Nm (300 lb-in) torque and avoid excessive force.
3.
4.