Do you have a question about the Funn Ripper and is the answer not in the manual?
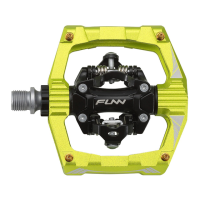
Instructions for attaching pedals to crank arms, including lubrication, threading, and tightening.
Information on removing and replacing grip pins for fine-tuning pedal grip.
Details on adjusting binding tension using an Allen key for shoe/pedal engagement.
Steps for attaching cleats to cycling shoes, including lubrication, alignment, and tightening.
Warranty information and user responsibilities regarding product use and potential damage.
Guidelines for servicing pedals when noise or rough rotation occurs, and bearing maintenance.
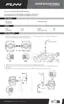
Overview of the steps for disassembling the pedal for bearing or axle replacement.
Remove the side cap using a 6mm hex key as the first step in disassembly.
Hold the axle with an 8mm hex key and unscrew the axle nut with an 8mm socket wrench.
Remove the bushing cap using a special tool or Shimano TL-PD40 tool.
Extract the bearing from the pedal using an M4 screw and special tool.
Gently push out the plastic bushing using an 8mm hex key.
Carefully separate the pedal body from the pedal cage, minding the side spring.
Remove the old washers from the pedal cage as illustrated.
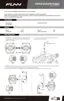
Overview of the steps for reassembling the pedal after bearing or axle replacement.
Place Washer A onto the pedal cage, aligning slots with the cage.
Place Washer B onto the pedal cage, aligning slots with the cage.
Insert the pedal body by fitting the side spring pin into Washer A's slot.
Align the bushing's slot and insert it into the cage and body, ensuring it seats properly.
Rock the pedal body to confirm smooth rotation after assembly.
Install the bushing screw with the special tool, torquing to 5-6 Nm.
Push the new bearing into the pedal by tightening the side cap to 5-6 Nm.
Unscrew the side cap to check if the bearing is fully seated. Repeat if necessary.
Fit new dust seals onto the pedal axles and lightly grease the axles.
Secure the axle by tightening the hex nut with an 8mm socket wrench to 8-9 Nm.
Install the side cap using a 6mm hex key, torquing to 5-6 Nm.
| Brand | Funn |
|---|---|
| Model | Ripper |
| Category | Bicycle Accessories |
| Language | English |