Do you have a question about the GardePro T5NG and is the answer not in the manual?
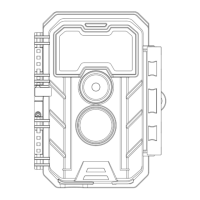
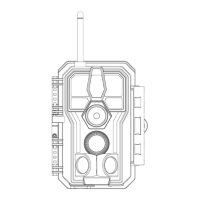
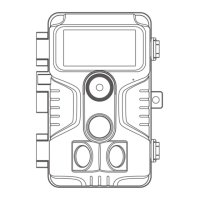
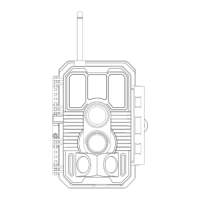
Describes the GardePro T5NG trail camera as a new generation digital scouting camera.
Lists key features like high-quality pictures, night vision, wide view angle, and multiple working modes.
Provides instructions and tips for correctly inserting AA batteries into the camera compartment.
Details the correct procedure for inserting an SD card into the camera, including formatting.
Describes the 'OFF' mode as a safe state for maintenance or storage, noting minimal power consumption.
Explains the 'ON' mode for accessing settings, reviewing images, and connecting to a computer.
Details how to enter and operate the camera in surveillance mode for capturing images or videos.
Offers recommendations for securely mounting the camera on a tree or other suitable surfaces.
Explains how to test the camera's motion detection range and angle for effective monitoring.
Details how to start the camera and set its working mode (Motion Detection, Time Lapse, Hybrid).
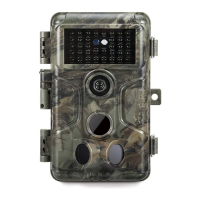
The GardePro T5NG trail camera is a new generation of digital scouting camera designed for outdoor use. It is triggered by movement of game, detected by a highly sensitive Passive Infra-Red (PIR) motion sensor. The camera then captures high-quality pictures (up to 32MP still photos) or H.264 video clips (1296P 20fps or 1080P 30fps) with audio.
The GardePro T5NG trail camera features innovative and ultra-clear Sony imaging technology, encompassing all-new software innovations such as smart illumination technology, blur reduction technology, auto noise reduction, and dynamic exposure technology to deliver high-resolution image quality. It offers clear night vision with a flash range of 100ft, equipped with 36pcs high-performance infrared no glow 940nm LEDs that are invisible to human and animal eyes. The camera has a wide view angle of 70°. It supports three working modes: Motion detection, Time lapse, and Hybrid.
The camera is designed for ease of use with well-designed operation buttons and a built-in 2.4-inch color screen, making it easy to program settings and review captured pictures and videos directly on the screen.
To operate the camera, eight (8) 1.5V AA Alkaline or Lithium batteries are required. For maximum battery life, Energizer AA Lithium batteries are recommended. It is important not to mix old and new batteries or different battery types. Rechargeable NiMH AA batteries can be used, but their lower voltage (generally 1.2V) may result in a shorter lifetime, requiring frequent replacement. Batteries should be removed when the camera is not in use.
A standard-size SDHC/SDXC memory card (maximum capacity 512GB, Class 10) is required. SanDisk 32GB SDHC Class 10 memory cards are recommended for optimal cost-performance. Before first use, the SD card must be formatted in the camera using the "Format SD Card" option in the menu settings. When inserting the SD card, ensure it is placed into the card slot with its label side upwards. A "click" sound indicates correct insertion. If the card is inserted incorrectly, it will not be recognized. To remove the SD card, gently push it in until it pops out.
The camera has three basic operational modes: OFF, ON, and SURVEILLANCE.
The camera can be mounted using the provided adjustable web belt or a tripod socket. For optimal picture quality, it should be placed 16-17ft (5m) away from the area to be monitored, with the camera placed at a height of 2.5-3.5ft (0.75-1m). It's important to ensure that the subject is within the ideal flash range (no farther than 100ft/30m and no closer than 10ft/3m).
To test the sensing angle and distance, switch the camera to ON mode and press the MENU button to go to "Motion Test." The camera will count down a maximum 60-second delay before being ready to capture motions. During this delay, the motion sensor is activated. Make movements in front of the camera at various positions to determine effective detection distances and angles. When the white motion indicator LED flashes RED, it indicates that the camera is able to sense the position. If the LED doesn't blink, it means the position lies beyond the sensing range. During these tests, the camera will capture pictures once motion is detected. Review the pictures on the screen to evaluate positioning. The device should be placed at a height appropriate for the animal size. Avoid potential false triggers due to temperature and motion disturbances from direct sunlight, nearby tree branches, or bushes. Do not install the camera behind glass objects, as glass can prevent motion sensing.
Captured photos and videos are stored in the folder \DCIM\100MEDIA on the SD card. Files are named with the format NSCFCHAS_230626110308_0001.JPG for images and NSCFCHAS_230626110308_0001.MP4 for videos. "NSCF" remains constant, "CHAS" corresponds to the camera name, "230626110308" indicates the precise time of the shot (YYMMDDHHMMSS), and "0001" is the file's serial number.
MP4 video files can be played back on most popular media players like Windows Media Player, QuickTime, or VLC. To review files, the camera can be powered on, and the provided USB cable can be used to download files to a computer. Alternatively, an SD card reader can be used to plug the SD card into a computer and browse the files without downloading.
The camera is built for any climate with an IP66 waterproof design, making it resistant to rain and snow. Its operation temperature ranges from -4~140°F (-20~60°C).
If the black PIR Lens becomes dirty or scratched, it typically does not affect performance due to the reliability design. If cleaning is necessary, try blowing off the dirt or picking it out very lightly. Avoid wiping the lens, as this may cause more scratches.
If the camera is not functioning properly or if there are photo/video quality issues, check the following:
If issues persist, contact customer support with your order number or check the website for the latest firmware.
| Detection Range | 65ft |
|---|---|
| Night Vision | Yes |
| IR Flash Range | 65ft |
| Waterproof Rating | IP66 |
| Night Vision Range | 65ft |
| Weight | 1.2 lbs |
| Photo Resolution | 20MP |
| Video Resolution | 1080P |
| Battery Type | 8 AA Batteries |
| PIR Detection Angle | 120° |
| Power Supply | 8 AA batteries or external power source |
| Screen | 2.4" Color TFT LCD |
| Battery Life | Up to 6 months |