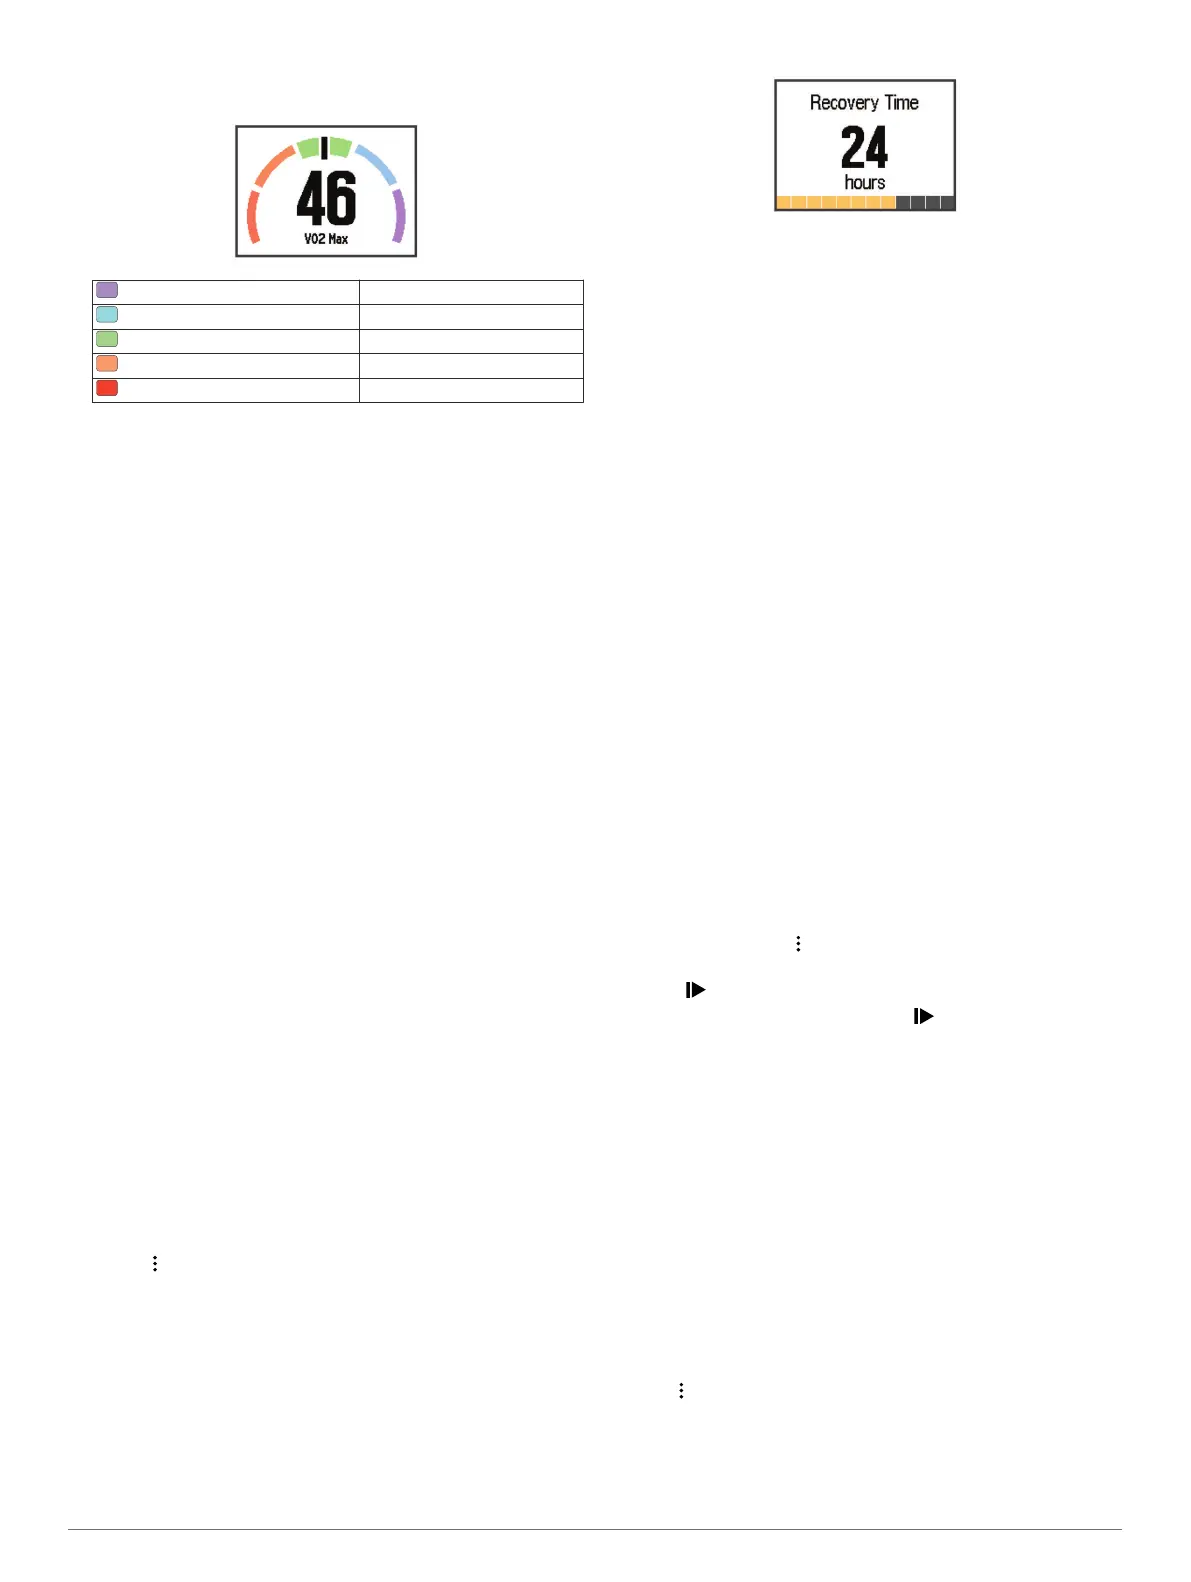
Your VO2 max. estimate is a number and position on the
color gauge.
Purple Superior
Blue Excellent
Green Good
Orange Fair
Red Poor
VO2 max. data and analysis is provided with permission from
The Cooper Institute. For more information, see the appendix
(VO2 Max. Standard Ratings, page 20), and go to
www.CooperInstitute.org.
Tips for Cycling VO2 Max. Estimates
The success and accuracy of the VO2 max. calculation
improves when your ride is a sustained and moderately hard
effort, and where heart rate and power are not highly variable.
• Before your ride, check that your device, heart rate monitor,
and power meter are functioning properly, paired, and have
good battery life.
• During your 20 minute ride, maintain your heart rate at
greater than 70% of your maximum heart rate.
• During your 20 minute ride, maintain a fairly constant power
output.
• Avoid rolling terrain.
• Avoid riding in groups where there is a lot of drafting.
Recovery Advisor
You can use your Garmin device paired with the heart rate
monitor to display how much time remains before you are fully
recovered and ready for the next hard workout. The recovery
advisor feature includes recovery time and recovery check.
Recovery advisor technology is provided and supported by
Firstbeat.
Recovery check: The recovery check provides a real-time
indication of your state of recovery within the first several
minutes of an activity.
Recovery time: The recovery time appears immediately
following an activity. The time counts down until it is optimal
for you to attempt another hard workout.
Turning On the Recovery Advisor
Before you can use the recovery advisor feature, you must put
on the heart rate monitor and pair it with your device (Pairing
Your ANT+ Sensors, page 8). If your Forerunner was packaged
with a heart rate monitor, the devices are already paired. For the
most accurate estimate, complete the user profile setup (Setting
Up Your User Profile, page 13), and set your maximum heart
rate (Setting Your Heart Rate Zones, page 10).
1
Select > My Stats > Recovery Advisor > Status > On.
2
Go for a run.
Within the first several minutes of your run, a recovery check
appears, showing your real-time state of recovery.
3
After your run, select Save.
The recovery time appears. The maximum time is 4 days,
and the minimum time is 6 hours.
Recovery Heart Rate
If you are training with a compatible heart rate monitor, you can
check your recovery heart rate value after each activity.
Recovery heart rate is the difference between your exercising
heart rate and your heart rate two minutes after the exercise has
stopped. For example, after a typical training run, you stop the
timer. Your heart rate is 140 bpm. After two minutes of no
activity or cool down, your heart rate is 90 bpm. Your recovery
heart rate is 50 bpm (140 minus 90). Some studies have linked
recovery heart rate to cardiac health. Higher numbers generally
indicate healthier hearts.
TIP: For best results, you should stop moving for two minutes
while the device calculates your recovery heart rate value. You
can save or discard the activity after this value appears.
Foot Pod
Your device is compatible with the foot pod. You can use the
foot pod to record pace and distance instead of using GPS when
you are training indoors or when your GPS signal is weak. The
foot pod is on standby and ready to send data (like the heart
rate monitor).
After 30 minutes of inactivity, the foot pod powers off to
conserve the battery. When the battery is low, a message
appears on your device. Approximately five hours of battery life
remain.
Going for a Run Using a Foot Pod
Before you go for a run, you must pair the foot pod with your
Forerunner device (Pairing Your ANT+ Sensors, page 8).
You can run indoors using a foot pod to record pace, distance,
and cadence. You can also run outdoors using a foot pod to
record cadence data with your GPS pace and distance.
1
Install your foot pod according to the accessory instructions.
2
If necessary, select > Activity Settings > GPS to turn on
or turn off GPS.
3
Select to start the timer.
4
After you complete your run, select > Save.
Foot Pod Calibration
The foot pod is self-calibrating. The accuracy of the speed and
distance data improves after a few outdoor runs using GPS.
Training with Power Meters
• Go to www.garmin.com/intosports for a list of ANT+ sensors
that are compatible with your device (such as Vector
™
).
• For more information, see the owner's manual for your power
meter.
• Adjust your power zones to match your goals and abilities
(Setting Your Power Zones, page 12).
• Use range alerts to be notified when you reach a specified
power zone (Setting Range Alerts, page 14).
• Customize the power data fields (Customizing the Data
Screens, page 14).
• Hold to calibrate the power meter.
Setting Your Power Zones
The values for the zones are default values and may not match
your personal abilities. If you know your functional threshold
power (FTP) value, you can enter it and allow the software to
12 ANT+ Sensors