IMPORTANT SAFETY INFORMATION.
READ ALL INSTRUCTIONS BEFORE USING.
2
Consumer Support Troubleshooting Tips
Care and Cleaning Operating Instructions Safety Instructions
(5141<<C165DI9>CDBE3D9?>C256?B5EC9>7D85@B?4E3D19<EB5D?6?<<?GD85C59>CDBE3D9?>C=1IB5CE<D9>69B55<53DB93
C8?3;C5B9?EC9>:EBI?B451D8
$'&(*%*)*/%&*
*851<96?B>91)165B9>;9>7-1D5B1>4*?H93>6?B35=5>D3DB5AE9B5CD85?F5B>?B?61<96?B>91D?@E2<9C81<9CD?6CE2CD1>35C
;>?G>D?D85CD1D5D?31EC531>35B29BD845653DC?B?D85BB5@B?4E3D9F581B=1>4B5AE9B5C2EC9>5CC5CD?G1B>3ECD?=5BC?6
@?D5>D91<5H@?CEB5D?CE38CE2CD1>35C
*856925B7<1CC9>CE<1D9?>9>C5<63<51>?F5>C79F5C?661F5BIC=1<<1=?E>D?631B2?>=?>?H9454EB9>7D853<51>9>73I3<5H@?CEB5
31>25=9>9=9J542IF5>D9>7G9D81>?@5>G9>4?G?BEC9>71F5>D9<1D9?>61>?B8??4
*?B54E35D85B9C;?6D9@@9>7D85B1>75D85B1>75=ECD25C53EB542I1
@B?@5B<I9>CD1<<541>D9D9@2B13;5D)559>CD1<<1D9?>9>CDBE3D9?>CC89@@54
G9D8D852B13;5D6?B3?=@<5D545D19<C256?B51DD5=@D9>7
D?9>CD1<<
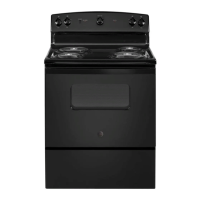
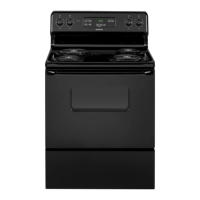
For Freestanding Ranges:
*?3853;96D852B13;5D9C9>CD1<<541>45>71754@B?@5B<IB5=?F5D85
CD?B1754B1G5B?B;93;@1>5<1>4<??;E>45B>51D8D85B1>75
D?C55D81DD85<5F5<9>7<579C5>717549>D852B13;5D&>=?45<CG9D8?ED
1CD?B1754B1G5B?B;93;@1>5<31B56E<<ID9@D85B1>756?BG1B4*85
2B13;5DC8?E<4CD?@D85B1>75G9D89>9>385C 69D
4?5C>?DD852B13;5D=ECD25B59>CD1<<54 6D85B1>759C@E<<54
6B?=D85G1<<6?B1>IB51C?>1<G1ICB5@51DD89C@B?354EB5D?
F5B96ID85B1>759C@B?@5B<IC53EB542ID851>D9D9@2B13;5D
%5F5B3?=@<5D5<IB5=?F5D85<5F5<9>7<57C?BD85B1>75G9<<>?D
25C53EB54D?D851>D9D9@45F935@B?@5B<I
For Slide-In Ranges:
To check if the bracket is installed and engaged properly, remove the
storage drawer or kick panel and look underneath the range to see that
the leveling leg is engaged in the bracket.
For Drop-In Ranges:
To check if the bracket is installed and engaged properly, lower
the oven door and gently apply medium force at the handle end until
movement of the range is detected. Continue pressing until the anti-tip
bracket is engaged and movement stops. A small amount of
movement is acceptable at the back of the range top, but it should be
stable and not tip once the anti-tip bracket is engaged. If it does not,
the bracket must be reinstalled.
If you did not receive an anti-tip bracket with your purchase,
call 1.800.626.8774 to receive one at no cost (in Canada, call
1.800.561.3344). For installation instructions of the bracket,
visit GEAppliances.com (in Canada, GEAppliances.ca).
%* * ',