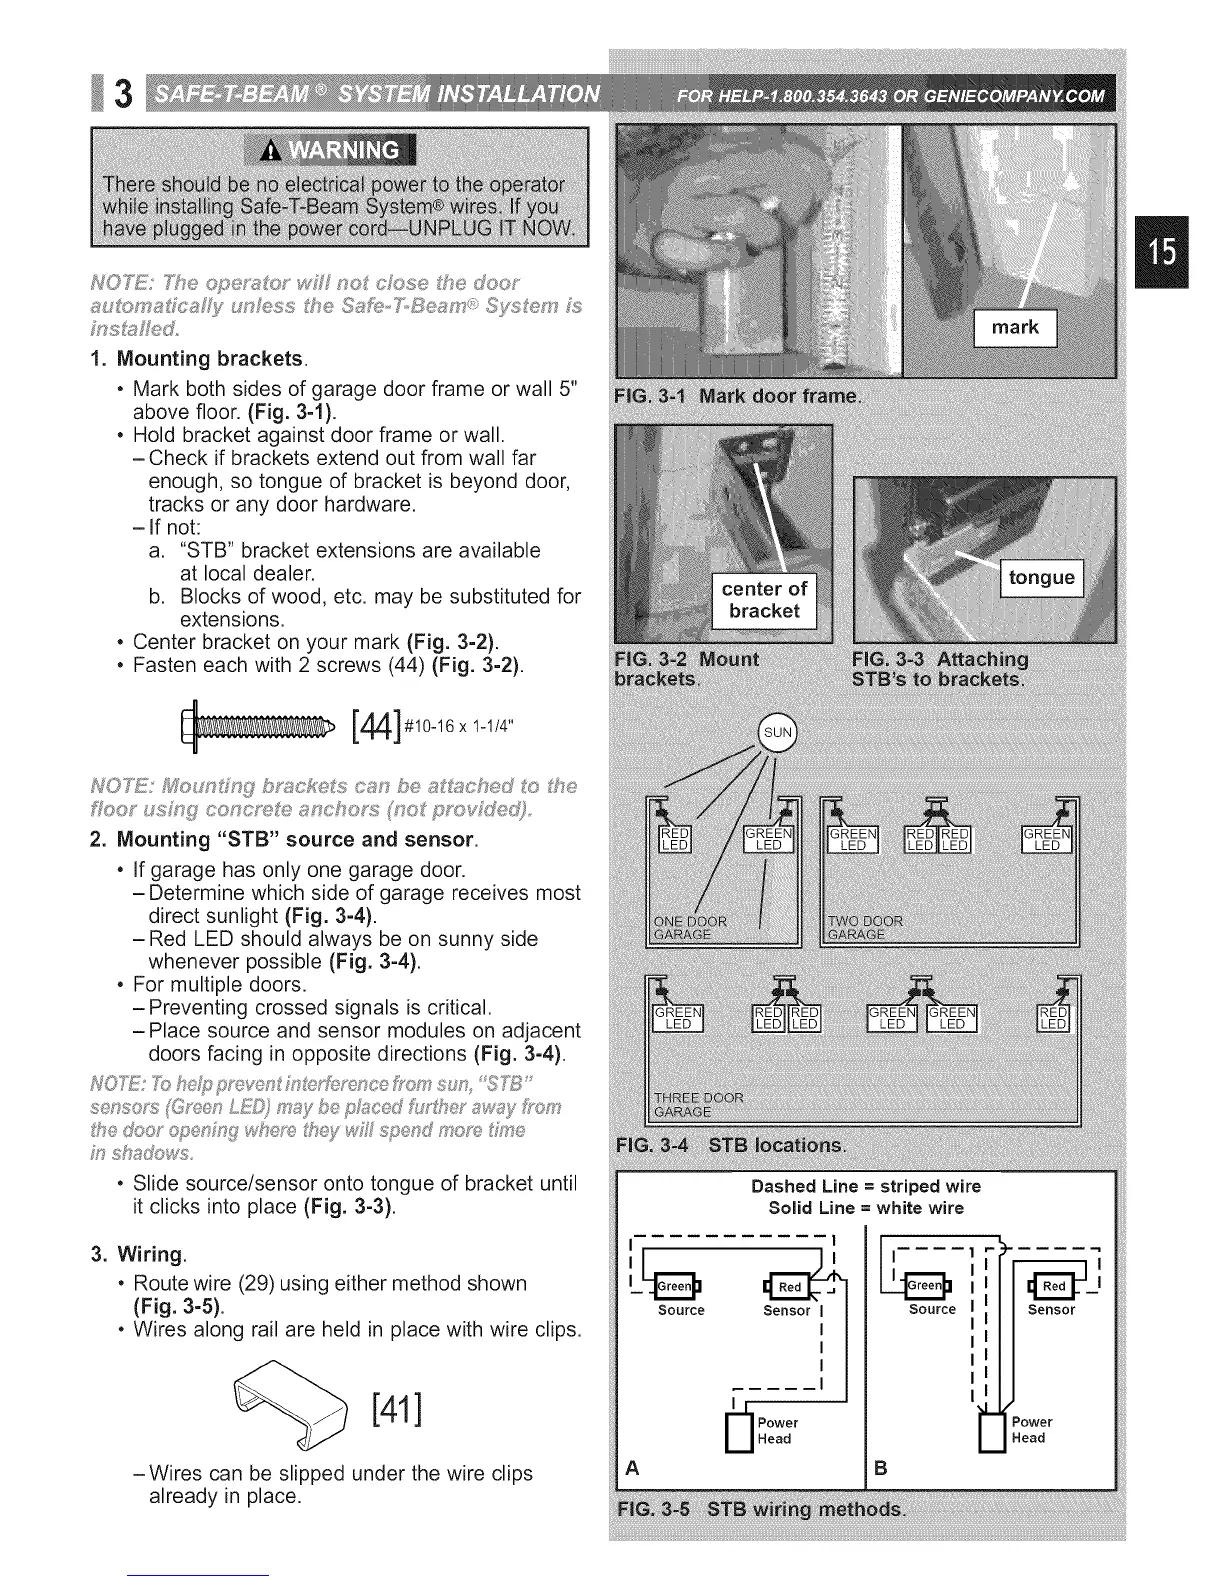
3
h_O_TE"%h....
1. Mounting brackets.
• Mark both sides of garage door frame or wall 5"
above floor. (Fig. 3-1).
• Hold bracket against door frame or wall.
- Check if brackets extend out from wall far
enough, so tongue of bracket is beyond door,
tracks or any door hardware.
-if not:
a. "STB" bracket extensions are available
at local dealer.
b. Blocks of wood, etc. may be substituted for
extensions.
• Center bracket on your mark (Fig. 3-2).
• Fasten each with 2 screws (44) (Fig. 3-2).
[44] #10-16 x 1-1/4"
2. Mounting "STB" source and sensor.
• If garage has only one garage door.
- Determine which side of garage receives most
direct sunlight (Fig. 3-4).
-Red LED should always be on sunny side
whenever possible (Fig. 3-4).
• For multiple doors.
-Preventing crossed signals is critical.
-Place source and sensor modules on adjacent
doors facing in opposite directions (Fig. 3-4).
• Slide source/sensor onto tongue of bracket until
it clicks into place (Fig. 3-3).
3. Wiring.
• Route wire (29) using either method shown
(Fig. 3-5).
• Wires along rail are held in place with wire clips.
[41]
-Wires can be slipped under the wire clips
already in place.
Source
A
Dashed Line = striped wire
Solid Line = white wire
1
_'lPower
U Head
Source
B
r- .i
Sensor
Power
Head
......i_:!:iii:iiii_i;iii_:!:iii:iiii_i;iii_:!:iiiii_i;iii_:!:iii:iiii_i;ii:iii:iiii_i;iii_:!:iii:iiii_i;iii_:!:iiiii_i;iii_:!:iii:iiii_i;ii:iii:iiii_i;iii_:!:iii:iiii_i;iii_:!:iiiii_i;iii_:!:iii:iiii_i;ii:iii:iiii_i;iii_:!:iii:iiii_i;iii_:!:iiiii_i;iii_:!:iii:iiii_i;ii:iii:iiii_i;iii_:!:iii:iiii_i;iii_:!:iiiii_i;iii_:!:iii:iiii_i;ii:iii:iiii_i;iii_:!:iii:iiii_i;iii_:!:iiiii_i;iii_:!:iii:iiii_i;ii:iii:iiii_i;iii_:!:iii:iiii_i;iii_:!:iiiii_i;iii_:!:iii:iiii_i;ii:iii:iiii_i;iii_:!:iii:iiii_i;iii_:!:iiiii_i;iii_:!:iii:iiii_i;ii:iii:iiii_i;iii_:!:iii:iiii_i;iii_:!:iiiii_i;iii_:!:iii:iiii_i;ii:iii:iiii_i;iii_:!:iii:iiii_i;iii_:!:iiiii_i;iii_:!:iii:iiii_i;ii:iii:iiii_i;iii_:!:iii:iiii_i;iii_:!:iiiii_i;iii_:!:iii:iiii_i;ii:iii:iiii_i;iii_:!:iii:iiii_i;iii_:!:iiiii_i;iii_:!:iii:iiii_i;ii:iii:iiii_i;iii_:!:iii:iiii_i;iii_:!:iiiii_i;iii_:!:iii:iiii_i;ii:iii:iiii_i;iii_:!:iii:iiii_i;iii_:!:iiiii_i;iii_:!:iii:iiii_i;ii:iii:iiii_i;iii_:!:iii:iiii_i;iii_:!:iiiii_i;ii!_
 Loading...