BRAIN 15
ENGLISH
Guide for the installer
Page 17
13. Send an OPEN command to determine the start of the
decelerated part and wait until the closing mechanical stop
point is reached.
14. When leaf 1 reaches the closing mechanical stop point, the
setup phase is completed. If it has been performed correctly,
LEDs LD4 and LD5 turn off. If this is not the case, LEDs LD4
and LD5 fl ash and the setup procedure must be repeated.
If the PROcoder is present, during manual SET-UP, the
leaves can be closed by means of the OPEN PULSE
AFTER START OF DECELERATION. (e.g. if there are
no mechanical stops).
With the MANUAL SETUP procedure, the leaf delay at
closure is set by default. To change it, execute a second
level programming (see paragraph 6.3.4.).
Pause time and leaf delay values can be modifi ed, both
at closure and at opening, by simply programming the
second level parameters, without repeating the setup
procedure.
6.3.3 PROGRAMMING OF THE LOGIC
Repeatedly press the SW3 push-button to select one of the 7
programming logics available. The selected logic is signaled by
the LD7 LED. The number of blinkings corresponds to the number
of the selected logic:
Tab. 3 - Selection logic
Logic
N°
pressure
SW3
N°
blinkings
LD7
“A”
Automatic
11
“E”
Semi-automatic
22
“AP”
"Stepped" automatic
33
“EP”
"Stepped" semi-automatic
44
“A1”
Automatic 1
55
“b”
Semi-automatic “b”
66
“C”
Dead man
77
6.3.4. SECOND LEVEL PROGRAMMING
To enter the second level menu, keep the SW2 SPEED push-
button pressed for more the 2.5 seconds. The two SETUP LEDs
are permanently lit. In this mode, the SPEED push-button is used
to scroll the menus. The different menus are identifi ed by the
number of blinkings.
The parameter value is set with the LOGIC push-button. The menu
is scrolled sequentially. Keep the SPEED push-button pressed for
2.5 seconds to exit the second level menu.
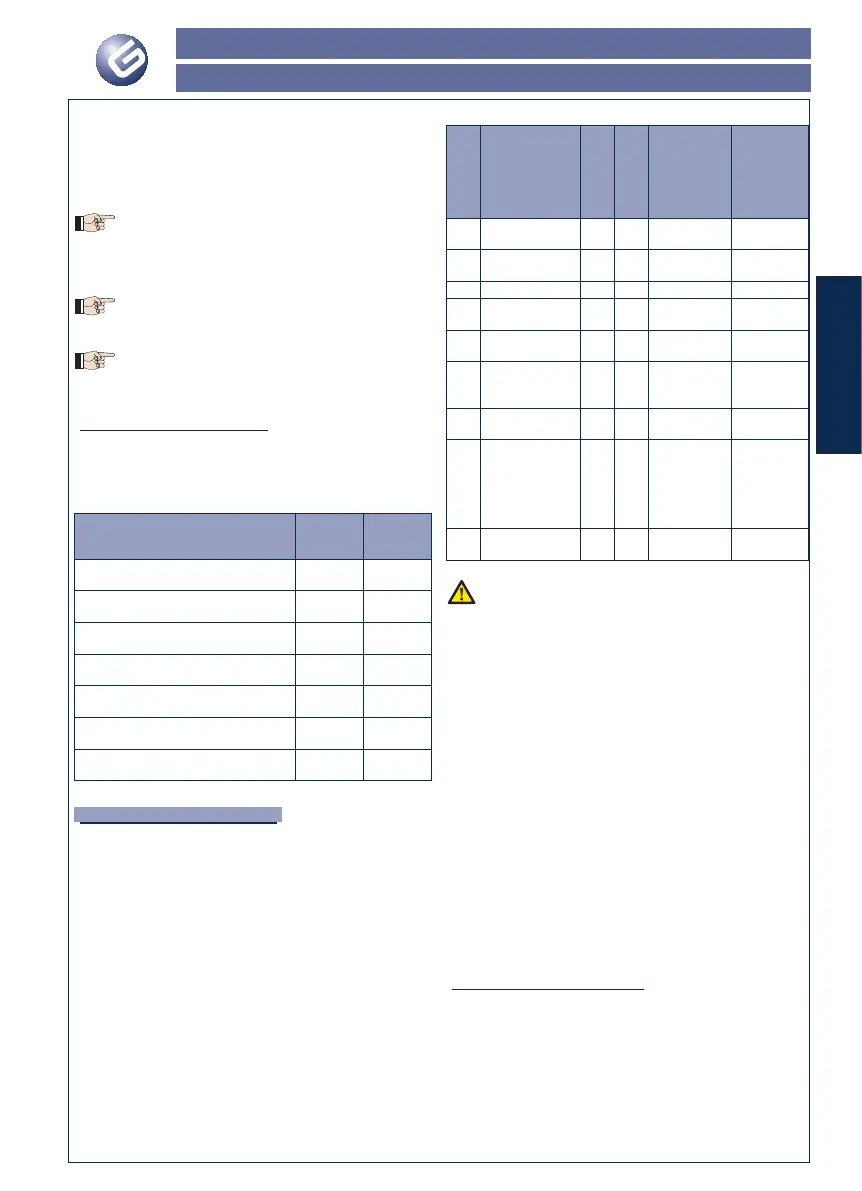
Tab. 4 - Programming features
Menu
Function
N° pressure
SW2
N° fl ashes
LD8
LD7
on
LD7 off
1
Wind-proof
facility
1 1 YES NO
2
Over pushing
stroke
2 2 SI NO
3 Soft-touch 3 3 SI NO
4
Preliminary
blinking
4 4 SI NO
5
Leaf opening
delay
5 5 SI NO
6
Leaf closing
delay
66
counting
of delayed
leaf
—
7 Pause time 7 7
counting
time break
—
8
Stop point se-
arch space
(function active
only if
PROcoder avai-
lable)
88
LOW
Long leaf
HIGH
Short leaf
9 Service Light 9 9
closed sta-
tus function
standard
function
With menus 6 and 7, keep the LOGIC push-button pres-
sed until reaching the time to be set. The time can be
set between 0 and 4.25 minutes.
Windproof function: The windproof function allows the gate to
operate even in gusts of wind. The obstacle search time is set at
5 sec. and commands motion reversal.
Reverse stroke: With the gate closed, the reverse stroke function
entails that before opening, the motors push in closing for approxi-
mately 3 seconds to facilitate release of the electric lock.
Soft-touch: The soft touch function allows the leaves, after having
touched the stop in closing, to move back to then lean delicately.
This function can be useful to respect the impact curve required
by standards in force.
Pre-fl ashing: Activated approximately 3 sec. before each opening
and closing movement
Leaf opening delay: Delays opening of leaf 2 respect to leaf 1,
thus preventing interference between the leaves.
Leaf closing delay: Delays closing of leaf 1 respect to leaf 2.
Standby time: In A, AP, A1 logics, this is the time set for the leaf
to reclose after opening.
Stop point search space: This parameter adjusts the mechanical
stop search angle within which the board stops the movement
without reversing if an obstacle is encountered or the mechanical
stop itself can be adjusted. It is only active if PROcoder is installed.
Service Light: This parameter defi nes the service light control
(See section 3.2).
6.3.5. RETURN TO DEFAULT SETTING
1. Keep the SETUP push-button pressed to switch the board
ON.
2. The two SETUP LEDs are alternately lit ("level crossing"
mode).
3. The board resets the parameters.
4. Until the SETUP push-button is pressed, movements are
inhibited.
5. When the SETUP push-button is released, the two LD4 and
LD5 LEDs blink.
6. The default confi guration is reset and the new Setup can
be started.
 Loading...