EasyManua.ls Logo

Glacier bay 1009257515 User Manual

Glacier bay 1009257515
14 pages
To Next Page IconTo Next Page
Page #1 background imageLoading...
Page #1 background image
USE AND CARE GUIDE
Model#
HD58302-1701
HD58302-1704
HD58302-1710H
HD58302-174405
SKU#
1009257515
1009647221
1009258072
1009258128
Modern 1-Spray 7.9 in. Raincan Shower Head
with 1-Spray 3.4 in. Handheld Hand Shower
Questions, problems, missing parts?
Before returning to the store, call Glacier Bay Customer Service
8 a.m. - 7 p.m., EST, Monday - Friday
9 a.m. - 6 p.m., EST, Saturday
01-800-00-4663-3
HOMEDEPOT.COM.MX
Questions, problems, missing parts?
Before returning to the store, call Glacier Bay Customer Service
8 a.m. - 7 p.m., EST, Monday - Friday
9 a.m. - 6 p.m., EST, Saturday
1-855-HD-GLACIER (1-855-434-5224)
HOMEDEPOT.COM
We appreciate the trust and confidence you have placed in Glacier Bay through the purchase of this wall bar shower kit.
We strive to continually create quality products designed to enhance your home. Visit us online to see our full line of
products available for your home improvement needs. Thank you for choosing Glacier Bay!
THANK YOU
REV.01HOMEDEPOT.COM 03/2023
Internet#
324593578
325600513
324593652
324593576
Question and Answer IconNeed help?

Do you have a question about the Glacier bay 1009257515 and is the answer not in the manual?

Glacier bay 1009257515 Specifications

General IconGeneral
BrandGlacier bay
Model1009257515
CategoryPlumbing Product
LanguageEnglish

Summary

Pre-Installation

PLANNING INSTALLATION

Ensure all parts are present and undamaged before starting the installation process.

TOOLS REQUIRED

Lists the necessary tools for installation, primarily a wrench.

PACKAGE CONTENTS

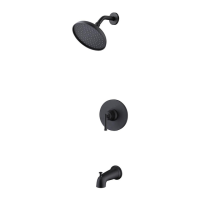
Details all the components included in the product packaging, with part identifiers.

Installation

Preparing for installation

Steps to remove the old showerhead and clean the shower arm thread before new installation.

Installing the diverter

Instructions for applying sealant tape and attaching the diverter to the shower arm.

Installing the showerhead

Guidance on applying sealant tape and hand-tightening the showerhead onto the diverter.

Installing the handshower and hose

Steps to connect the hose to the diverter and the handshower.

Installation

Move the cover

Instructions for sliding the cover up to remove it, likely for access or adjustment.

Install the suction bracket

Steps to install the suction bracket on the wall, including positioning and securing the suction cup.

Move the cover

Instructions for sliding the cover back into place on the suction bracket.

Finishing the installation

Final steps involve turning on water, checking for leaks, tightening, and placing the hand shower.

Care and Cleaning

Preserve the finish of the showerhead using a non-abrasive wax.

Recommends using non-abrasive wax to maintain the showerhead's finish.

When using non-abrasive cleaners, rinse off immediately when finished cleaning the showerhead.

Advises rinsing the showerhead promptly after cleaning with non-abrasive agents.

Do not use abrasive cleaners when cleaning this showerhead.

Warns against using abrasive cleaning products on the showerhead to prevent damage.

If your product is not equipped with prevention, in order to make your product backflow compliant, avacuum breaker will need to be added.

Mentions adding a vacuum breaker for backflow compliance if the product lacks built-in prevention.

Related product manuals