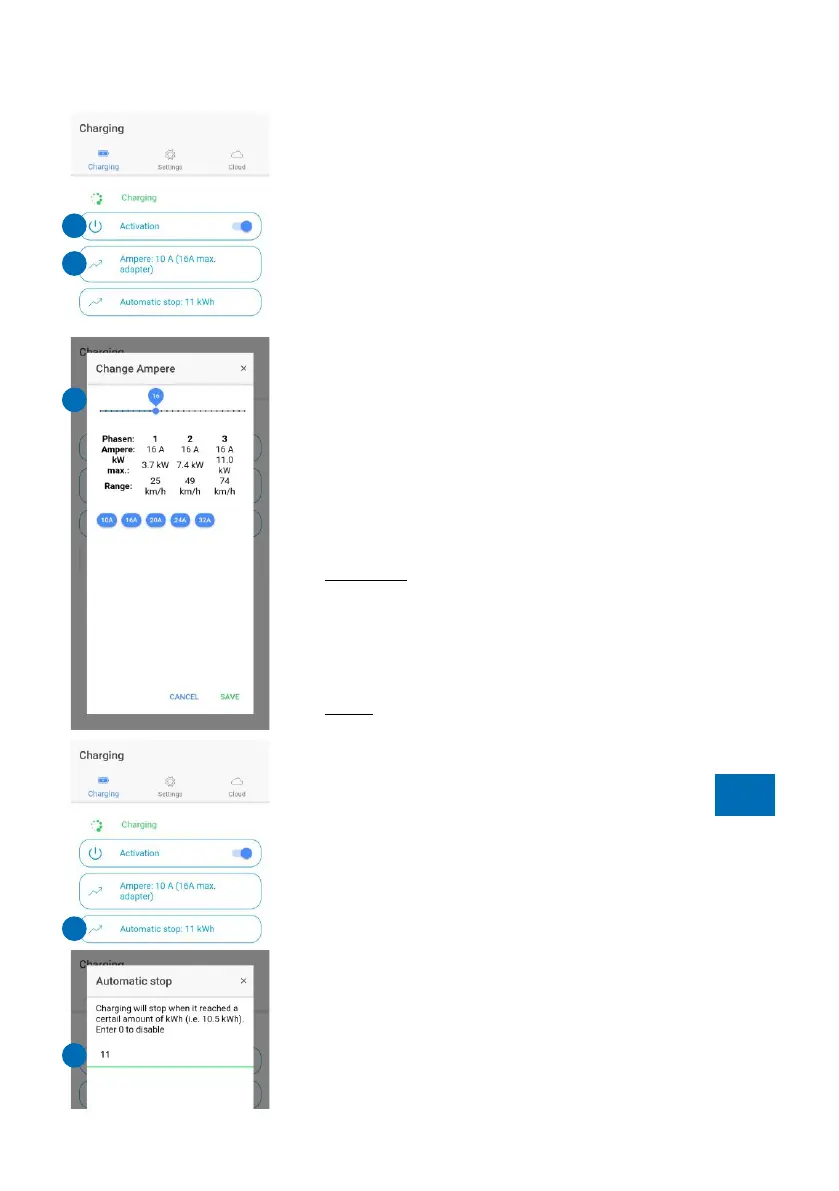
Activation (2)
You can activate or deactivate your charging
processes via the regulator (2). If "Activation" is
permanently switched on, charging starts
automatically. With the corresponding default setting
under "Settings/Access control" (12), you have to
authorise each charging process via this button of
the app or RFID chip/card.
The charging cable remains locked in the default
setting until it is removed from the vehicle.
Change ampere (3)
The charging power can be freely selected between
6 and 16 A (HOME+ 11 kW) or 32 A (HOME+ 22 kW)
via the slider (4) after pressing the "Ampere" button
(3). This setting is identical for all phases.
Practical: This setting can also be used to regulate
the charging current during the charging process.
The overview also shows you the approximate
theoretical charging time (depending on how many
phases your car is charging with).
Note: To change the default settings for the blue push
button of the go-eCharger, look at "Settings/Button"
(9).
Automatic stop (5)
If you only want to charge a certain amount of
electricity, use the „Automatic stop" button (5) to set
the maximum kWh (6) with which the vehicle's
battery is going to be charged. Does not work
together with the access control types „Electricity
prices“ (13) and „Scheduler“ (15).
The function is practical if you do not want to fully
charge the battery, e.g. because you live on a
mountain and want to recuperate when driving
downhill or if you are able to charge cheaper at your
employer's site.
Page 16
Charging details (7)
If you touch the button "Show more" (7), an overview
opens below it in which you receive further
information about the current and the total amount of
electricity charged with the Charger (in kWh). In
addition, you can see, for example, data on the
current charging power or current intensity on the
individual phases.
Settings
Serial (8)
The serial number of the connected go-eCharger.
Button (9)
You can set/change up to five charging levels for the
blue button of the go-eCharger in the app via
„Button" (9). You activate the entered charging levels
(11) by repeatedly pressing the blue Charger push
button. Entry fields with the value "0" are skipped.
Default values are already predefined when the unit
is delivered.
Access control (10)
You can choose between four options (12):
1. Open: charging starts immediately after
connecting the charger to the vehicle.
2. RFID/app: charging process needs to be enabled
by the slider "Activation" (2) or RFID.
3. Electricity prices: this option is currently only
available in Germany/Austria and requires Internet.
You also need to be an electricity customer of
aWATTar. (more information www.awattar.com/services/goe)
4. Scheduler: you only charge at specified times.
Depending on the option selected, you need to
Page 17
TIP
TIP
The appThe app
3
2
4
5
6
7
11
9
10
8
12