configure the following detailed settings.
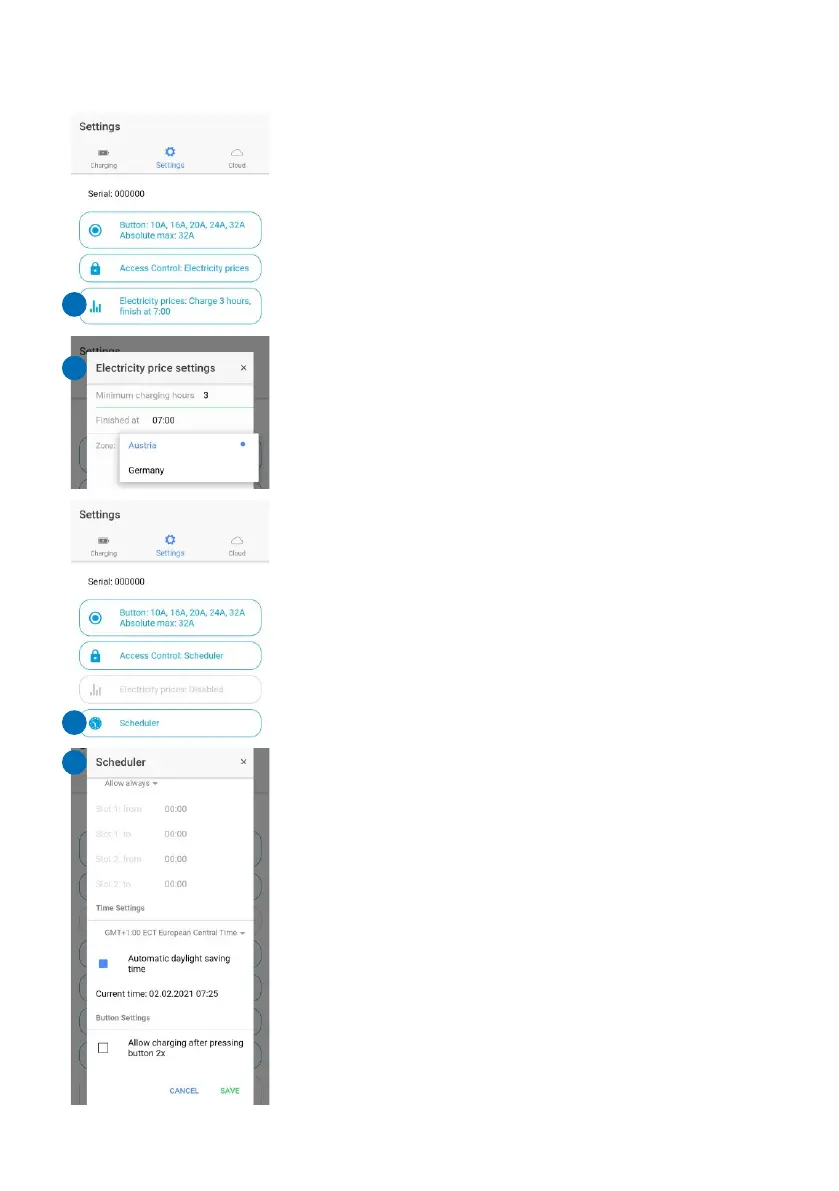
Electricity prices (13)
After selecting the access control option Electricity
prices, you define via the button "Electricity prices"
(13) further details (14). You have to deposit your
country (zone) and define how many hours the car
should charge at least. You also define the time for
the end of the charging process. The go-eCharger
now automatically determines when the electricity is
cheapest for the defined number of consecutive
hours and starts the charging process in the time
slot. If the battery is not yet fully charged, the
charging process will continue automatically.
Scheduler (15)
Define the times for your charging processes via the
app button „Scheduler" (15), if you have selected the
option scheduler as type of "Access control" (10).
You can "Always allow" (16) or only allow or prohibit
charging at certain times. Two time periods can be
defined for weekdays and the weekend. The current
time is determined automatically after you have set
the time zone. An Internet connection is required for
this. (If the charger is disconnected from the power
supply, the current time needs to be determined
again via the Internet.)
If you occasionally want to charge without a
scheduler, activate the option "Allow charging after
pressing button 2x". Then you can also start the
charging process by pressing the blue push button of
the charger twice.
Show RFID cards (17)
The go-eCharger can be unlocked using an RFID
card/chip if the corresponding option has been
selected at "Access control". To do this, simply hold a
learned RFID chip/card in front of the RFID sign of
the charger. You can find the RFID cards/chips
(maximum of ten) that have been registered with the
Page 18
charger in the app by scrolling all the way down in the
section "Settings" and clicking on "Show RFID card
settings" (17). You manage them by selecting the
desired "Card". The charged kWh (without decimal
places) is stored for each card (chip). The RFID chip
included in the scope of delivery is already learned
as "Card 1" and can therefore be used immediately.
Learn a card/chip (18)
If you want to allow additional people access to the
charging station via RFID, you have to learn
additional cards/chips. First select a free card slot in
the app. Now hold the RFID chip or the RFID card to
be learned close to the go-eCharger (but never the
go-eCharger reset card) until 5 red LEDs light up and
then press "Learn" (18) in the app at the same time.
Now 5 green dots should light up, which means that
the card has been learned. You can now also rename
the card.
Note: Any RFID card that transmits on a frequency of
13.56 MHz can be learned.
Delete card/chip (18)
You can also delete learned cards (18). With the
card, all data on the corresponding memory location
of the charging unit will be deleted. If you want to
reset the charged current to zero, you have to delete
the entire card and learn it again.
Load balancing (19)
You can obtain detailed instructions at static load
balancing directly in the app. You will find the menu
item in the section "Settings" (19). Select the option
"Load balancing over cloud" (20). A WiFi connection
Page 19
ATTENTION
The appThe app
15
13
14
16
17
18
19