SPRAY
TIP
and
TIP
GUARD
To
reduce the
risk
of fluid injection or splashing In the
eyes or on the skin, completely relieve the fluid pres-
sure before installing, cleaning orchanglngtips.
See
the Pressure Relief Procedure on page
4.
WARNING
Failure
to
install or
use
the
RAC
IV
tip guard assem-
bly correctly may result In an undirected spray
of
paint into the eyes or on the skin of
the
operator.
Be
sure you:
0
Use the appropriate gasketforthe solventused.
0
Fully insert the SwitchTip Into the guard.
0
Fully tighten the guard onto the gun nozzle using
0
Tum the SwitchTip handle
so
it
is
parallel to the
0
When replacing a wom spray tip, always install
a wrench.
gun nozzle.
a new gasket and seat.
Gasket Selection
WARNING
To
reduce the risk of fluid splashback into the eyes
fied
in the following text.
or on the skin,
use
the appropriate gasket as specl-
Use the black rubber gasket
(D)
ONLY with latex and oil-
tine and water. When using this gasket, the SwltchTip can
based paints, stoddard solvents, mineral spirits, tUrpen-
be
removed
and
replaced Without using tools.
fluids as above and with
moa
other solvents, including
Use
the
red
or
yellow plastlc gasket (C) with the same
lacquer thinner, trichloroethylene,
MEK,
acetone, brush
cleaner, xylol. When using this gasket, loosen the
RAC
IV
retaining nut to remove the Switch'Tip.
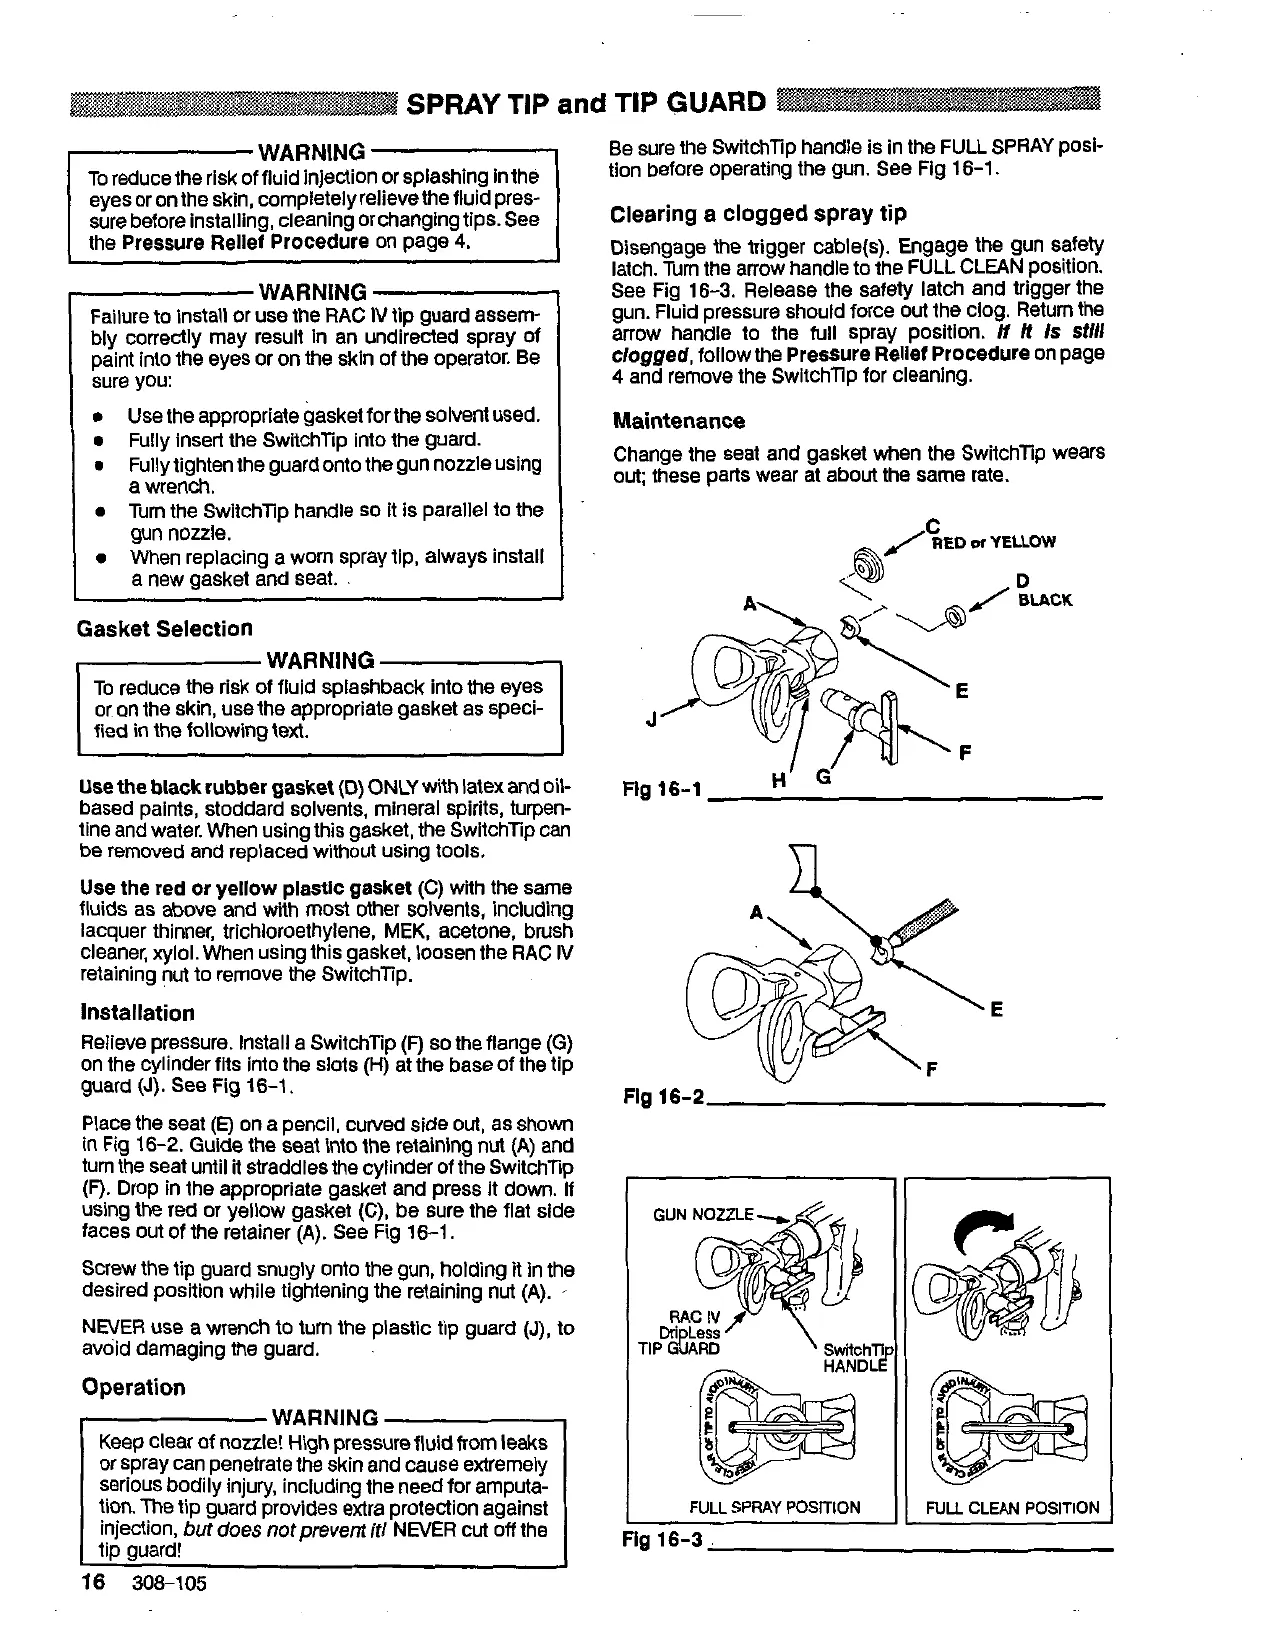
Installation
Relieve pressure. Install a SwitchTip
(F)
so
the flange (G)
on the cylinder
fits
into the slots
(H)
at the base of the tip
guard
(J).
See
Fig
16-1.
Place the seat
(E)
on a pencil, curved side
out,
as shown
in Fig
16-2.
Guide the seat into the retaining nut (A) and
turn the seat until
it
straddles the cylinder of the SwltchTip
(F).
Drop in the appropriate gasket and press It down. If
using the red or yellow gasket (C), be sure the flat side
faces out of the retainer (A).
See
Fig
16-1.
Screw the tip guard snugly onto the gun, holding it in the
desired position while tightening the retaining nut (A).
'
NEVER
use a wrench
to
turn the plastic tip guard
(J),
to
avoid damaging the guard.
Operation
WARNING
Keep
clear of nozzle! High pressure fluid from leaks
or spray can penetrate the skin and cause extremely
tion. The tip guard provides extra protection against
serious bodily injury, including the need for amputa-
injection,
bot
does
notprevent
if!
NEVER
cut
off
the
tip guard!
2
16
308-105
tion before operating the gun.
See
Flg
16-1.
Be
sure the SwitchTip handle Is in the FULL
SPRAY
posl-
Clearing a clogged spray
tip
Disengage the trigger cable@). Engage the gun safety
latch.
Turn
the arrow handle to the FULL CLEAN position.
See
Fig
16-3.
Release the safety latch and trigger the
gun. Fluid pressure should force out the clog. Return the
clogged, follow
the
Pressure Relief Procedure on page
arrow handle to the
full
spray position.
ff
ff
Is
sflll
4
and remove the SwitchTip for cleaning.
Maintenance
Change the seat and gasket when the SwitchTip wears
out;
these parts wear at about
the
same rate.
n
Flg
16-2
v
I
FULL SPRAY POSrrlON
1 1
FULL
CLEAN POSITION
Ig
16-3
-I
 Loading...


