EasyManua.ls Logo

Graco FinishPro 395 User Manual

Graco FinishPro 395
2 pages
To Next Page IconTo Next Page
Page #1 background imageLoading...
Page #1 background image
www.graco.be
INBETRIEBNAHME
Attach fluid high pressure swivel and
gun air regulator to gun.
Connect blue fluid hose to fluid
inlet fitting on gun fluid tube.
Tighten securely.
Cut air hose to length
and couple to air connection on
air/fluid supply hose.
If air cap is installed
on gun, remove it
.
Fill throat packing nut with TSL to
prevent premature packing wear.
Do this each time you spray.
Lock gun trigger safety. Turn
prime valve down.
Set function selection
switch to AIRLESS.
Turn prime valve
horizontal. Unlock
gun trigger sefety.
Hold gun against grounded metal
flushing pail.
Trigger gun and increase fluid pres-
sure to 1/2. Flush 1 minute.
Lock gun trigger safety.
Assemble tip and air cap.
Diese Vorgehensweise gilt für Reinigungsflüssigkeiten und Farben auf Wasserbasis. Für lösemittelhaltige Farben
und Reinigungsflüssigkeiten müssen Sie unbedingt die Sicherheitshinweise für Feuer- und Explosionsgefahr in der
Anleitung lesen!
* Für nähere Angaben beachten Sie bitte die Bedienungsanleitung, die dem Gerät beiliegt.
INBETRIEBNAHME / DIRECT IMMERSION TUBE - 390 ONLY
ACHTUNG
Unscrew fluid hose set. Pull hose
down and remove from pump.
Tilt sprayer backward. Align end of direct
immersion tube with bottom of pump.
Push tube into bottom of pump
and tighten fitting securely.
Remove direct immersion
tube from brackets.
FinishPro
290/390/395
Kurzanleitung
Attach air hose to sprayer air fitting and
fluid hose to fluid fitting. Tighten securely.
Anschluss der Pistole an den Schläuchen.
Die verbundenen Schläuche flach
nebeneinander legen.
Das erste Schlauchband
0,5 bis 1 m vor dem
Spritzgerät anbringen.
Weitere Bänder in
Abständen von 0,5
bis 1 m anbringen.
Den Luftschlauch am
Haken am ufteinstell-
ventil anschließen.
nur 390/395
nur 290
Remove and
check
inlet straine
for clogs
and debris.
nur 390/395
Verify function selection switch
is OFF. Plug power supply cord
into properly grounded electrical
outlet.
nur 390/395
nur 290
Place suction tube in grounded metal
pail partially filled with flushing fluid and drain
tube in waste pail. Attach ground wire to pail
and to true earth ground.
WASTE
FLUSH
Turn fluid pressure
all the way down.
390/395
290
290
390/395
Increase pressure to start motor and
allow fluid to circulate through drain tube
for 15 seconds; then turn pressure down.
290
390/395
Place siphon tube in
paint pail. Trigger gun again
into flushing pail until paint
appears.
Move gun to paint pail
and trigger for 20 seconds.
WASTE
PAINT
Den Sitz (33a) ins Sitzgehäuse (35) einsetzen.
Das Sitzgehäuse (35) in die Luftkappe (6)
einsetzen. Die Dichtung (33b) über dem Sitz (33a) ein-
setzen. Für Materialien auf Wasserbasis die schwarze
Dichtung und für Materialien auf Lösungsmittel- und
Mineralölbasis die orange Dichtung verwenden.
6
Fill throat packing
nut with TSL
to prevent
premature packing wear
.
35
33a
33b
33
Entfernen Sie die
RAC-Luftkappe
Montieren Sie die Zerstäuber-
düse in die Flachdüsen
Luft-kappe. Steg der Düse in
die Nut der Luftkappe.
Entfernen Sie den
Diffusor mittels des
Pistolen Werkzeug´s.
Montieren Sie den neuen
Diffusor an die Pistole.
Drehmoment 18-19Nm
Montieren Sie die
Flachdüsen Luftkappe

Other manuals for Graco FinishPro 395

Question and Answer IconNeed help?

Do you have a question about the Graco FinishPro 395 and is the answer not in the manual?

Graco FinishPro 395 Specifications

General IconGeneral
BrandGraco
ModelFinishPro 395
CategoryPaint Sprayer
LanguageEnglish

Summary

Initial Setup and Commissioning

Connect Air and Fluid Hoses

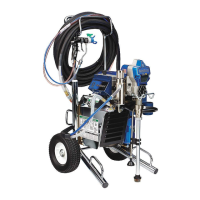
Attach air hose to sprayer air fitting and fluid hose to fluid fitting, ensuring they are tightened securely.

Prepare Gun and Regulators

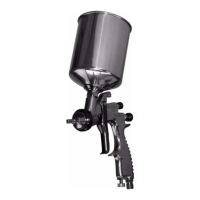
Attach fluid high pressure swivel and gun air regulator to the gun for proper operation.

Connect Fluid Hose to Gun

Connect the blue fluid hose to the gun's fluid inlet fitting and tighten securely.

Prepare Air Hose

Cut the air hose to the required length and couple it to the air connection on the air/fluid supply hose.

Check Inlet Strainer

Remove and inspect the inlet strainer for any clogs or debris to ensure proper flow.

Electrical Setup and Safety Checks

Ensure the function selection switch is OFF, then plug the power cord into a grounded outlet.

Initial Priming Procedure

Lock trigger safety, turn prime valve down, increase pressure to circulate fluid, then turn pressure down.

Flushing Preparation

Set up pails for waste and flushing fluid, attach ground wire to pail and earth ground.

Flush System

Hold gun against flushing pail, trigger, and increase pressure to flush fluid through the system.

Prepare for Paint

Move gun to paint pail, trigger to draw paint, then set function switch to AIRLESS.

Final Assembly

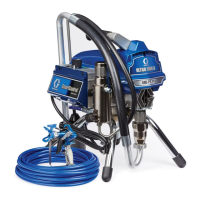
Assemble the tip and air cap onto the gun for spraying.

Direct Immersion Tube Setup (390 Only)

Remove Immersion Tube

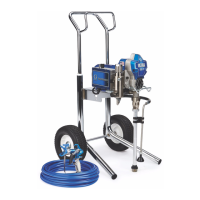
Remove the direct immersion tube from its brackets before proceeding.

Disconnect Fluid Hose

Unscrew the fluid hose set and pull the hose down to remove it from the pump.

Install Immersion Tube

Tilt sprayer, align immersion tube with pump bottom, push in, and tighten fitting securely.

Spraying Modes

Air-Assisted Spraying

Steps for operating the sprayer in air-assisted mode, including pressure adjustments.

Airless Spraying Technique

Guidelines for airless spraying, including gun positioning and pressure settings for optimal patterns.

Cleaning and Maintenance

Initial Cleaning Steps

Power off, unplug, set lowest pressure, relieve pressure, lock trigger, and set drain tube.

Prepare for Flushing

Remove gun parts, prepare flushing fluid, plug in, set to AIRLESS, and turn prime valve horizontal.

Flush Paint and System

Flush paint from gun into pail, then flush system thoroughly with cleaning fluid.

Drain and Purge

Circulate fluid to clean drain tube, drain fluid, and purge remaining fluid from the hose.

Final Cleaning and Protection

Clean filters, wipe down sprayer, hose, and gun, and apply protective coating if needed.

Related product manuals