EasyManua.ls Logo

Graco ST Max 395 - User Manual

Graco ST Max 395
2 pages
Print Icon
To Next Page IconTo Next Page
Loading...
www.graco.be
ST Max
395
ST Max
II 495/595
SETUP
Connect hose to sprayer and gun.
Tighten hose connections with wrench.
Unscrew tip & guard from gun.
Fill throat packing nut with TSL
to prevent premature packing wear.
Make sure power
switch is set to OFF.
Plug electrical cord
into grounded outlet.
Turn prime valve
to Prime position (down).
Place siphon tube in pail
partially filled with water.
Turn pressure control knob
to lowest pressure, and set
power switch to ON.
Increase pressure until
sprayer starts and water
runs out of prime tube.
Let water run out of prime
tube for 15 seconds.
Decrease pressure
until sprayer stops.
Turn prime valve
to Spray position
(horizontal).
Make sure safety
lever of gun is OFF.
Aim gun at inside
wall of water pail
and squeeze trigger.
Increase pressure until
sprayer starts. Keep gun
triggered into water pail for
1 minute. Release trigger.
Turn prime
valve to Prime
position (down).
Place siphon tube in paint
pail, but leave drain tube
in water pail.
Aim gun at inside
wall of water pail,
and squeeze trigger.
Transfer drain
tube to paint pail.
Increase pressure until
sprayer starts and paint
comes out of drain tube.
Keeping gun triggered into water
pail, turn prime valve
to Spray position (horizontal).
When paint comes out of gun,
release trigger and turn safety
lever of gun to ON.
Screw tip & guard onto gun, making sure
arrow-shaped handle of tip is pointing forward.
You can reverse this tip to quickly clear clogs
without taking it apart.
This procedure is for water-base paints and flushing fluids. For solvent-base paints and flushing
fluids (i.e. mineral spirits), you must read Fire and Explosion Hazard in the Operating Instructions.
* check the Graco operations manual delivered with the unit for more details.
CHOOSE THE RIGHT TIP & FILTER
WARNING
Quick Operators Guide
207
307
109
209
309
409
509
609
111
211
311
411
511
611
113
213
313
413
513
613
115
215
315
415
515
615
815
217
317
417
517
617
817
917
119
219
319
419
519
619
819
121
221
321
421
521
621
721
821
223
323
423
523
623
723
225
325
425
525
625
725
327
427
527
627
827
429
529
629
729
331
531
631
831
433
533
633
833
235
435
535
635
735
835
935
439
443
543
645
451
551
455
555
655
5 cm
10 cm
15 cm
20 cm
25 cm
30 cm
35 cm
40 cm
45 cm
3 cm
7 cm
10 cm
15 cm
20 cm
25 cm
30 cm
35 cm
40 cm
pump filter
gun filter
200 mesh
100 mesh
100 mesh
100 mesh
60 mesh
60 mesh
none
none
30 mesh
* at 30 cm spraying distance
Ink
Stains
Lacquers
Enamels
Urethanes
Acrylics
Emulsions
Latex
Block filler
Intumescents
Texture material
for spray applications
1
st
digit X5
=
fan width
*
Time to
change!
NEW
WORN
Question and Answer IconNeed help?

Do you have a question about the Graco ST Max 395 and is the answer not in the manual?

Summary

Setup and Initial Operations

Connect and Prepare Equipment

Connect hoses, prepare gun, ensure power is off, and plug in.

Water Priming Procedure

Prime the sprayer using water, flushing it through the system.

Transferring to Paint

Move siphon tube to paint pail and drain tube to water pail.

Paint Spraying Setup

Aim gun at paint, increase pressure, and adjust prime valve.

Tip and Filter Selection Guide

Material and Application Guide

Table for selecting spray tips and filters based on material type.

Tip Reversal for Clogs

Instructions on reversing the tip to clear blockages.

Spraying Technique

Proper Spraying Method

Technique for achieving an even spray pattern and setting pressure.

Shutdown and Cleanup

System Shutdown

Steps to safely turn off the sprayer and relieve pressure.

Disassembly and Cleaning

Instructions for disassembling and cleaning gun, filters, and parts.

Flushing and Final Cleaning

Process for flushing the system with water and Pump Armor.

Reassembly and Storage

Reassembling the gun and applying lubricant.

Overview

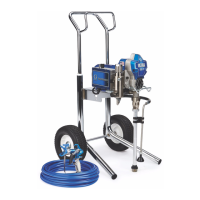
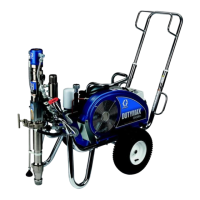
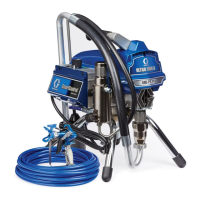
The Graco ST Max 395, ST Max II 495/595 is a professional-grade airless paint sprayer designed for efficient application of various coatings, including water-base paints, lacquers, enamels, urethanes, acrylics, emulsions, latex, block fillers, and intumescents. It is suitable for both residential and commercial painting projects, offering features that enhance ease of use, performance, and maintenance.

Function Description

The sprayer operates by pressurizing paint and forcing it through a small tip, creating a fine, atomized spray pattern. This method allows for faster application and a smoother finish compared to traditional brush or roller methods. The device is equipped with a pressure control knob, allowing users to adjust the spray pressure to match the specific material being applied and achieve the desired finish. A prime valve facilitates priming the system and switching between prime and spray modes, which is crucial for proper operation and cleaning. The gun features a safety lever to prevent accidental triggering, enhancing user safety. The system is designed to handle a range of viscosities, from thin stains to thicker texture materials, by selecting the appropriate tip and filter combination.

Important Technical Specifications

While specific pressure ratings and motor power are not explicitly detailed in the provided manual, the device's capability to spray various materials implies a robust pump and motor system. The tip selection chart provides critical specifications for different applications:

  • Tip Sizes: Tips are categorized by fan width (first digit) and orifice size (last two digits). For example, a "207" tip has a 2-inch fan width and a 0.007-inch orifice. The manual lists tip sizes ranging from 109 (1-inch fan, 0.009-inch orifice) to 935 (9-inch fan, 0.035-inch orifice).
  • Filter Mesh: The system utilizes both a pump filter and a gun filter, with recommended mesh sizes varying by material:
    • Pump Filter: 200 mesh for ink, 100 mesh for stains, lacquers, enamels, urethanes, acrylics, emulsions, latex, and block fillers. 60 mesh for intumescents. 30 mesh for texture materials.
    • Gun Filter: 100 mesh for ink, stains, lacquers, enamels, urethanes, acrylics, emulsions, latex, and block fillers. 60 mesh for intumescents. No filter recommended for texture materials.
  • Fan Width: The manual provides a conversion chart for fan width, indicating that the first digit of the tip number corresponds to the fan width in inches (e.g., "1" = 1 inch, "2" = 2 inches, up to "9" = 9 inches). It also provides approximate fan widths in centimeters at a 30 cm spraying distance (e.g., 10 cm for a "2" series tip, 40 cm for an "8" series tip).
  • Worn Tip Indicator: A useful feature is the "Time to change!" column, which indicates when a tip is worn out by comparing the new tip's fan width to the worn tip's fan width. For example, a new "2" series tip (10 cm fan) should be changed when its fan width expands to 7 cm. This helps maintain spray quality and efficiency.

Usage Features

The Graco ST Max series is designed for user-friendly operation, from initial setup to spraying and cleanup.

  • Quick Setup: The manual outlines a straightforward setup process:
    1. Connecting the hose to the sprayer and gun, tightening with a wrench.
    2. Unscrewing the tip and guard from the gun.
    3. Filling the throat packing nut with TSL™ (Throat Seal Liquid) to prevent premature packing wear.
    4. Ensuring the power switch is OFF.
    5. Turning the prime valve to the Prime position (down).
    6. Placing the siphon tube in a pail partially filled with water.
    7. Turning the pressure control knob to the lowest setting and setting the power switch to ON.
    8. Increasing pressure until the sprayer starts, keeping the gun triggered into the water pail for 1 minute.
    9. Increasing pressure until water runs out of the prime tube for 15 seconds.
    10. Turning the prime valve to the Prime position (down) and decreasing pressure until the sprayer stops.
    11. Plugging the electrical cord into a grounded outlet.
    12. Turning the prime valve to the Spray position (horizontal).
    13. Placing the siphon tube in the paint pail and the drain tube in the water pail.
    14. Aiming the gun at the inside wall of the water pail and squeezing the trigger.
    15. Increasing pressure until paint comes out of the drain tube.
    16. Keeping the gun triggered into the water pail, turning the prime valve to the Spray position (horizontal).
    17. Releasing the trigger and turning the safety lever to ON once paint comes out of the gun.
    18. Screwing the tip and guard onto the gun, ensuring the arrow-shaped handle of the tip points forward. The reversible tip design allows for quick clearing of clogs.
  • Spraying Technique: The manual emphasizes proper spraying technique:
    1. Turning the safety lever of the gun to OFF.
    2. Pointing the gun at the area to be sprayed, approximately 30 cm from the surface.
    3. Beginning to move the gun before triggering.
    4. Maintaining an even spray pattern by adjusting pressure and selecting the appropriate tip size (smaller for thinner material, larger for thicker material).
  • Tip and Filter Selection: A comprehensive chart guides users in selecting the correct tip and filter mesh for various materials, ensuring optimal performance and finish quality. This is a crucial feature for achieving professional results and preventing clogs.

Maintenance Features

Regular maintenance is essential for the longevity and performance of the sprayer. The manual provides clear instructions for shutdown and cleanup.

  • Shutdown and Cleanup Procedure:
    1. Setting the power switch to OFF.
    2. Triggering the gun until pressure is relieved.
    3. Turning the prime valve to the Prime position (down).
    4. Removing the gun filter assembly, manifold filter and spacer.
    5. Unscrewing the tip and guard from the gun.
    6. Cleaning the gun filter, inlet screen, tip, guard, and manifold filter with water and a brush.
    7. Assembling the gun without the filter.
    8. Placing the drain tube and siphon tube in a pail of water.
    9. Turning the pressure control knob to the lowest setting, setting the power switch to ON, and increasing pressure until the sprayer starts.
    10. Allowing the sprayer to run and flush itself for 2 minutes.
    11. Keeping the gun triggered into the water pail, turning the prime valve to the Spray position (horizontal).
    12. Keeping the gun triggered into the pail for 1 minute until the water coming out of the gun is clean.
    13. Setting the power switch to OFF, turning the pressure control knob to the lowest setting, and turning the prime valve to the Prime position (down).
    14. Placing the drain tube in a waste pail and the siphon tube in a container of Pump Armor™.
    15. Setting the power switch to ON and increasing pressure until the sprayer starts.
    16. As soon as Pump Armor™ comes out of the drain tube, setting the power switch to OFF.
    17. Unscrewing the inlet screen from the siphon tube.
    18. Screwing the inlet screen onto the siphon tube, replacing the manifold filter and spacer, and assembling the gun with the filter, tip, and guard.
    19. Wiping the outside of the sprayer, hose, and gun with a rag soaked in water or mineral spirits.
    20. Filling the throat packing nut with TSL™.
  • TSL™ Application: The repeated instruction to fill the throat packing nut with TSL™ highlights its importance in preventing premature packing wear, which is a common wear item in airless sprayers. This simple maintenance step significantly extends the life of critical components.
  • Reversible Tip: The reversible tip design is a practical maintenance feature, allowing users to quickly clear clogs by simply reversing the tip without disassembling the gun. This minimizes downtime during a project.
  • Filter System: The use of both pump and gun filters helps protect the system from debris, ensuring consistent spray quality and preventing damage to the pump and gun. Regular cleaning of these filters is crucial.

In summary, the Graco ST Max 395, ST Max II 495/595 is a versatile and user-friendly airless sprayer designed for professional results across a wide range of painting applications. Its detailed tip and filter selection guide, straightforward setup and cleanup procedures, and emphasis on protective maintenance like TSL™ application contribute to its efficiency, reliability, and ease of ownership.

Graco ST Max 395 Specifications

General IconGeneral
BrandGraco
ModelST Max 395
CategoryPaint Sprayer
LanguageEnglish

Related product manuals