Do you have a question about the GREADIO HD-838 and is the answer not in the manual?
Outlines the 12-month warranty against manufacturing defects from the purchase date.
Instructions for opening the battery compartment and inserting 'AAA' batteries correctly.
Explanation of the battery indicator reference for different power levels.
Description of the radio's turned-off state and button limitations.
Description of the radio's turned-on state and available functions.
Step-by-step guide to setting the time, including 12/24 hour format and adjustments.
Procedure to enable and set the alarm clock's hour and minute.
Explanation of automatic snooze cycles and manual snooze activation.
How to turn the radio on, off, and enter sleep mode.
Instructions for tuning radio stations and selecting AM/FM bands.
How to automatically scan for and store radio stations.
How to recall and listen to stations saved in memory.
Steps to manually tune and save desired stations to memory slots.
Methods for manually searching stations sequentially or automatically.
How to increase or decrease the radio's volume level.
Information on using the earphone port and specific notes.
How to enable stereo sound for FM reception with headphones.
How to activate and deactivate the control panel lock feature.
How the display backlight activates, its duration, and limitations.
Instructions for setting the automatic timed shutdown for sleep.
Proper use of the whip antenna for optimal FM broadcast reception.
Proper use of the built-in antenna for optimal AM broadcast reception.
Explanation of the low-voltage shutdown feature and its purpose.
Important safety guidelines and precautions for operating the radio.
Detailed technical specifications of the AM/FM clock radio.
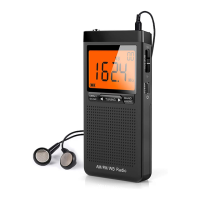
This document outlines the features and operation of a portable AM/FM clock radio, designed for ease of use and portability.
The device primarily functions as a portable AM/FM radio with an integrated clock and alarm clock. It allows users to listen to radio broadcasts across both AM and FM bands, set and display the current time, and utilize an alarm clock function with a snooze feature. Additionally, it includes a sleep timer for automatic shutdown, an earphone jack for private listening, and a lock switch to prevent accidental button presses. The radio also features a low battery protection mechanism and a backlight for improved visibility in dark environments.
The radio is powered by two "AAA" batteries. To install them, the battery cover needs to be pushed back. It's crucial to insert the batteries according to the correct polarity. The device includes a battery indicator on the LCD display, showing power levels from 3 bars (2.91-3.1V) down to 0 bars (<2.2V). For optimal performance, high-performance or alkaline batteries are recommended. Users are advised to replace batteries promptly when the display becomes blurred, volume is low, or the device shuts down automatically due to low voltage. Mixing new and old batteries or different types is not allowed, and dry batteries should not be charged, heated, or disassembled. If the radio is not in use for an extended period, batteries should be removed to prevent damage from leakage.
A short press of the power button turns the radio on, displaying the last tuned band frequency. Another short press turns the radio off, and the LCD screen then displays the current time. In radio mode, a long press of the power button for 2 seconds activates the sleep mode.
When the clock is displayed, users can set the time. A long press of the "TIME/AL" button for 2 seconds makes the "24Hr/12Hr" character flash. The "TUNING" buttons are used to select between 24-hour and 12-hour modes (where 12-hour mode displays a.m. and p.m.). Another press of the "TIME/AL" button flashes the hour, which can then be adjusted using the "TUNING" buttons. A subsequent press of "TIME/AL" flashes the minute, adjustable with the "TUNING" buttons. Finally, pressing "TIME/AL" again confirms and saves the time setting.
In time display mode, a short press of the "TIME/AL" button enables the alarm clock, indicated by an alarm clock symbol on the screen. To set the alarm time, a long press of the "TIME/AL" button for 2 seconds flashes the hour, which is adjusted using the "TUNING" buttons. Pressing "TIME/AL" again flashes the minute, adjustable with the "TUNING" buttons. A final press of "TIME/AL" confirms and saves the alarm setting.
When the alarm rings, it will automatically snooze for 2 minutes if no button is pressed, and this cycle repeats up to 6 times. Pressing the "TUNING" button during an alarm activates the snooze function, indicated by "SNOOZE" flashing on the display. The snooze interval is 5 minutes. To completely turn off the alarm, any button (except "TUNING") can be pressed.
To turn on the radio, press the power button. The "BAND" button selects between FM and AM bands. For FM reception, the whip antenna should be extended and adjusted for optimal signal. For AM reception, the radio has a built-in magnetic antenna; rotating the radio helps achieve the best signal.
In radio mode, pressing the "BAND" button selects the desired AM/FM band. A long press of the "MEM./SCAN" button for 2 seconds initiates an automatic scan for stations, which are then stored sequentially in 20 memory spaces (P01-20). After scanning, the "M-" or "M+" buttons can be used to recall stored stations.
Short presses of the "TUNING" buttons allow for manual tuning, searching for stations one by one. A long press of the "TUNING" button for 2 seconds automatically searches for the next strong signal. To manually store a station, first turn on the radio. Tune to the desired frequency using the "TUNING" buttons. Then, press the "MEM./SCAN" button to flash the storage space address (P--) and "PRESET". Use the "M-" or "M+" buttons to select the desired memory location. Finally, press "MEM./SCAN" again to confirm and save the station.
The "V+" button increases the volume, while the "V-" button decreases it. The current volume level is displayed on the screen, ranging from "V00" to "V38".
The radio includes an "EARPHONE" port for private listening. When stereo earphones are plugged in, the device will display a stereo indication, allowing listening through both left and right channels. If the earphones are unplugged, the radio plays through its speaker in mono mode. Note: In weather alert mode, earphones should be unplugged to receive alert information.
A long press of the "LOCK/ST." button flashes a lock symbol on the display, disabling all other buttons to prevent accidental operation. To unlock, long press the "LOCK/ST." button again until the lock symbol disappears. In the locked state, the backlight will not activate when other buttons are pressed (except the Lock button itself).
All buttons on the control panel are equipped with backlight switches. Pressing any button illuminates the display for 10 seconds, facilitating use in dark environments. However, the backlight does not work when the radio is in the locked state (except for the Lock button). If the battery voltage drops to 2.5V or lower, the backlight will flash when increasing the radio's volume, indicating that the volume should be reduced to extend battery life.
The sleep timer function allows the radio to automatically shut down after a set period, conserving power. In radio mode, a long press of the sleep off button (power button) enters the sleep setting, displaying a sleep indication and "90" (minutes). Short presses of the "TUNING" buttons adjust the sleep off time (90-60-45-30-15-10 minutes). Pressing the sleep off button again confirms and saves the setting. To shut down the radio before the set sleep time, simply press the power button.
The radio incorporates a low-voltage shutdown function. When the battery voltage drops to 2.1V during operation, the radio will stop playing and revert to displaying only the time. This feature serves two purposes: to prevent batteries from completely draining, which would cause the time display to disappear, and to maintain the clock's operation, eliminating the need to reset the time after battery replacement. Users can extend battery life by reducing volume or using earphones.
To ensure the longevity and safe operation of the device, users should avoid violent shocks or dropping the radio. It should not be exposed to direct sunlight, high temperatures, or humidity. Magnetic media like cassettes or cards should be kept away from the speaker to prevent data erasure or noise. If any debris falls into the radio, it should be inspected by qualified personnel. For cleaning, a soft cloth dampened with detergent solution is recommended; strong solvents like alcohol or thinner should be avoided. When walking or driving, using earphones should be avoided to prevent accidents. The earphone cord should not be pulled or folded excessively to prevent internal wire breakage. Listening at a proper volume is advised to remain aware of surroundings. In dry and cold conditions, static electricity from materials like chemical fibers or silk can affect or damage sensitive components; users should avoid rubbing the radio with such items.
| Brand | GREADIO |
|---|---|
| Model | HD-838 |
| Category | Portable Radio |
| Tuning | Digital |
| FM Frequency Range | 87-108 MHz |
| SW Frequency Range | 4.75-21.85 MHz |
| Antenna | Telescopic Antenna |
| Power Source | AC or Battery |
| Speaker | Yes |
| Headphone Jack | 3.5mm |
| Display | LCD |
| Additional Features | Alarm clock, sleep timer |
| AM Frequency Range | 520-1710 kHz |